Skip to content
  • support@bgpgroup.com.au
  • 1300 827 154
  • NBN Coverage
  • Opticomm Coverage
  • My PABX
  • Home
  • Internet Plans
  • Mobile Plans
  • Business
    • Hosted Pbx
    • Microsoft Teams Voip
    • Phone Packages
    • Docs
  • Need Help?
    • Guides & Support
    • Uptime & Outages
  • Contact Us
Login / Register
$0.00 0 Cart

eFax

  • How to Prepare & Upload Voice Prompts to PBX Announcements
  • Scan to Email – Brother
  • eFax By Email
  • eFax Messenger
  • eFax Online
  • How To Use a Fax Machine

Handsets

  • Cisco
    • Manual Configuration of Cisco SPA IP Handsets
  • Yealink
    • Hold and Resume
    • How to Change the Logo/Wallpaper on Yealink Handsets
    • Transfer calls using a Yealink DECT phone (W53H, W56H)
    • PBX Yealink T5 Dect Mode
    • Yealink SIP IP Phone Comparison
    • Transferring Calls on Yealink Handsets
    • Paging Configuration on Yealink Devices
    • Yealink Teams Phone Comparison
    • Yealink DECT Handsets
  • Zoiper
    • Softphone Error Troubleshooting
    • Zoiper Softphone Configuration

Hosted PABX

  • Building Your Phone System
    • How to Configure Inbound Numbers
    • How to Configure Internal Numbers
    • How to Configure Web Callback
    • How to Configure a User License & Device License
    • How to Configure Voicemail
    • How to Configure Inbound Email Alerts
    • How to Configure Time Conditions
    • How to Configure Call Flow Controls
    • How to Configure Geo Routing
    • How to Configure Custom Announcements & Prompts
    • How to Configure Your Automated Voice Menu (IVR)
    • How to Configure Your Automated Voice Menu (IVR)
    • How to Configure DTMF prefix
    • How to Configure Call Diversions
    • How to Configure CallerID Prefix
    • How to use Set Caller ID
    • How to Enable Call Recordings
    • How to Configure Ring Groups
    • How to Configure Call Queues
    • How to Configure Queue Priority
    • How to Configure Queue Callbacks
    • How to Configure Queue Wallboards
    • How to Configure Inbound Fax-to-Email
    • How to Configure Phonebooks
    • Default Settings Configurations
    • How to Configure Global Blocklists
    • How to set up User(s) with External Number(s)
    • How to Prepare & Upload Voice Prompts to PBX Announcements
    • How to Block or Hide Caller ID
    • How to Restrict Dialing Destinations
    • How to Configure SMS to email
    • How to Import/Export Call flow
    • How to Configure Real Time Call Monitoring
    • How To Use Tabs In Your PBX
    • Device Twinning
    • How to Configure Call Parking
    • How to Configure Conferencing
    • How to Configure Blocklist
    • How to Configure PIN codes
    • How to Configure SIP Trunks
    • How to Configure Dial Tone Access (DISA)
  • Webphone
    • Webphone Troubleshooting
    • Webphone Configuration
    • Webphone End User Set Up
    • Webphone Overview

Internet

  • Connect Your BYO Modem
  • Home Internet troubleshooting

Microsoft Teams

  • Skype Communication via Microsoft Teams
  • Microsoft Teams Audio Conference Integration
  • Microsoft 365 Teams
  • How to Troubleshoot Microsoft Teams

On Premise PBX

  • Panasonic
    • How do I configure a Panasonic KX-NS SIP trunk?

SIP Trunks

  • Configuring a SIP trunk to 3CX
View Categories
  • Home
  • Docs
  • Hosted PABX
  • Building Your Phone System
  • How to Configure Your Automated Voice Menu (IVR)

How to Configure Your Automated Voice Menu (IVR)

3 min read

Introduction #

At the end of this article, you will be able to configure a voice menu object within your call flow on the PBX tab. The article will also assist you with some common uses of the object within your call flow configuration. Should you need any assistance, feel free to contact our support department.

Configuring a PBX voice menu #

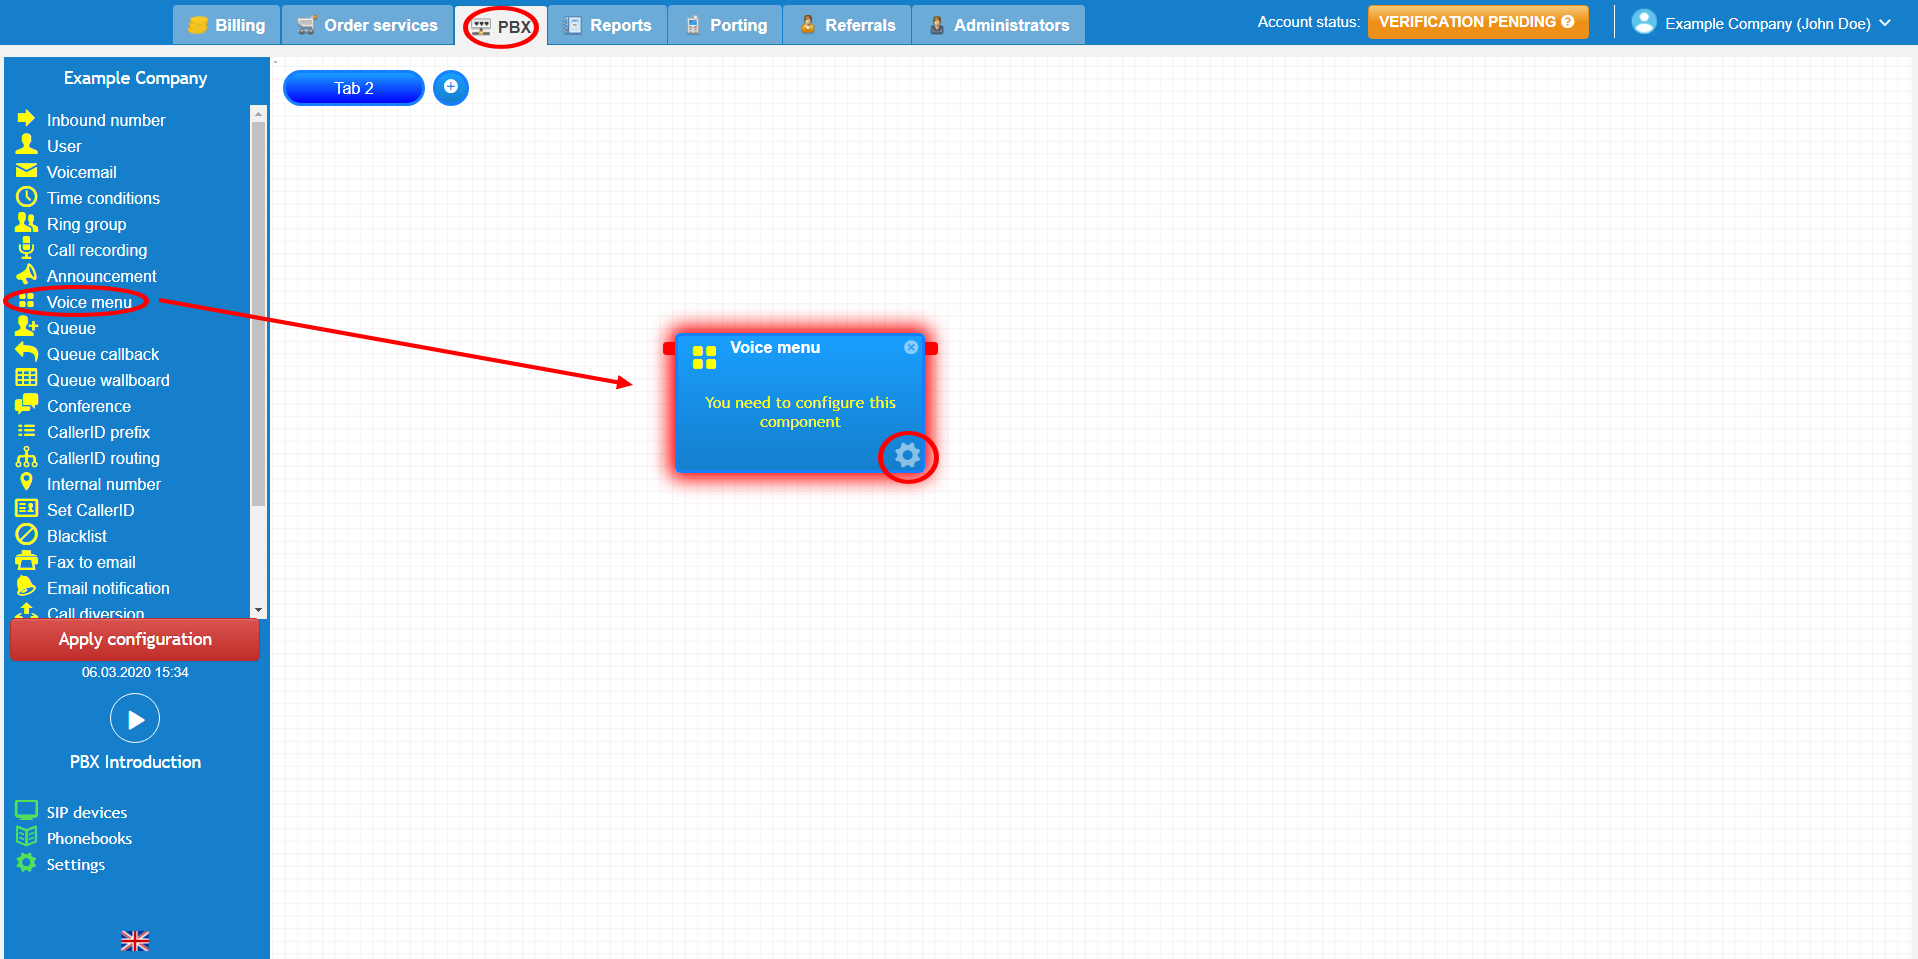
The PBX voice menu object is a feature which allows you to create an automated message that is played to the caller asking for their input. As an example, welcome to Bob’s plumbing press 1 for service or 2 for sales. Once you have logged into the customer portal click on the PBX tab.Then select the voice menu from the toolbox menu on the left, drag and drop it onto the main configuration screen. Next, click on the settings icon.

voicemenu1.PNG

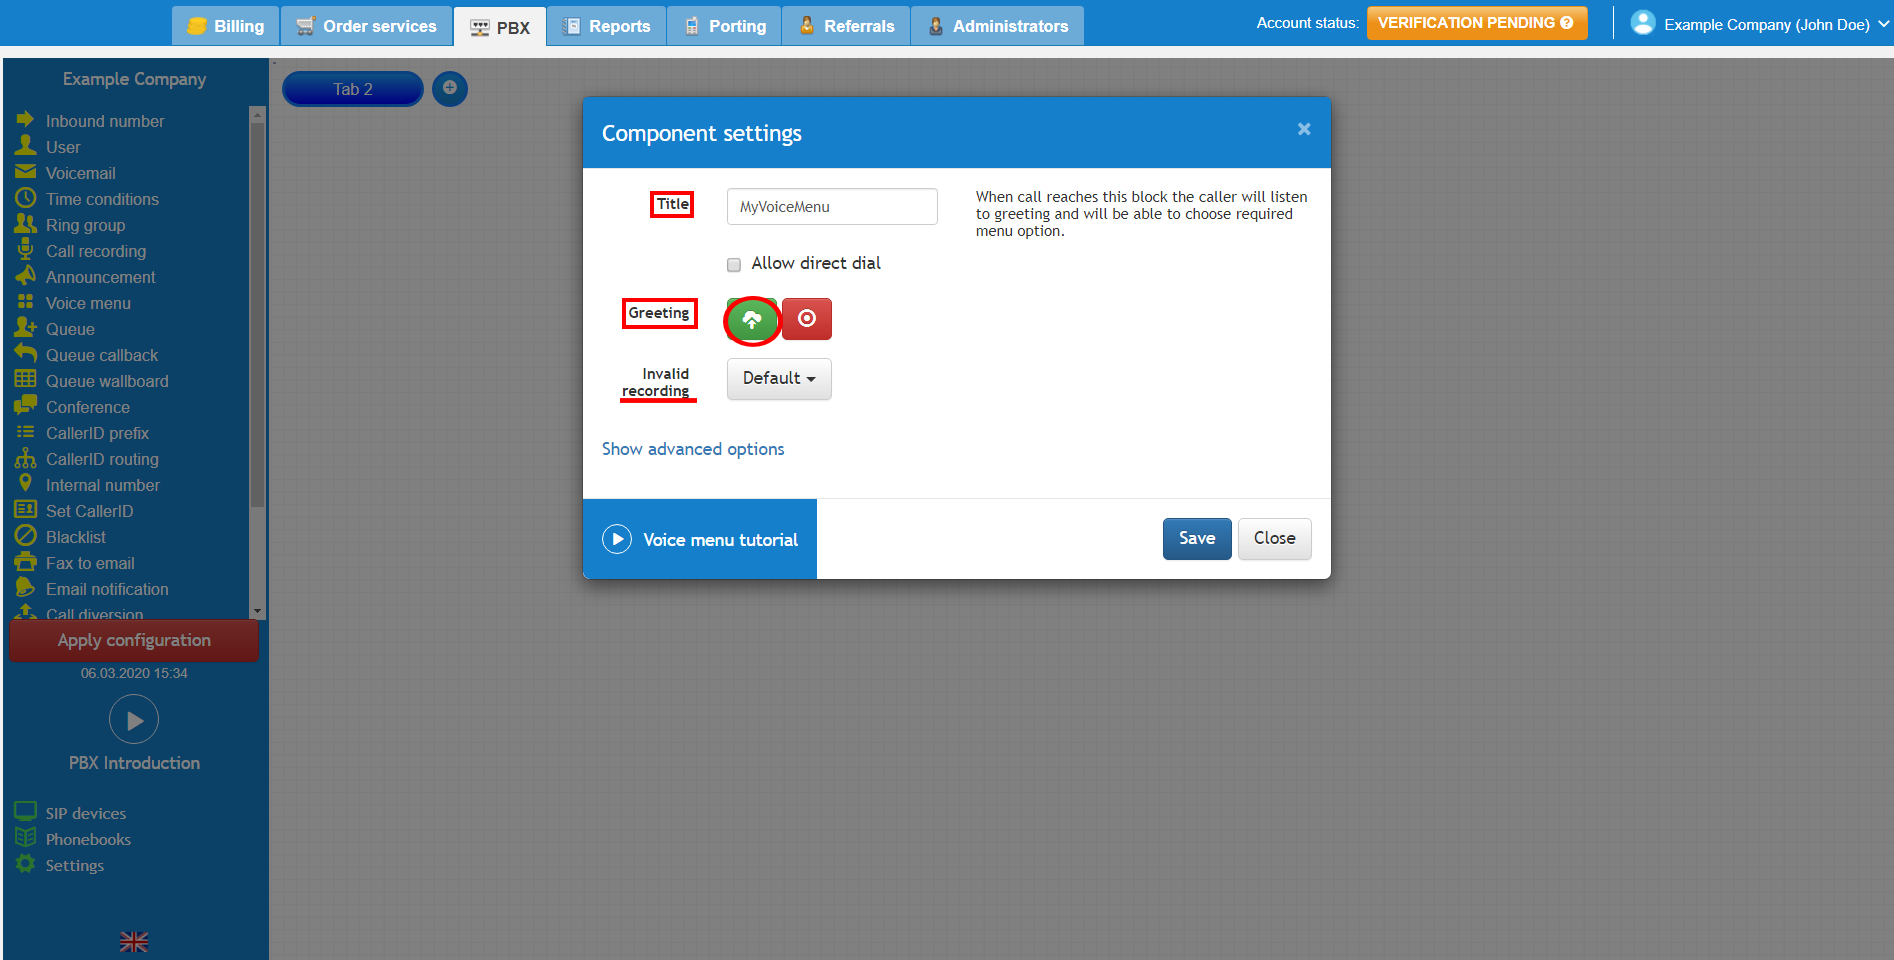
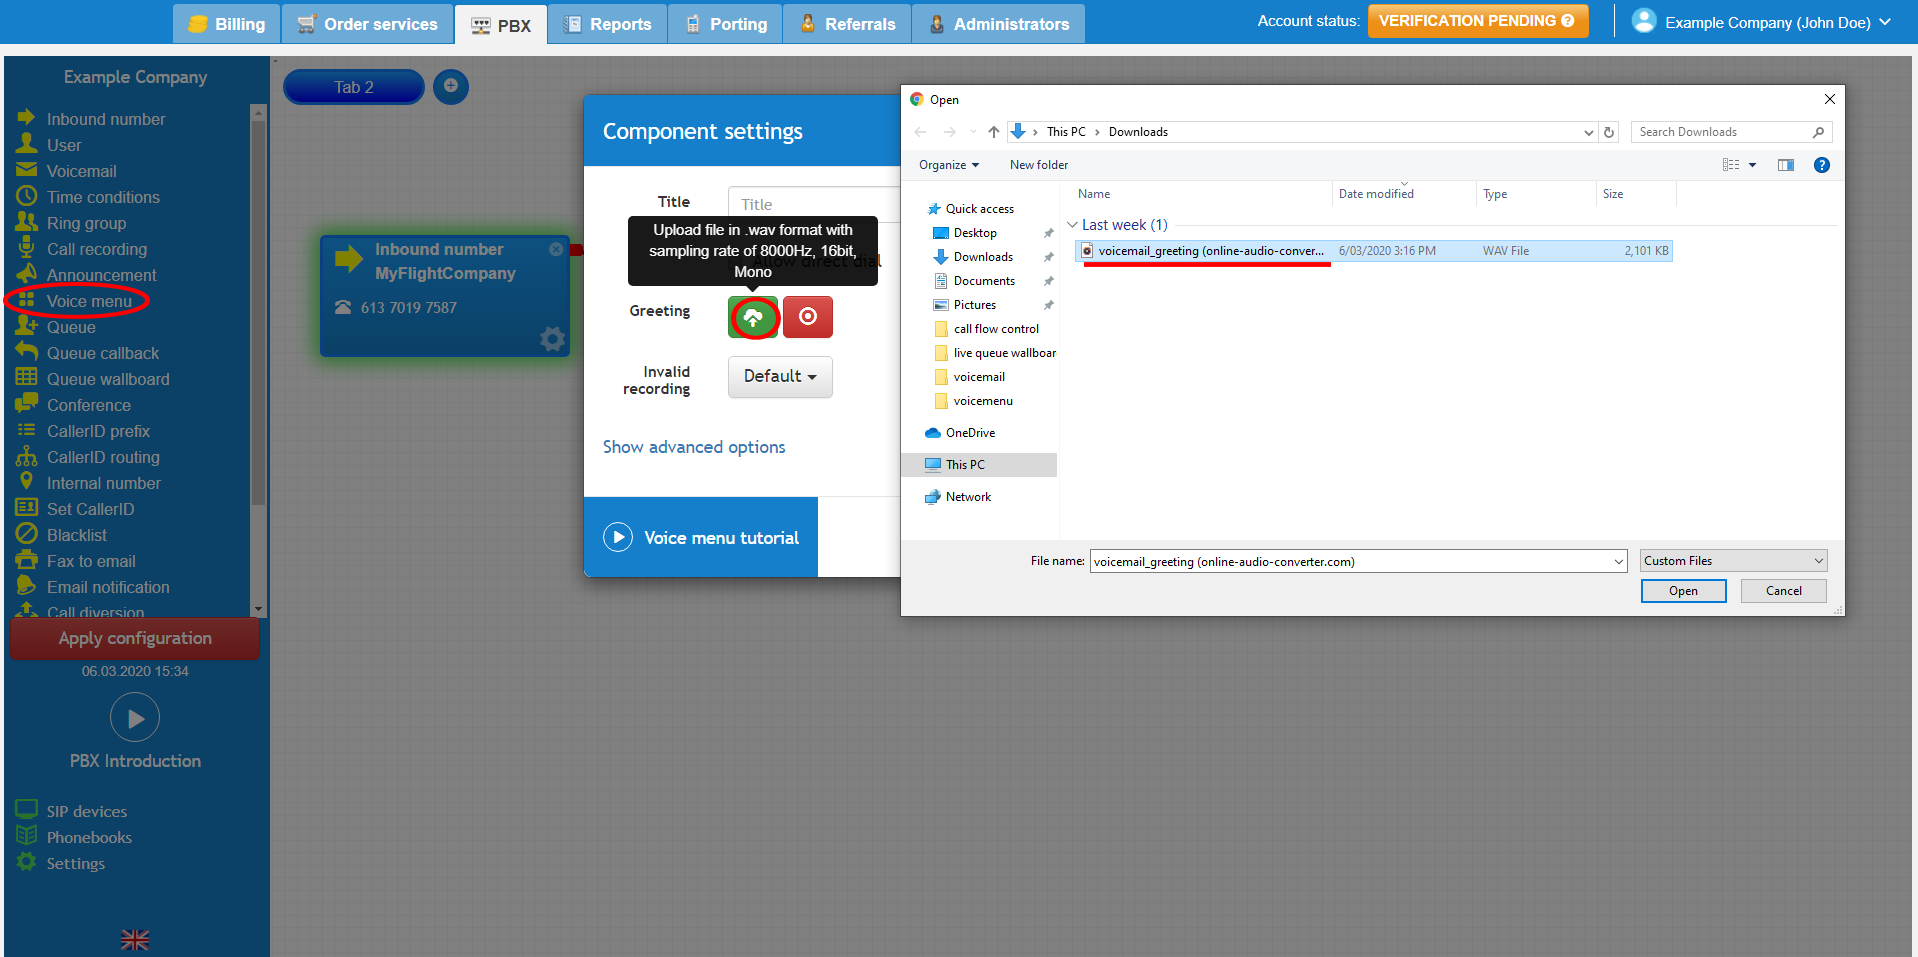
After that, you should enter a title for the voice menu and select a media option between upload your own greeting or record from an external number or SIP device. Click the green icon to upload a pre-recorded announcement, making sure you have followed the guide ‘Preparing & Uploading Voice Prompts to PBX Announcements’. Alternatively, click the red icon to call an external number or user to record a new announcement. On top of this, it is also possible to record your own invalid recording announcement, this is only utilised if your callers enter an option that is not available.

voicemenu2.PNG

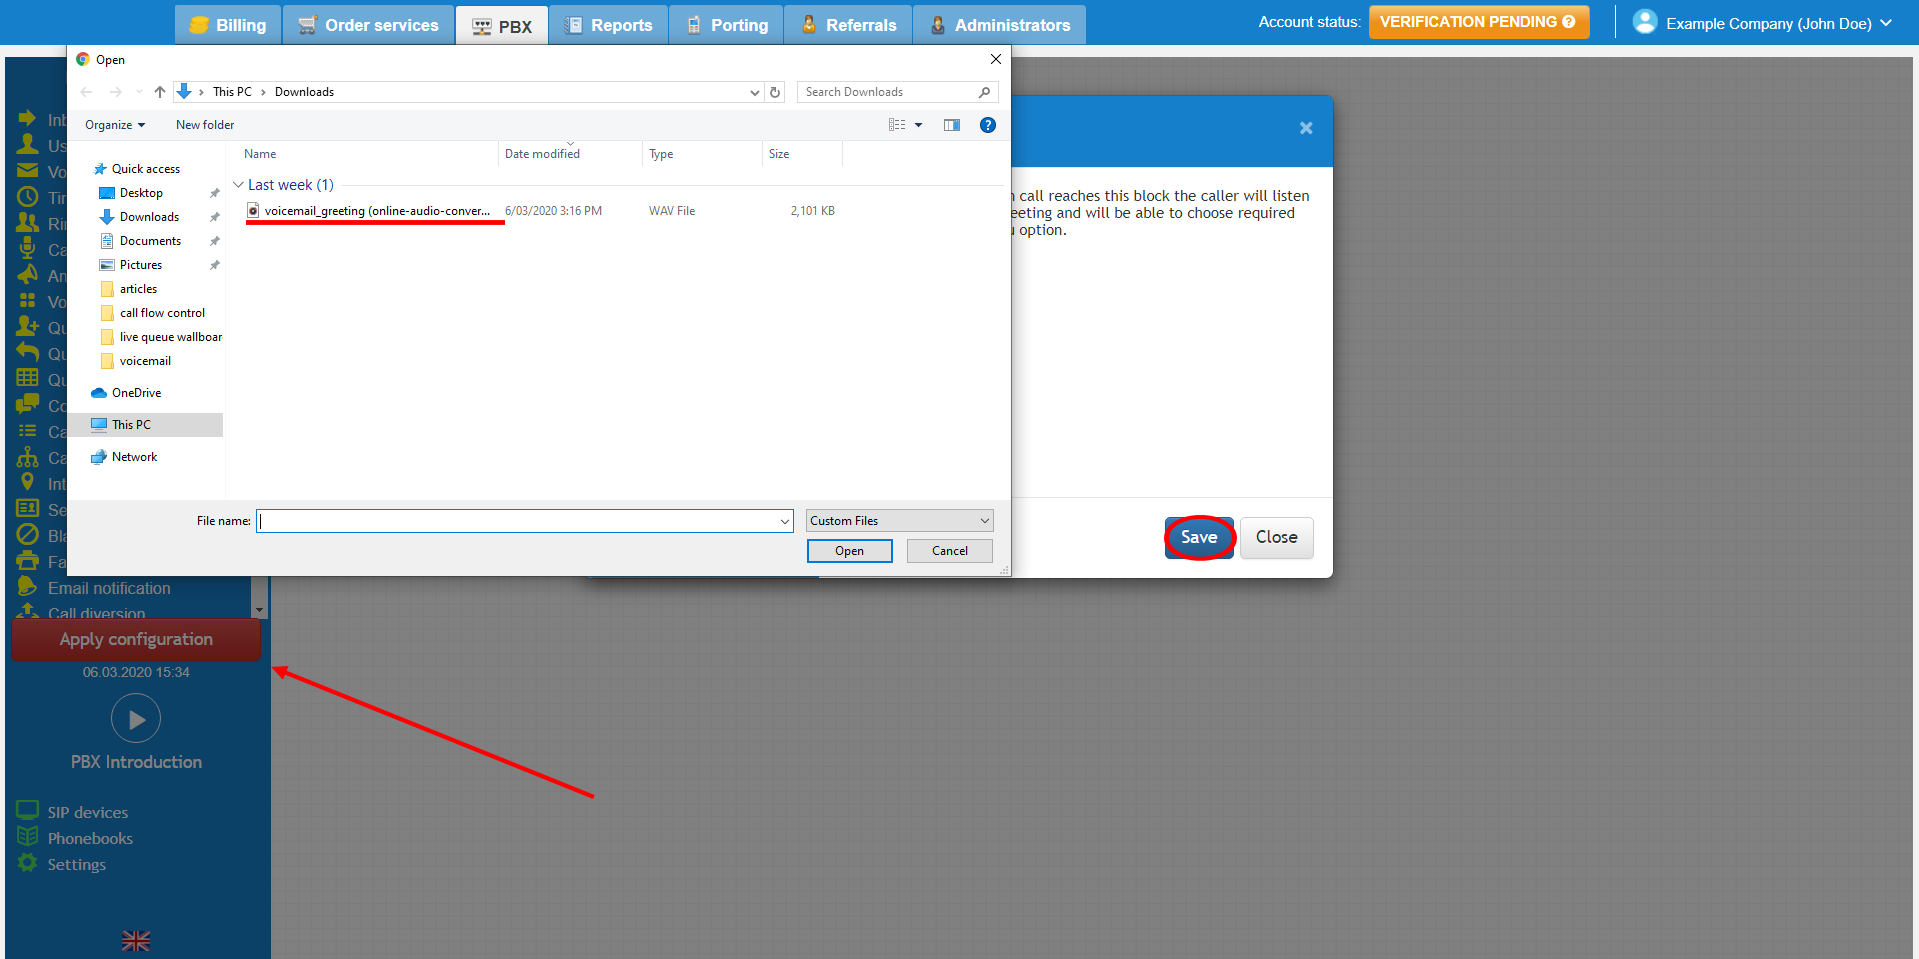
It is highly important you ensure you upload your announcement in the 8000hz, 16-bit, mono WAV format otherwise your announcement will not play as expected. Additionally, it is possible from the customer portal to order professional voice artists, select order services and then the voice artists tab and you will have a range of options to select from. Then, save it and don’t forget to apply your new configuration.

voicemenu3.PNG

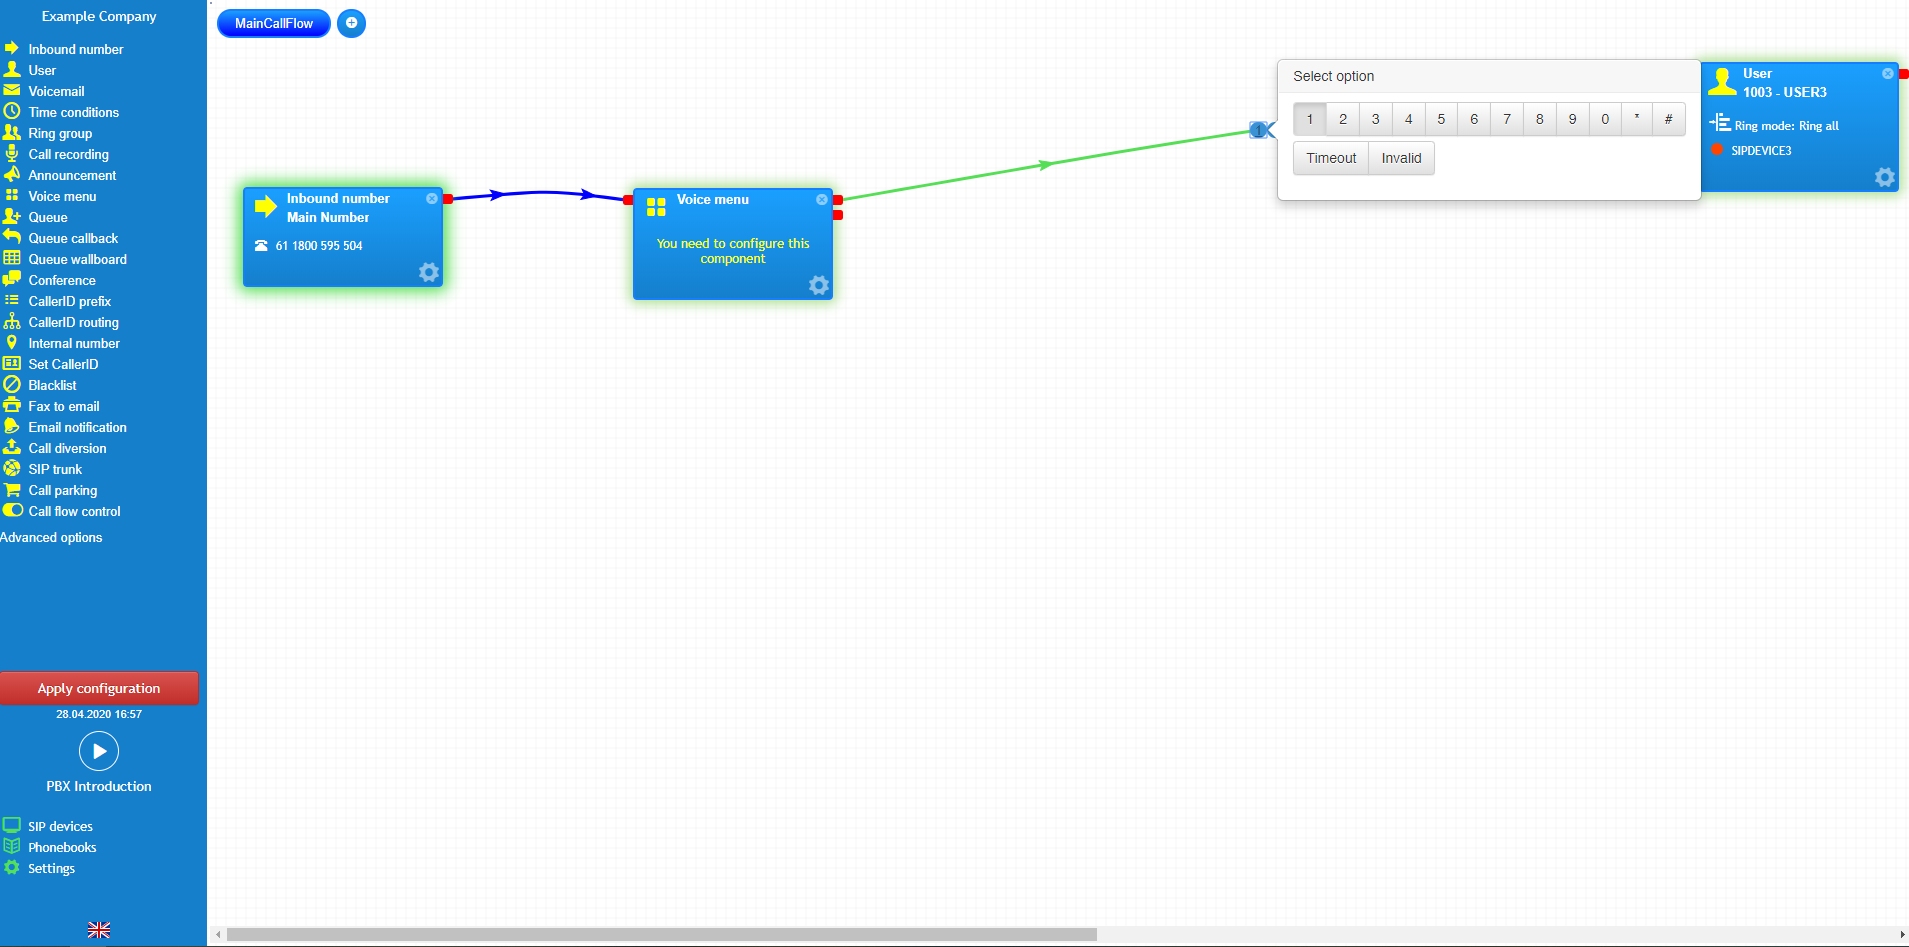
Now to complete the configuration simply connect the voice menu object into your call flow to an inbound number, and drag the required number of options from the right of the object. Clicking on the exit clause will allow you to update the flow of the digit pressed by the caller. Lastly, it is important you configure a time out and invalid clause to ensure inbound calls are not disconnected if a timeout is reached or an invalid option is entered.

mceclip0.png

PBX voice menu usages #

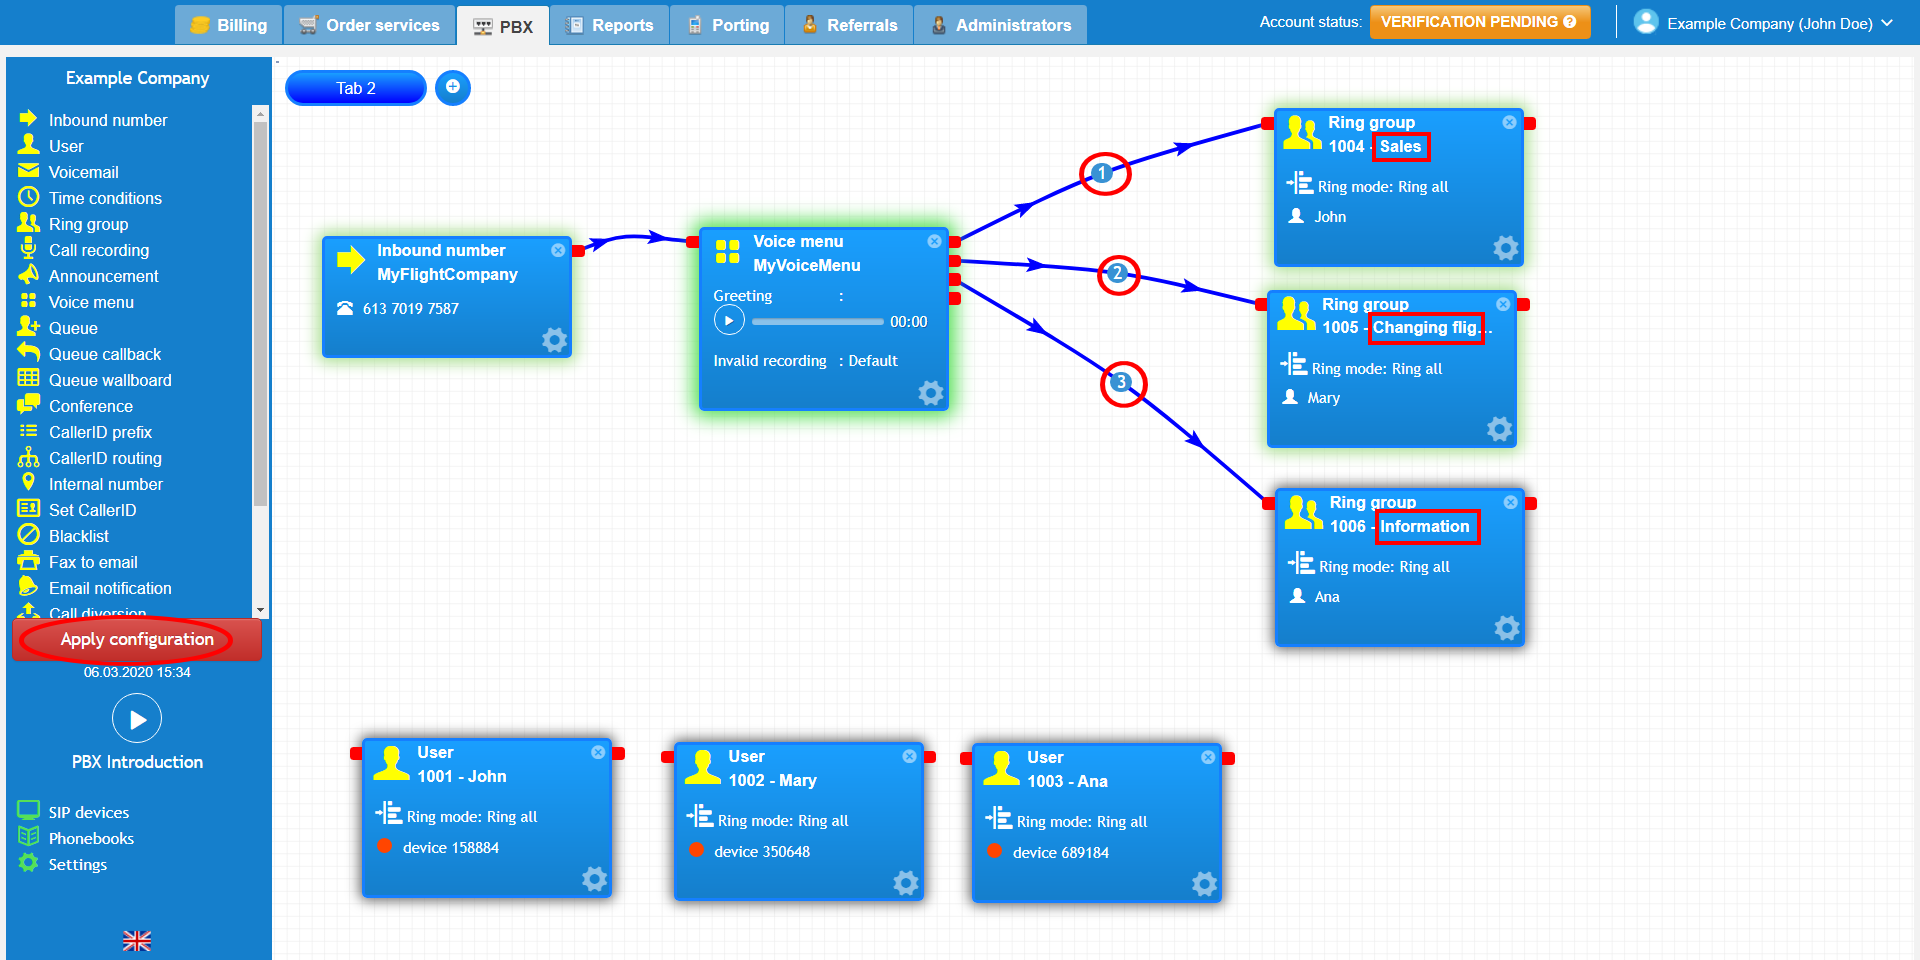
This scenario simulates a small flight booking company which has a main inbound number that is answered by an automated receptionist, with the calls being redirected according to the caller’s requirements. For example, manage a booking, book a new ticket or further information. A previously recorded professional voice artist announcement, outlining the company’s services and available options was uploaded as a custom greeting.

voicemenu4.PNG

Customers for the flight booking company are now presented with a friendly announcement from the automated menu asking for their input that suits their enquiry best when they call the main business number. The options that are provided to the customer are; press 1 for sales, press 2 to change a flight booking or press 3 for any other enquiries. On entering options 1, 2, or 3 from their dial pad the customers are redirected to the relevant department, removing the need for a receptionist.

voicemenu5.PNG

Watch this in action #

The video below will show you a visual representation of the areas covered throughout this knowledge base guide.

gif.gif
What are your Feelings

Share This Article :

  • Facebook
  • X
  • LinkedIn
  • Pinterest
Still stuck? How can we help?

How can we help?

Updated on September 25, 2025
How to Configure Internal Numbers
Table of Contents
  • Introduction
  • Configuring a PBX voice menu
  • PBX voice menu usages
  • Watch this in action
Facebook-f Instagram Pinterest

Company

  • About us
  • Leadership
  • Careers
  • News & Article
  • Legal Notices

Support

  • Help Center
  • Ticket Support
  • FAQ
  • Contact us
  • Community
Get exclusive deals by signing up to our Newsletter.
©CopyRight 2025 | bgptelecom.com.au