Skip to content
  • support@bgpgroup.com.au
  • 1300 827 154
  • NBN Coverage
  • Opticomm Coverage
  • My PABX
  • Home
  • Internet Plans
  • Mobile Plans
  • Business
    • Hosted Pbx
    • Microsoft Teams Voip
    • Phone Packages
    • Docs
  • Need Help?
    • Guides & Support
    • Uptime & Outages
  • Contact Us
Login / Register
$0.00 0 Cart

eFax

  • How to Prepare & Upload Voice Prompts to PBX Announcements
  • Scan to Email – Brother
  • eFax By Email
  • eFax Messenger
  • eFax Online
  • How To Use a Fax Machine

Handsets

  • Cisco
    • Manual Configuration of Cisco SPA IP Handsets
  • Yealink
    • Hold and Resume
    • How to Change the Logo/Wallpaper on Yealink Handsets
    • Transfer calls using a Yealink DECT phone (W53H, W56H)
    • PBX Yealink T5 Dect Mode
    • Yealink SIP IP Phone Comparison
    • Transferring Calls on Yealink Handsets
    • Paging Configuration on Yealink Devices
    • Yealink Teams Phone Comparison
    • Yealink DECT Handsets
  • Zoiper
    • Softphone Error Troubleshooting
    • Zoiper Softphone Configuration

Hosted PABX

  • Building Your Phone System
    • How to Configure Inbound Numbers
    • How to Configure Internal Numbers
    • How to Configure Web Callback
    • How to Configure a User License & Device License
    • How to Configure Voicemail
    • How to Configure Inbound Email Alerts
    • How to Configure Time Conditions
    • How to Configure Call Flow Controls
    • How to Configure Geo Routing
    • How to Configure Custom Announcements & Prompts
    • How to Configure Your Automated Voice Menu (IVR)
    • How to Configure Your Automated Voice Menu (IVR)
    • How to Configure DTMF prefix
    • How to Configure Call Diversions
    • How to Configure CallerID Prefix
    • How to use Set Caller ID
    • How to Enable Call Recordings
    • How to Configure Ring Groups
    • How to Configure Call Queues
    • How to Configure Queue Priority
    • How to Configure Queue Callbacks
    • How to Configure Queue Wallboards
    • How to Configure Inbound Fax-to-Email
    • How to Configure Phonebooks
    • Default Settings Configurations
    • How to Configure Global Blocklists
    • How to set up User(s) with External Number(s)
    • How to Prepare & Upload Voice Prompts to PBX Announcements
    • How to Block or Hide Caller ID
    • How to Restrict Dialing Destinations
    • How to Configure SMS to email
    • How to Import/Export Call flow
    • How to Configure Real Time Call Monitoring
    • How To Use Tabs In Your PBX
    • Device Twinning
    • How to Configure Call Parking
    • How to Configure Conferencing
    • How to Configure Blocklist
    • How to Configure PIN codes
    • How to Configure SIP Trunks
    • How to Configure Dial Tone Access (DISA)
  • Webphone
    • Webphone Troubleshooting
    • Webphone Configuration
    • Webphone End User Set Up
    • Webphone Overview

Internet

  • Connect Your BYO Modem
  • Home Internet troubleshooting

Microsoft Teams

  • Skype Communication via Microsoft Teams
  • Microsoft Teams Audio Conference Integration
  • Microsoft 365 Teams
  • How to Troubleshoot Microsoft Teams

On Premise PBX

  • Panasonic
    • How do I configure a Panasonic KX-NS SIP trunk?

SIP Trunks

  • Configuring a SIP trunk to 3CX
View Categories
  • Home
  • Docs
  • Hosted PABX
  • Building Your Phone System
  • How to Configure Call Queues

How to Configure Call Queues

1 min read

Introduction #

The call queue object allows incoming calls to be put on hold for a set period of time if users are busy handling other calls or unavailable. Under the queue object, you can add users and external numbers to receive the incoming calls. Queue is similar to the Ring Group but it has more advanced features, such as a longer hold time and music on hold. Please ensure to set up users that you would like to add to the queue prior to configuring the queue object.

Configuring a call queue #

Firstly, head to your PBX tab to drag and drop the “Queue” object. Once the queue is added to the PBX, go to its settings.OM5kEHpmAL.png

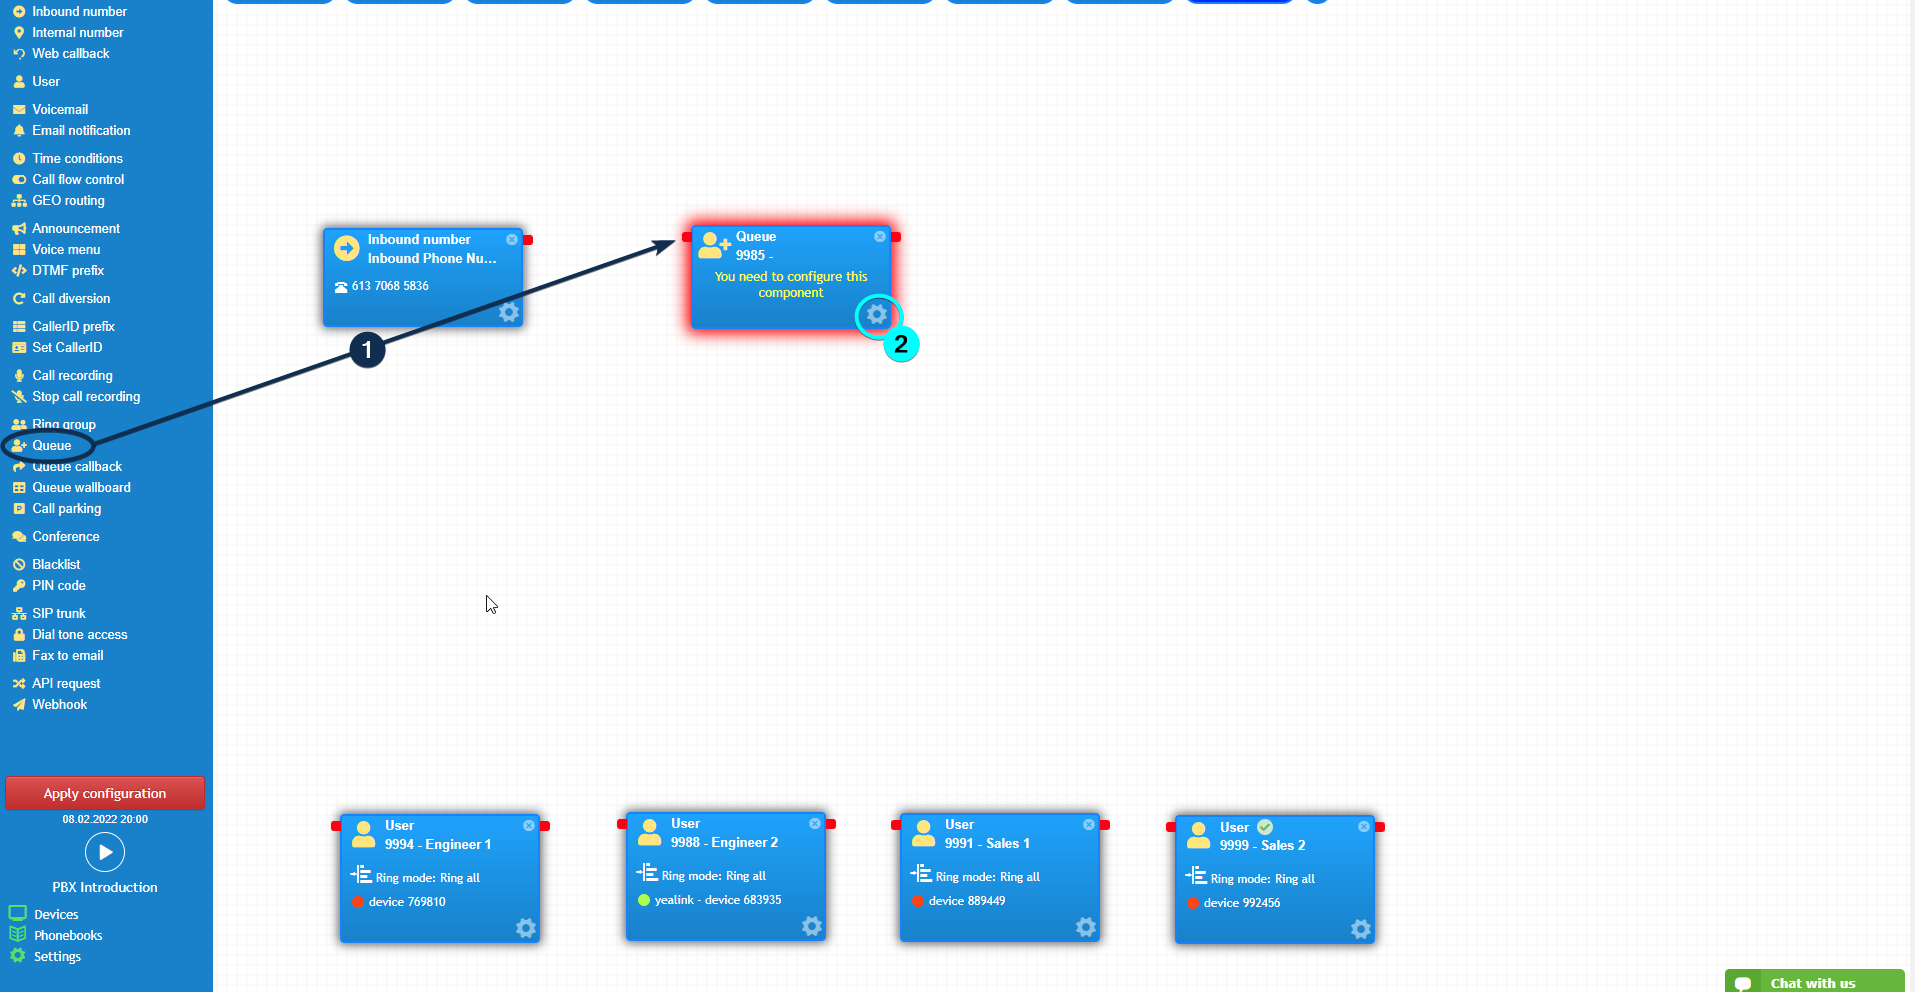
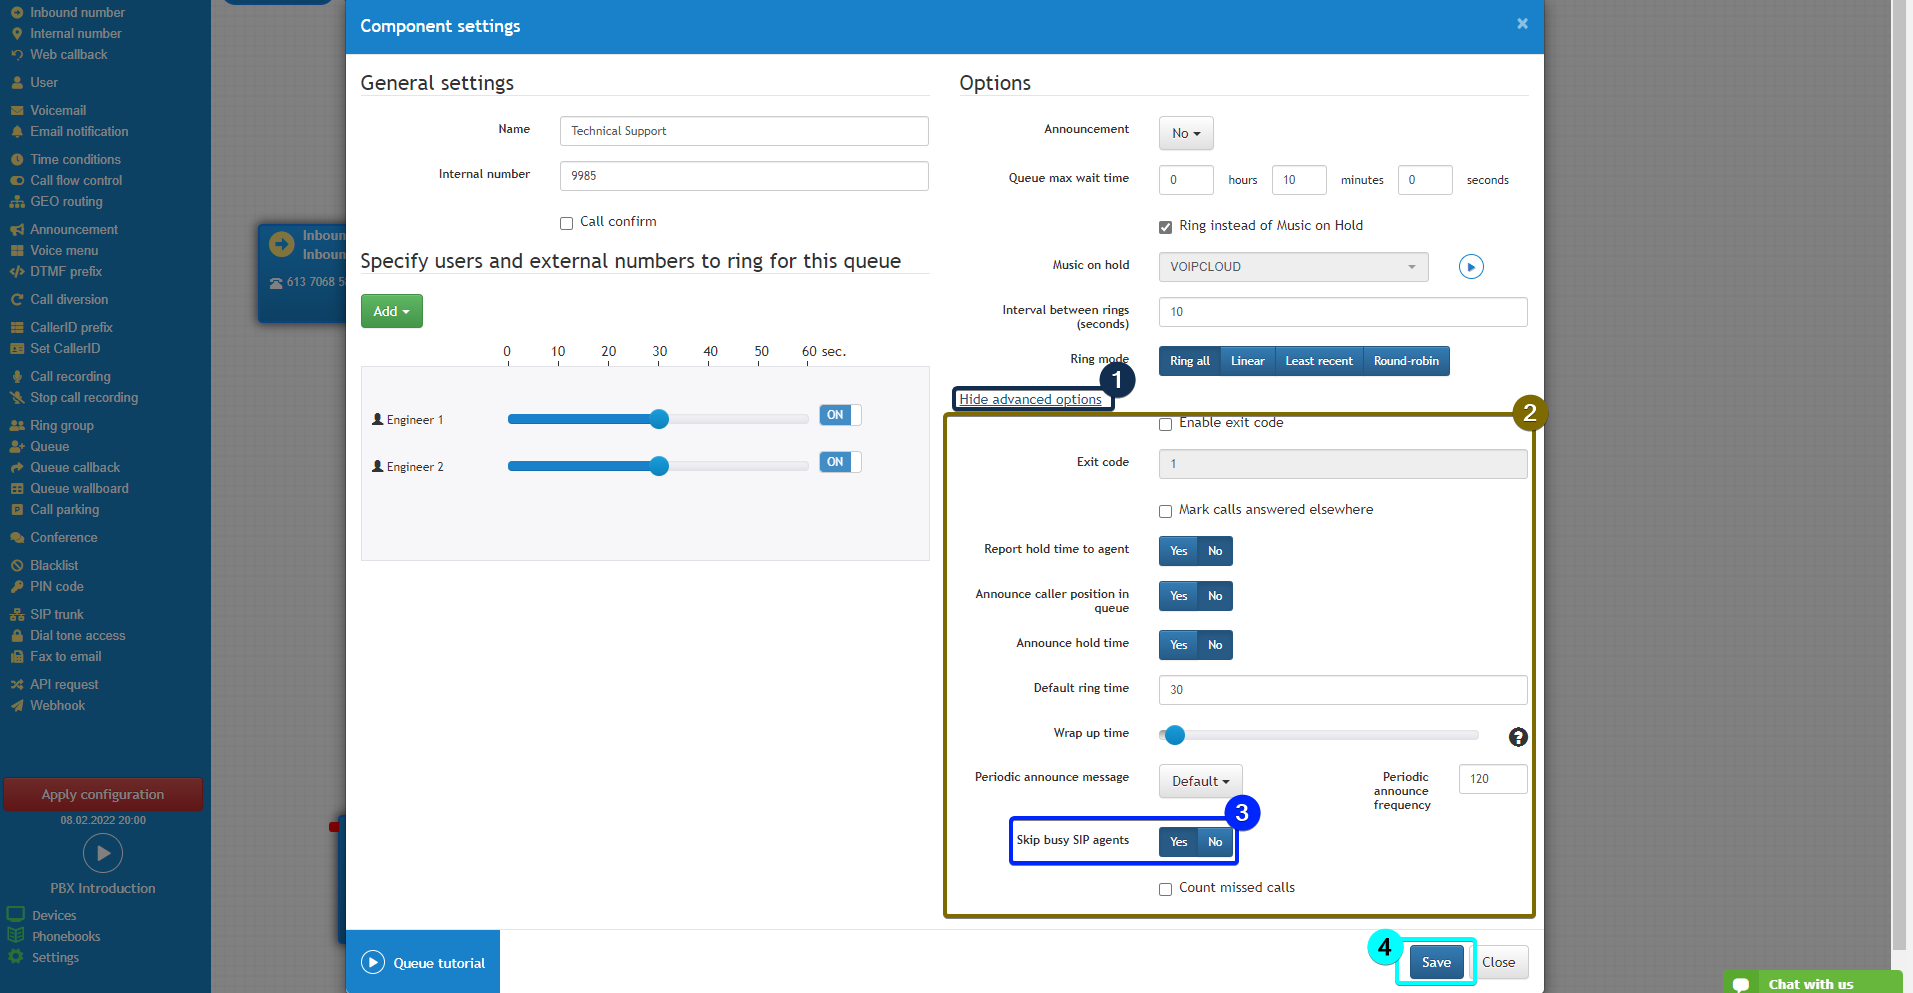
In the settings, enter the name for the queue and add Users to it by clicking the “add” button. You can also change the wait time of the queue and add any announcements or hold music as required.

It is recommended to select “Skip Busy Agents” in order to avoid calling occupied users. This can be done under the advanced settings.

oQXrj0PjXs.png

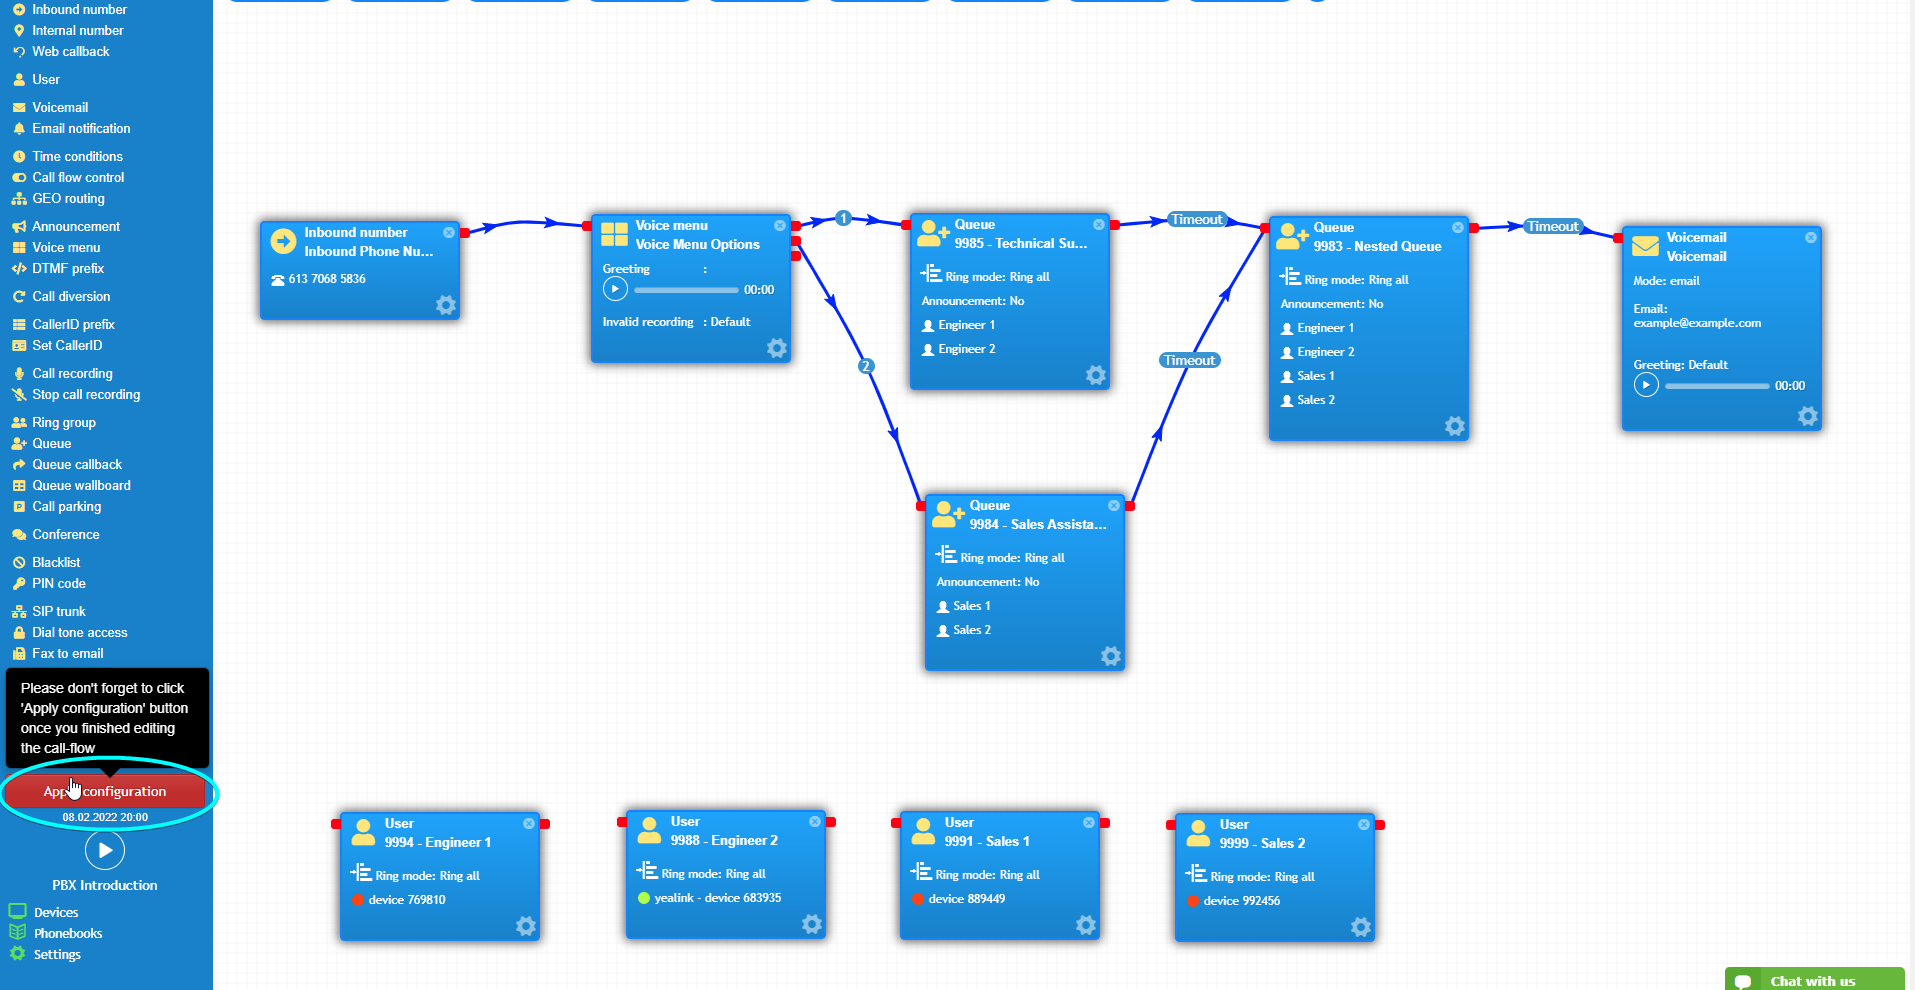
When the queue is set up, connect it to your call flow as per the example below. Finally, click the “Apply configuration” button to save the call flow.

Gi6xnqDwUQ.png
What are your Feelings

Share This Article :

  • Facebook
  • X
  • LinkedIn
  • Pinterest
Still stuck? How can we help?

How can we help?

Updated on September 25, 2025
How to Configure Internal Numbers
Table of Contents
  • Introduction
  • Configuring a call queue
Facebook-f Instagram Pinterest

Company

  • About us
  • Leadership
  • Careers
  • News & Article
  • Legal Notices

Support

  • Help Center
  • Ticket Support
  • FAQ
  • Contact us
  • Community
Get exclusive deals by signing up to our Newsletter.
©CopyRight 2025 | bgptelecom.com.au