Skip to content
  • support@bgpgroup.com.au
  • 1300 827 154
  • NBN Coverage
  • Opticomm Coverage
  • My PABX
  • Home
  • Internet Plans
  • Mobile Plans
  • Business
    • Hosted Pbx
    • Microsoft Teams Voip
    • Phone Packages
    • Docs
  • Need Help?
    • Guides & Support
    • Uptime & Outages
  • Contact Us
Login / Register
$0.00 0 Cart

eFax

  • How to Prepare & Upload Voice Prompts to PBX Announcements
  • Scan to Email – Brother
  • eFax By Email
  • eFax Messenger
  • eFax Online
  • How To Use a Fax Machine

Handsets

  • Cisco
    • Manual Configuration of Cisco SPA IP Handsets
  • Yealink
    • Hold and Resume
    • How to Change the Logo/Wallpaper on Yealink Handsets
    • Transfer calls using a Yealink DECT phone (W53H, W56H)
    • PBX Yealink T5 Dect Mode
    • Yealink SIP IP Phone Comparison
    • Transferring Calls on Yealink Handsets
    • Paging Configuration on Yealink Devices
    • Yealink Teams Phone Comparison
    • Yealink DECT Handsets
  • Zoiper
    • Softphone Error Troubleshooting
    • Zoiper Softphone Configuration

Hosted PABX

  • Building Your Phone System
    • How to Configure Inbound Numbers
    • How to Configure Internal Numbers
    • How to Configure Web Callback
    • How to Configure a User License & Device License
    • How to Configure Voicemail
    • How to Configure Inbound Email Alerts
    • How to Configure Time Conditions
    • How to Configure Call Flow Controls
    • How to Configure Geo Routing
    • How to Configure Custom Announcements & Prompts
    • How to Configure Your Automated Voice Menu (IVR)
    • How to Configure Your Automated Voice Menu (IVR)
    • How to Configure DTMF prefix
    • How to Configure Call Diversions
    • How to Configure CallerID Prefix
    • How to use Set Caller ID
    • How to Enable Call Recordings
    • How to Configure Ring Groups
    • How to Configure Call Queues
    • How to Configure Queue Priority
    • How to Configure Queue Callbacks
    • How to Configure Queue Wallboards
    • How to Configure Inbound Fax-to-Email
    • How to Configure Phonebooks
    • Default Settings Configurations
    • How to Configure Global Blocklists
    • How to set up User(s) with External Number(s)
    • How to Prepare & Upload Voice Prompts to PBX Announcements
    • How to Block or Hide Caller ID
    • How to Restrict Dialing Destinations
    • How to Configure SMS to email
    • How to Import/Export Call flow
    • How to Configure Real Time Call Monitoring
    • How To Use Tabs In Your PBX
    • Device Twinning
    • How to Configure Call Parking
    • How to Configure Conferencing
    • How to Configure Blocklist
    • How to Configure PIN codes
    • How to Configure SIP Trunks
    • How to Configure Dial Tone Access (DISA)
  • Webphone
    • Webphone Troubleshooting
    • Webphone Configuration
    • Webphone End User Set Up
    • Webphone Overview

Internet

  • Connect Your BYO Modem
  • Home Internet troubleshooting

Microsoft Teams

  • Skype Communication via Microsoft Teams
  • Microsoft Teams Audio Conference Integration
  • Microsoft 365 Teams
  • How to Troubleshoot Microsoft Teams

On Premise PBX

  • Panasonic
    • How do I configure a Panasonic KX-NS SIP trunk?

SIP Trunks

  • Configuring a SIP trunk to 3CX
View Categories
  • Home
  • Docs
  • eFax
  • How to Prepare & Upload Voice Prompts to PBX Announcements

How to Prepare & Upload Voice Prompts to PBX Announcements

2 min read

Table of contents

Introduction #

At the end of this article, you will be able to convert and upload your custom media messages and on-hold music to your call flow. It is important to note that if the media messages are not in the correct format, which is an 8000hz, 16-bit, mono WAV format, your audio message may not be played as expected.

Converting a custom greeting file #

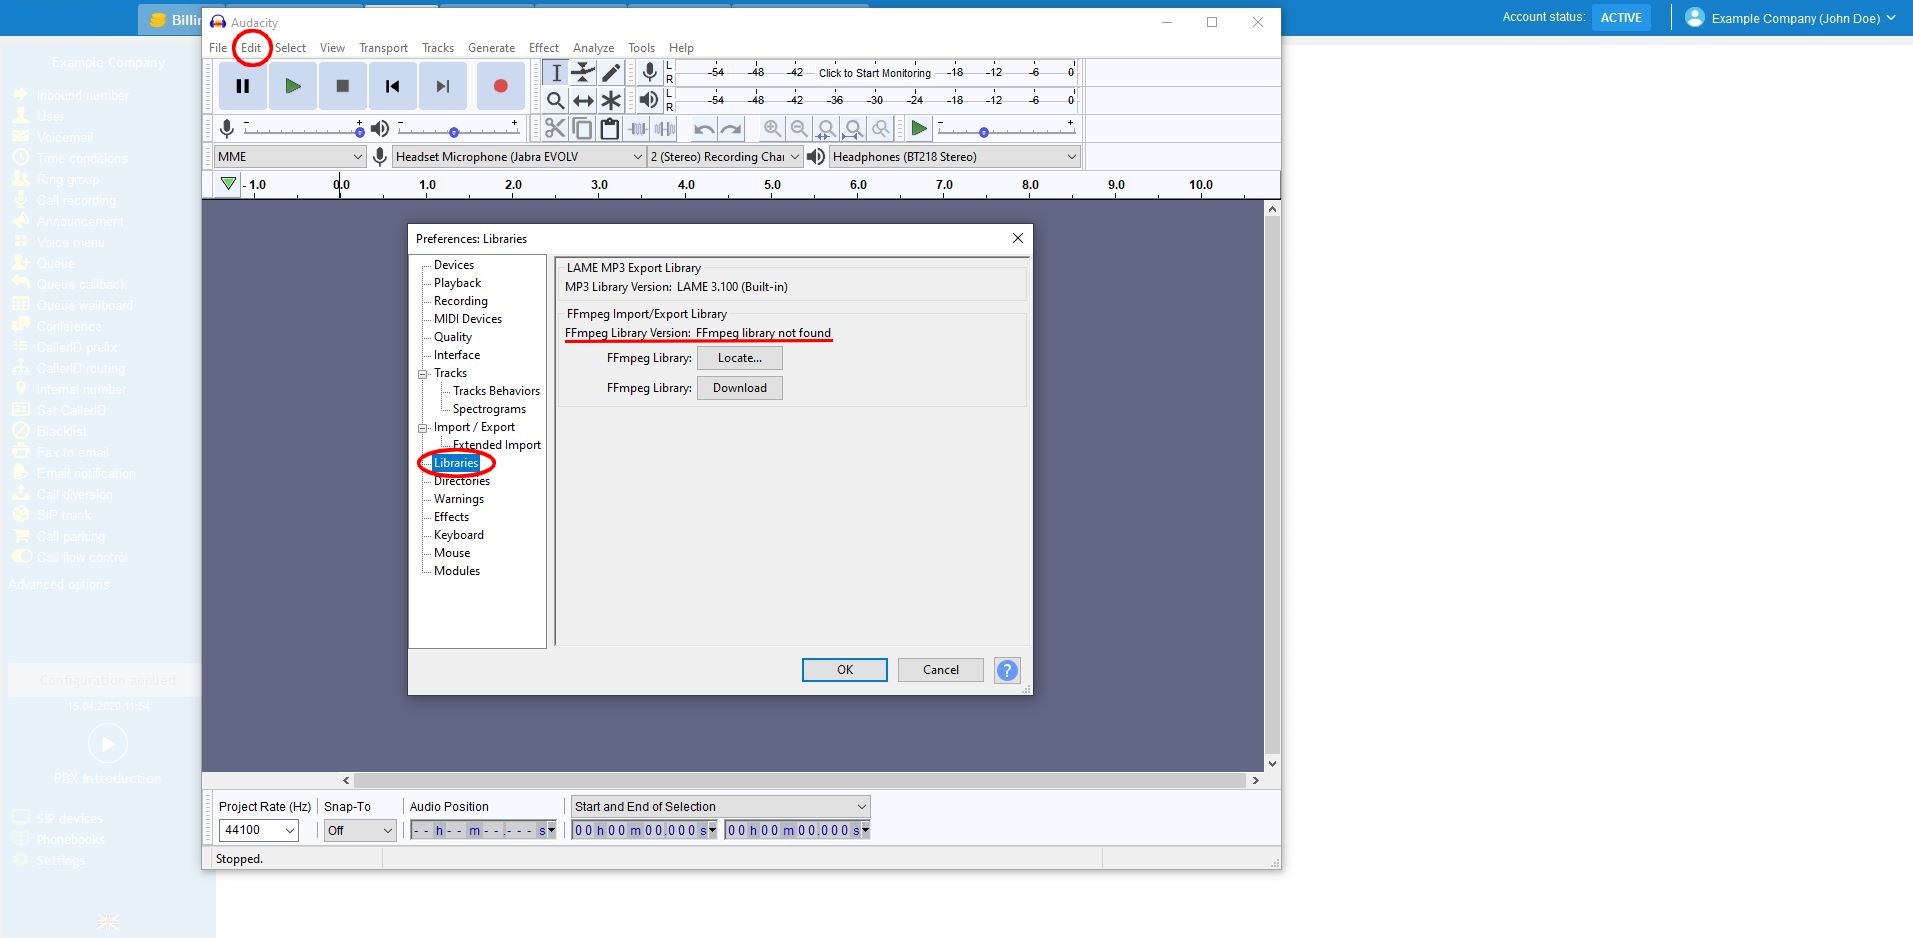
Firstly, you will need to utilise a program that allows you to adjust the coding of media files. We recommend you download audacity, which is an open-source freeware program that allows editing media file. Audacity can be downloaded from the link https://www.audacityteam.org/. Once downloaded and installed, you should launch the application. Then, the audio package needs to be installed to edit different audios format. For this, you should select “Edit” and then “Preferences”. Navigate to the “Libraries” tab on the left-hand side and you will see the MP3 and FFmpeg libraries options. This is shown in the screenshot below.

customgreeting2.JPG

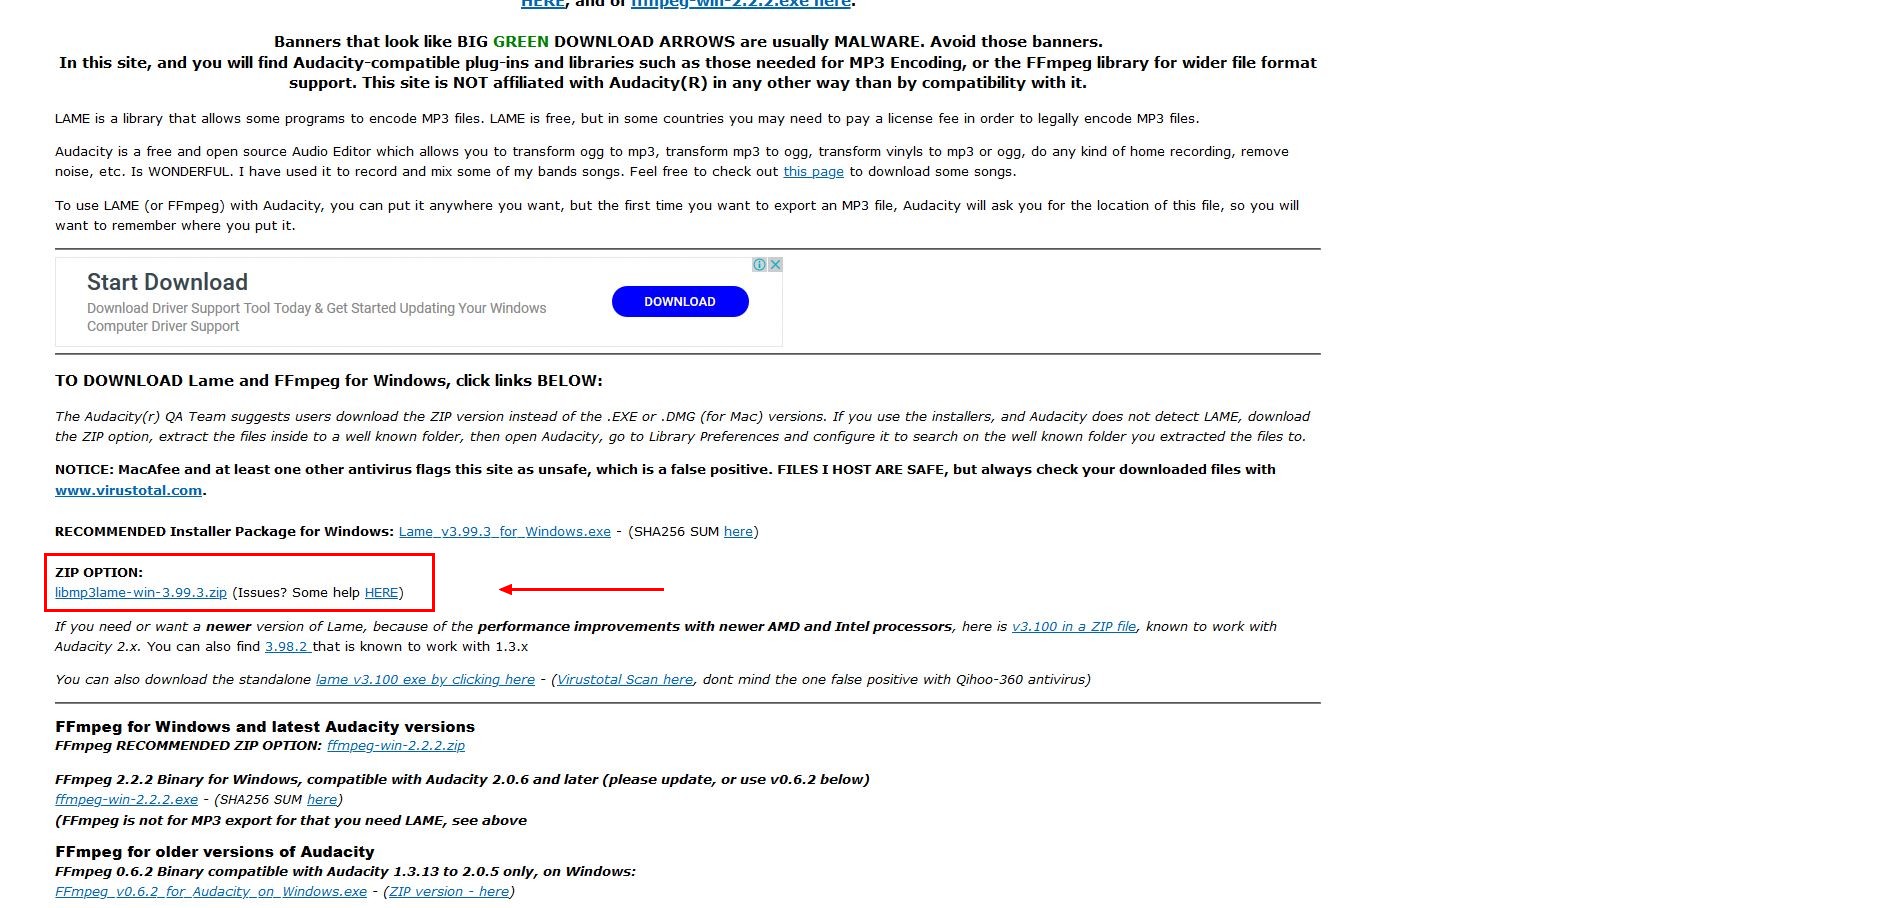
You will now need to download the FFmpeg and MP3 libraries, click on the download button and follow the instructions from the relevant download page. It is recommended that the FFmpeg library is downloaded from the link https://lame.buanzo.org/#lamewindl. On this webpage, you should download and extract the marked ZIP file and run the executable file. Please remember the folder’s path which the extracted file was saved, you will need it for the next steps.

customgreeting3.JPG

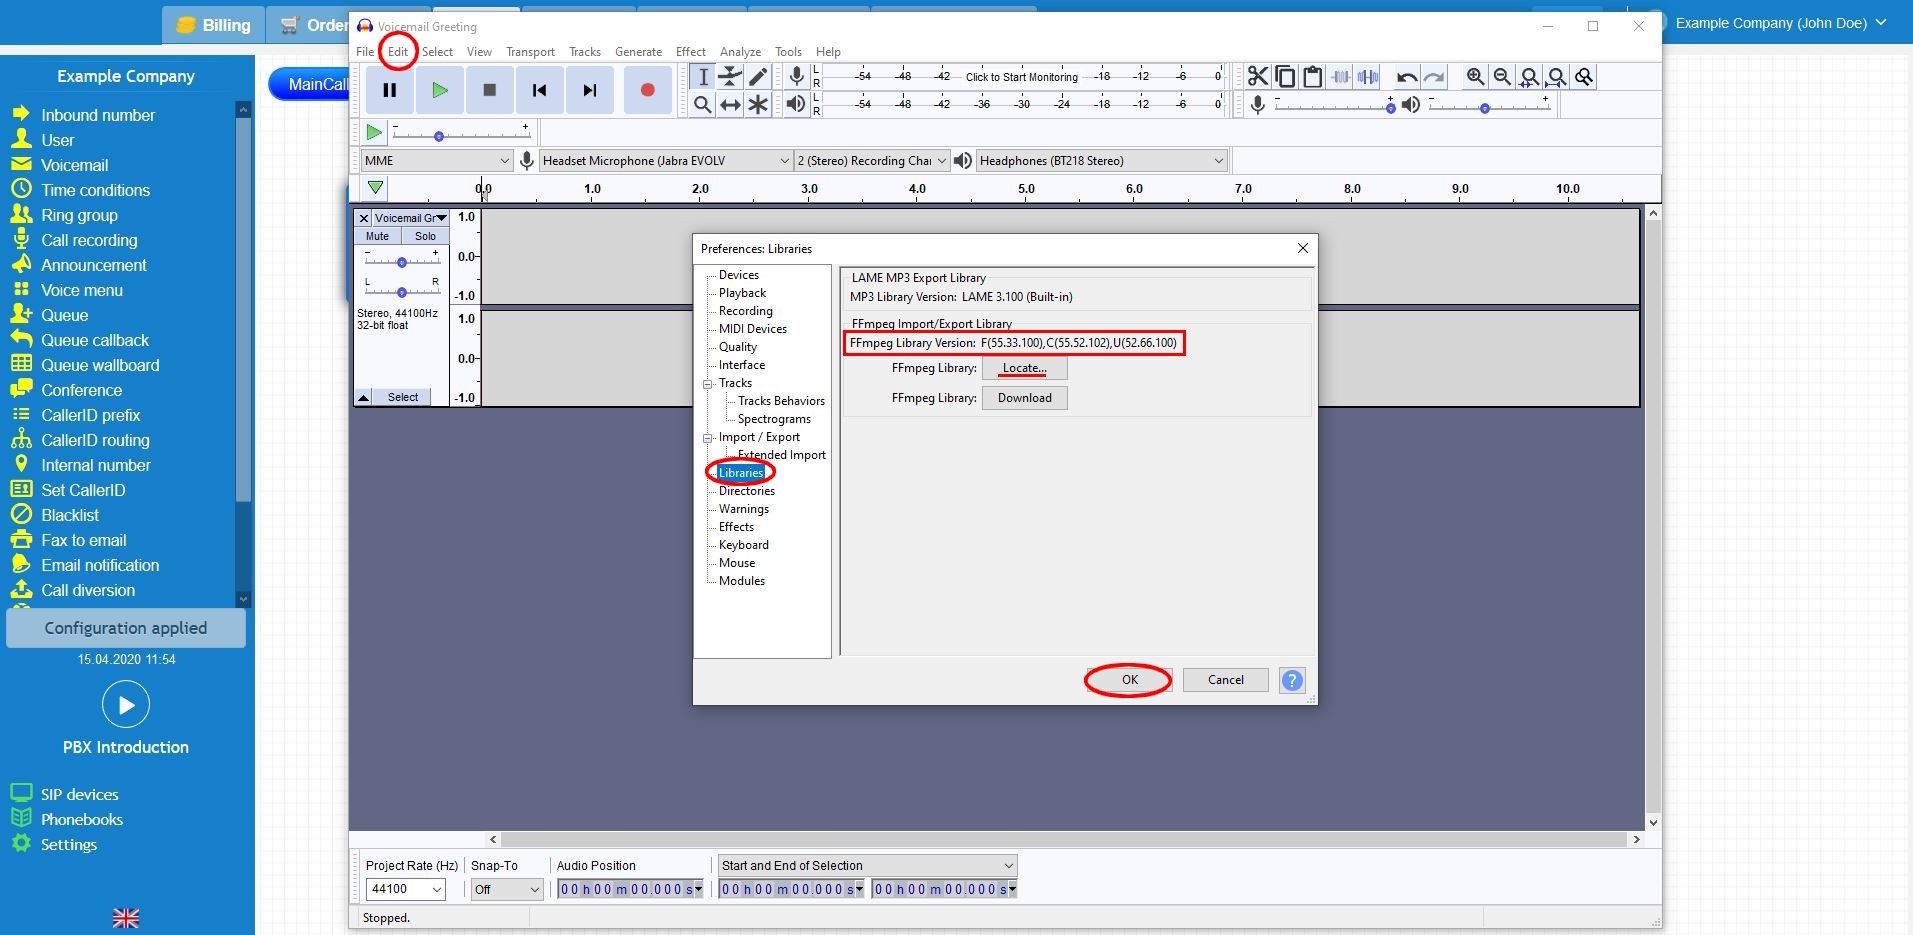
Next, you should access the library again to check if the package has been automatically located. For this, select “Edit” on the left-top and then “Preferences”. Navigate to the “Libraries” and check the FFmpeg and MP3 libraries. If you see the warning “library not found”, you will need to locate the downloaded file manually from the ZIP file downloaded in the previous step.

customgreeting7.JPG

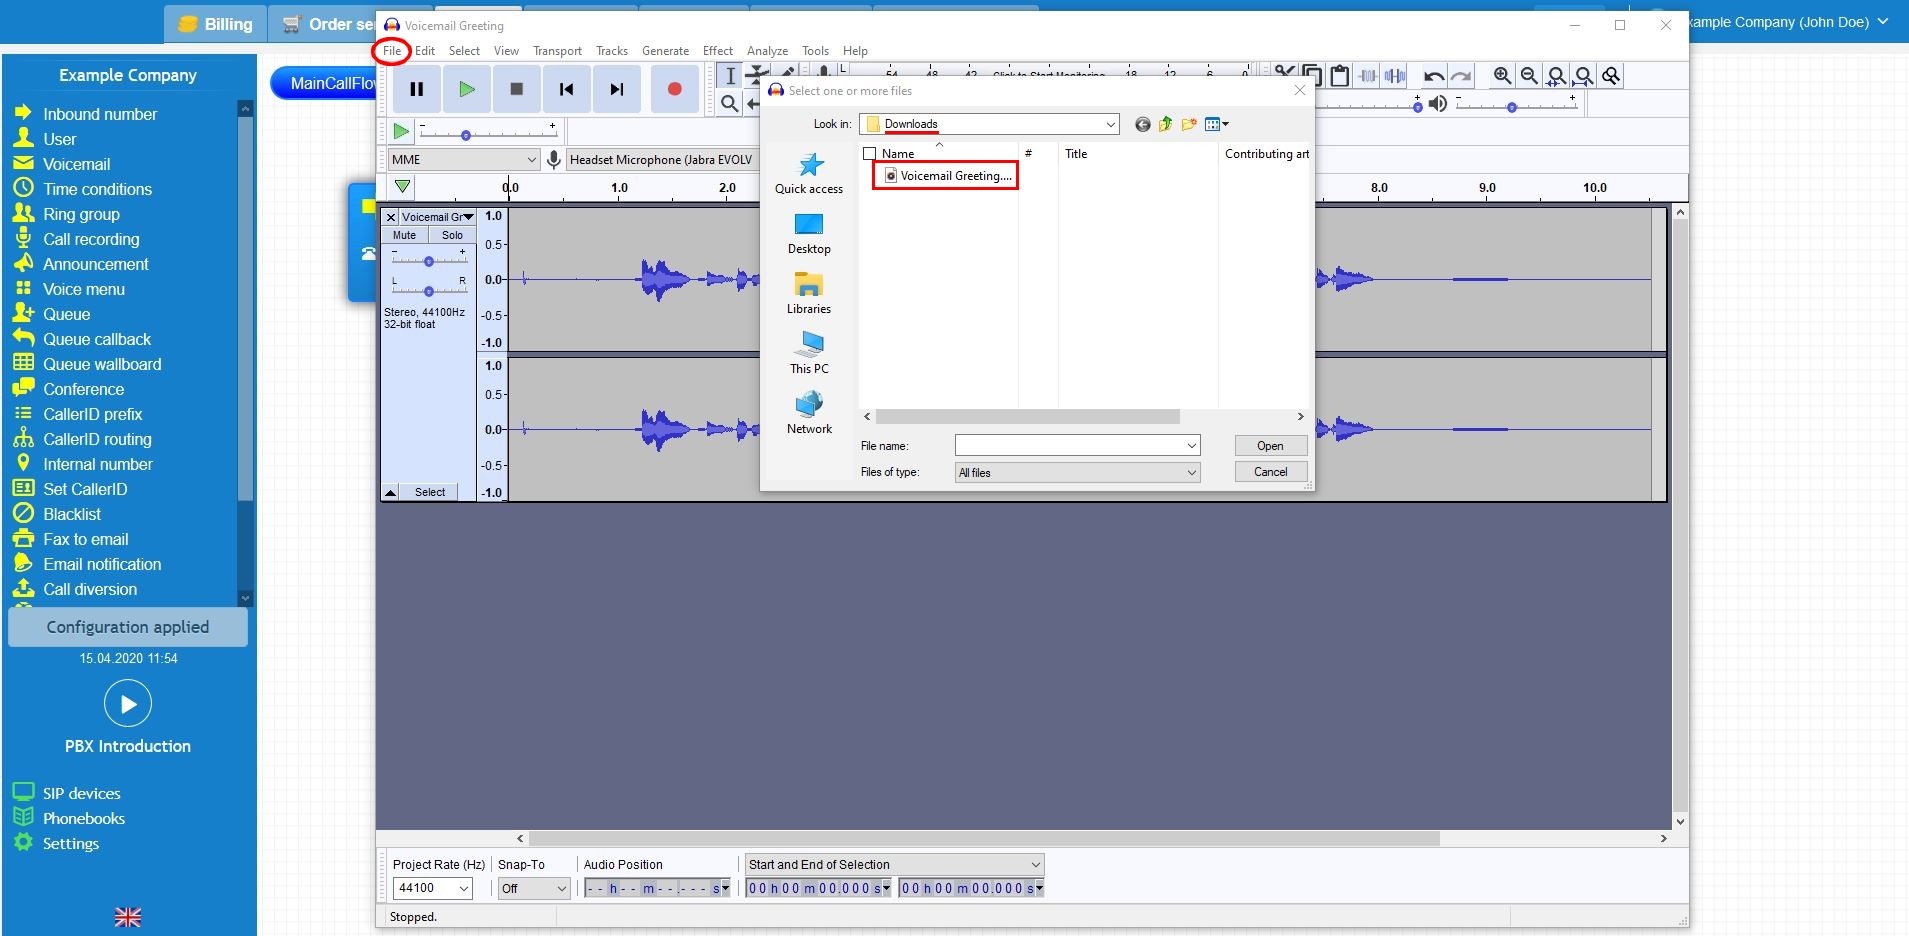
Now you have Audacity installed and configured, you are able to edit most of the common audio format. So, you should open the media file that you would like to convert to the compatible format for the PBX system. At the top left corner, select file and then open, select your media file and you will see appear on the screen.

customgreeting8.JPG

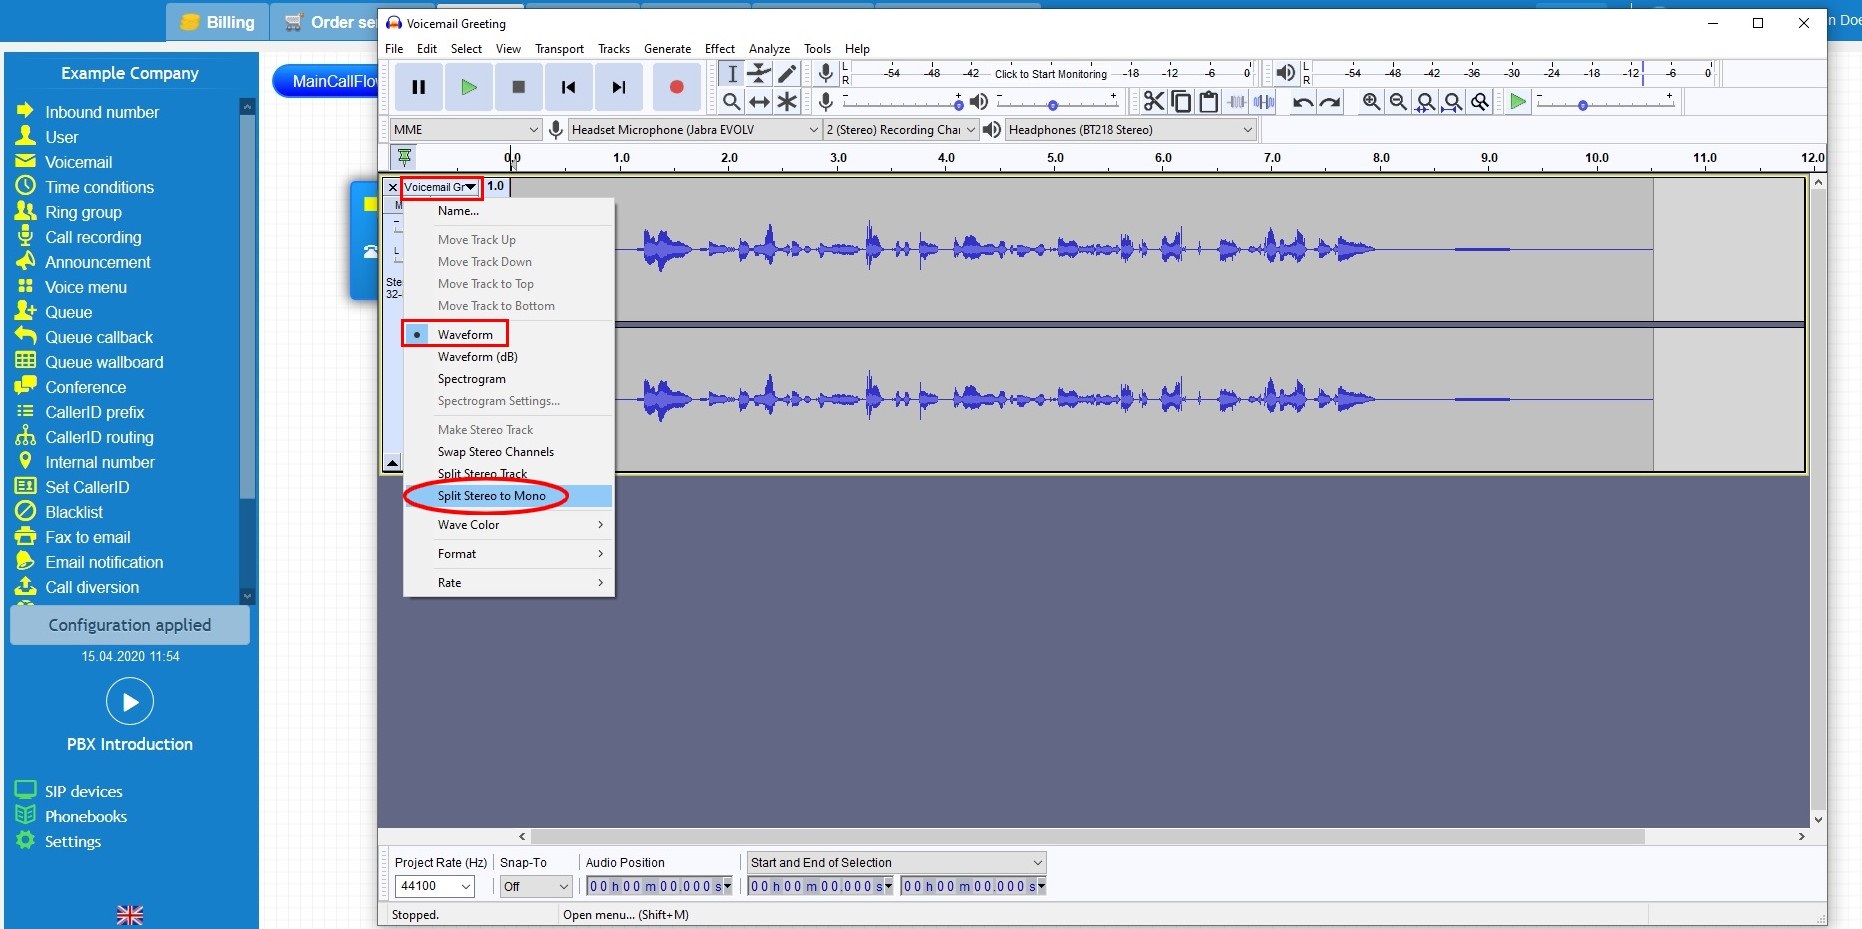
Open the media or music on hold file, click on the drop-down button, on the left-hand side. A range of options will be presented, you should select the “waveform” and “split stereo to mono”. The audio will be duplicate as shown in the image below.

customgreeting9.JPG

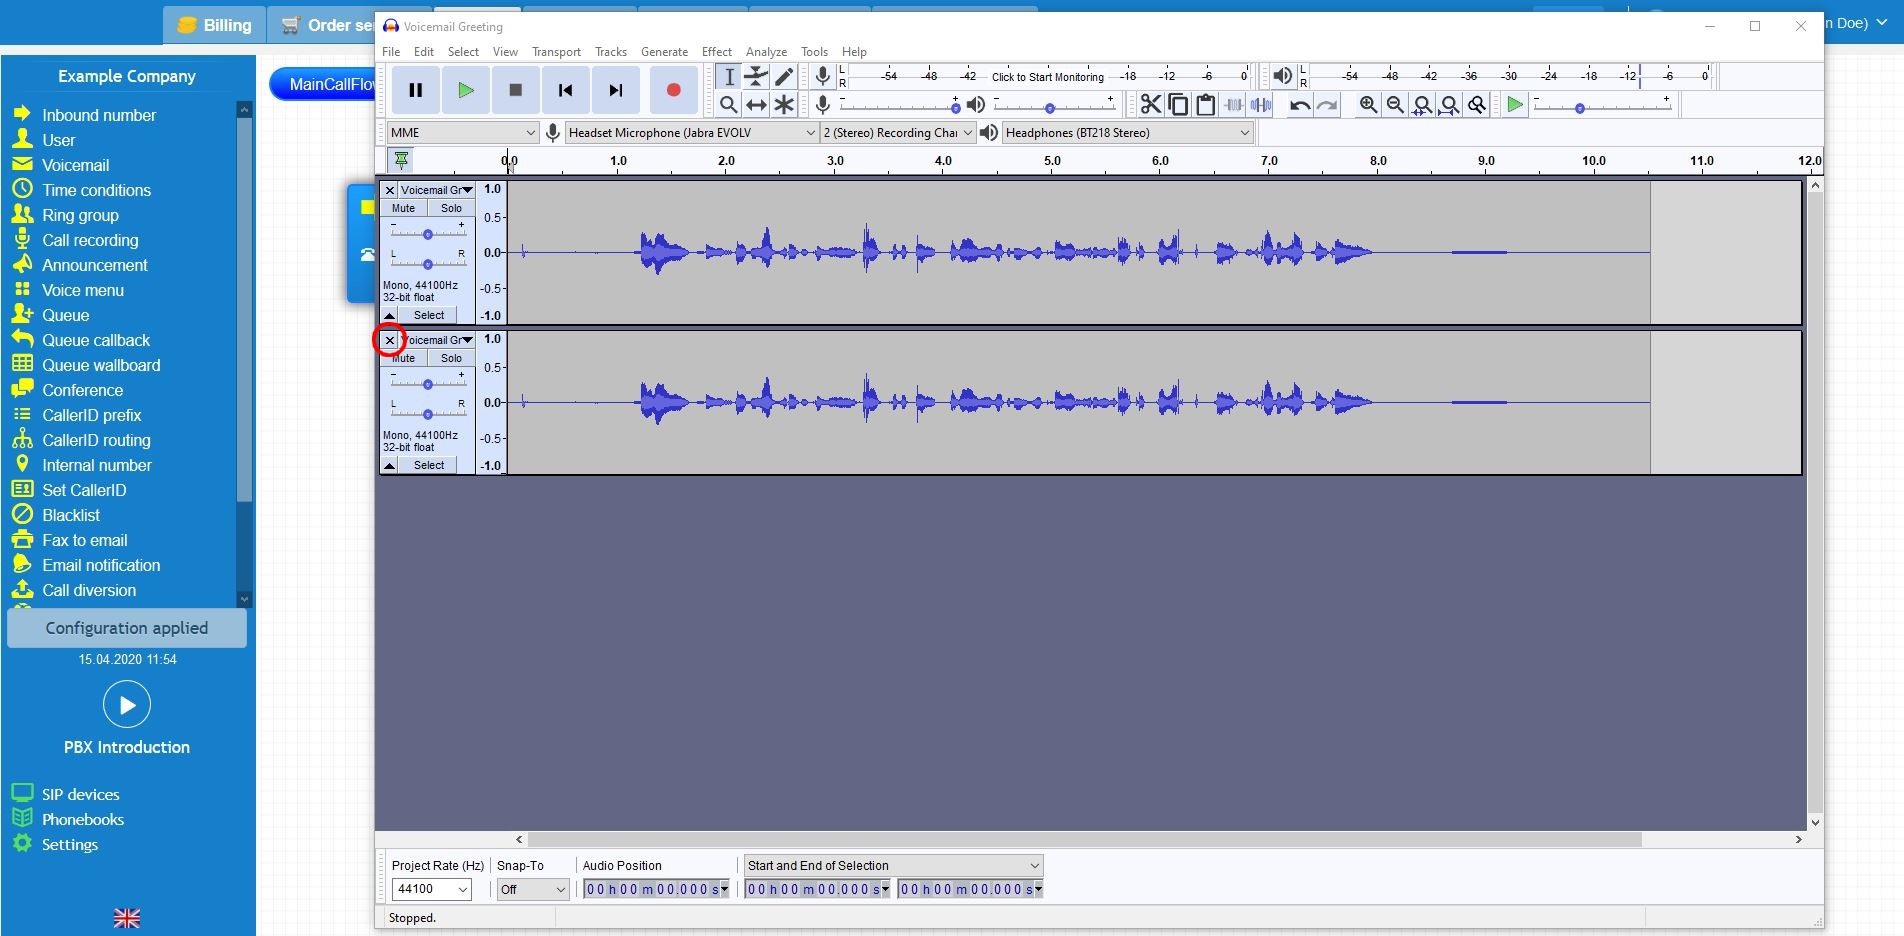
Now, you should remove the bottom audio track by clicking the cross in the corner as the following image.

customgreeting10.JPG

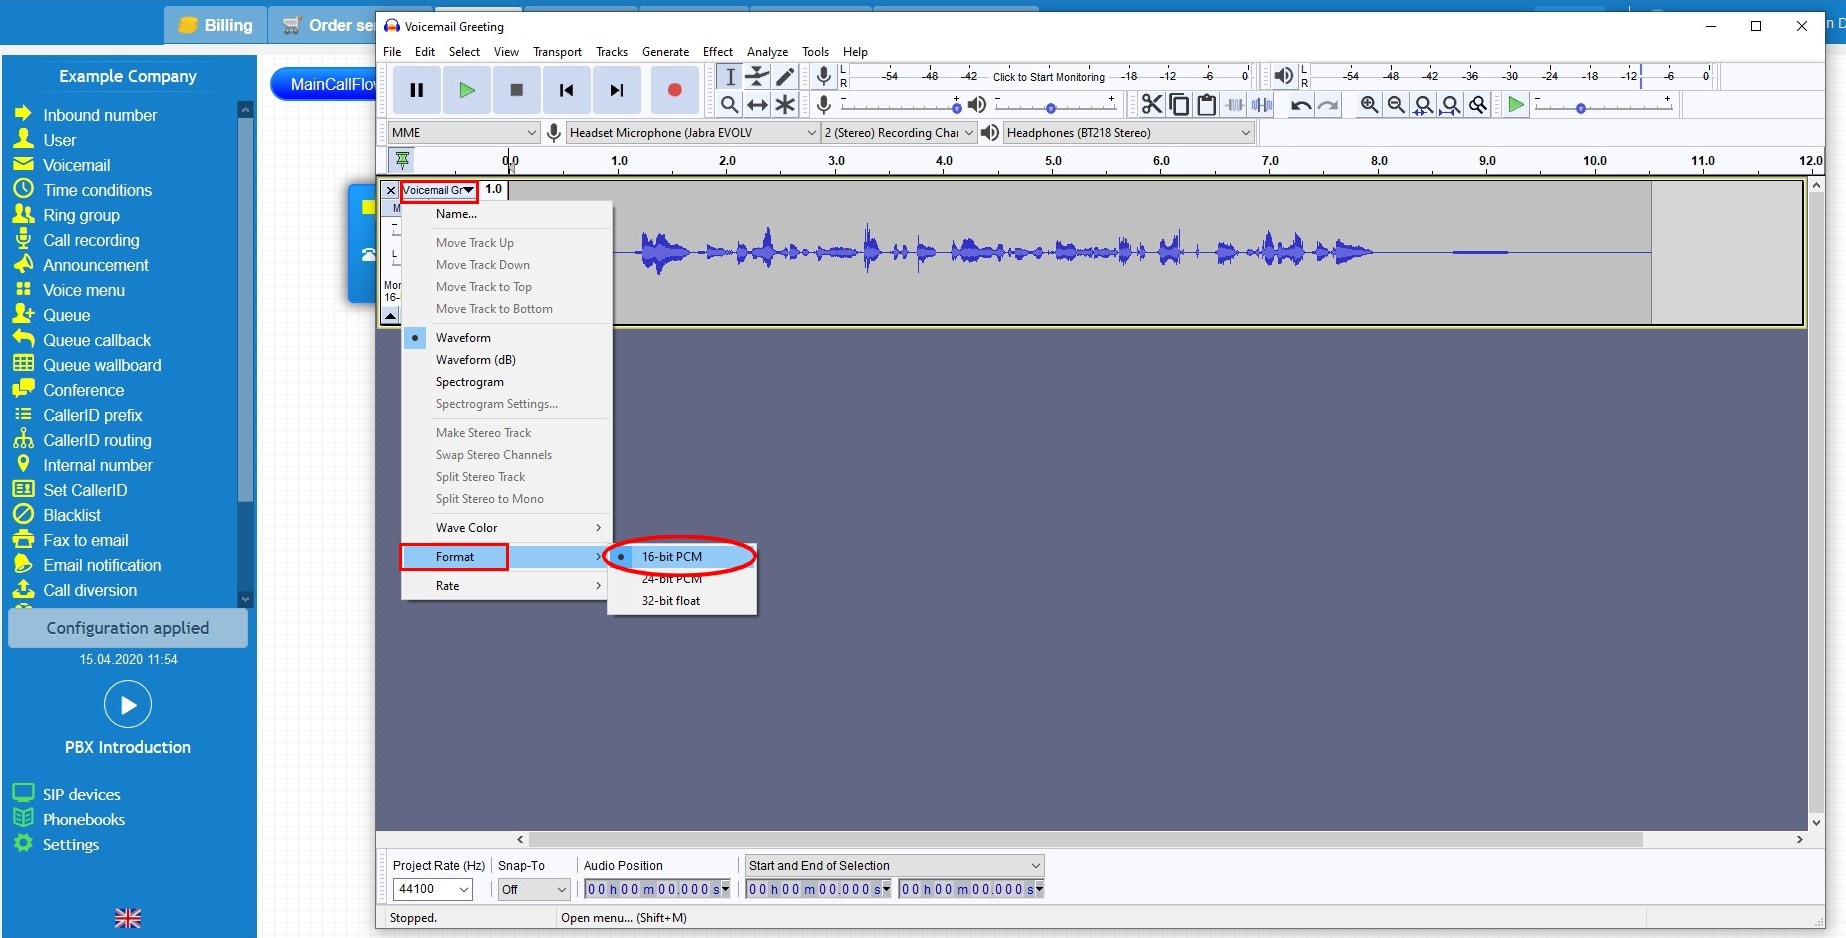
The following step of the process alters the audio format. For this, click again on the drop-down button and change the format from 32-bit to 16-bit PCM.

customgreeting11.JPG

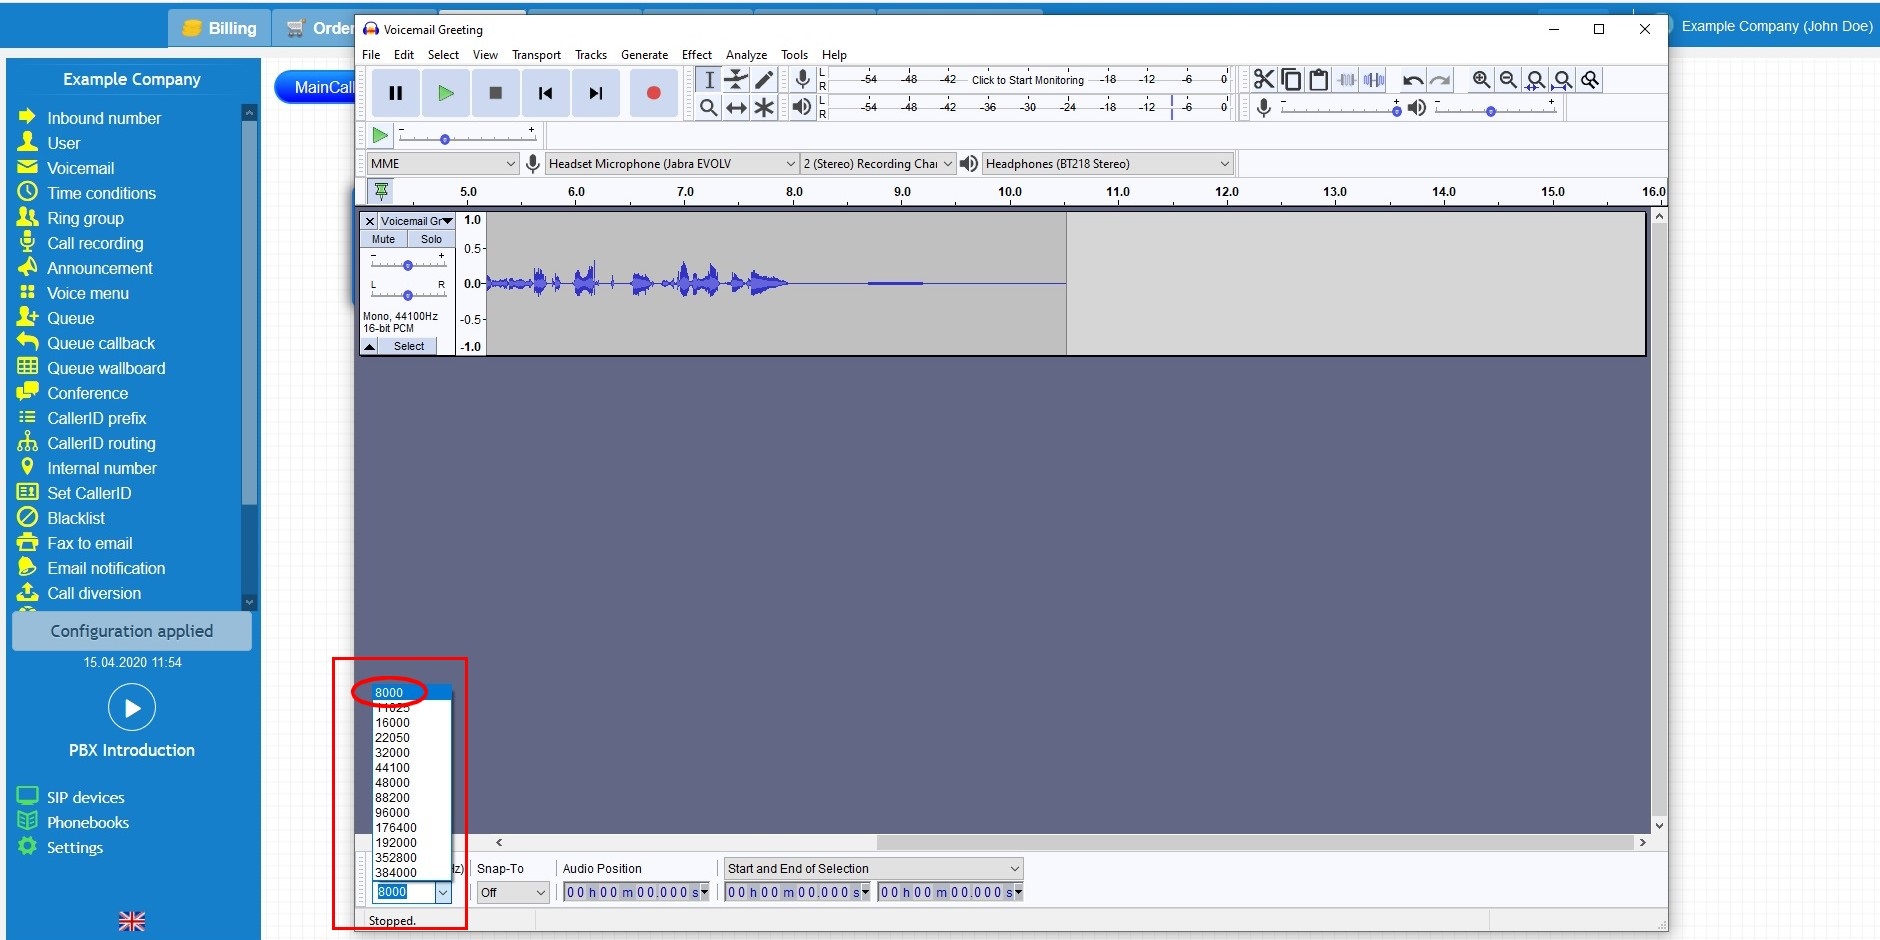
Finally, change the project rate to 8000 Hz by clicking on the drop-down list at the bottom left corner.

customgreeting15.jpg

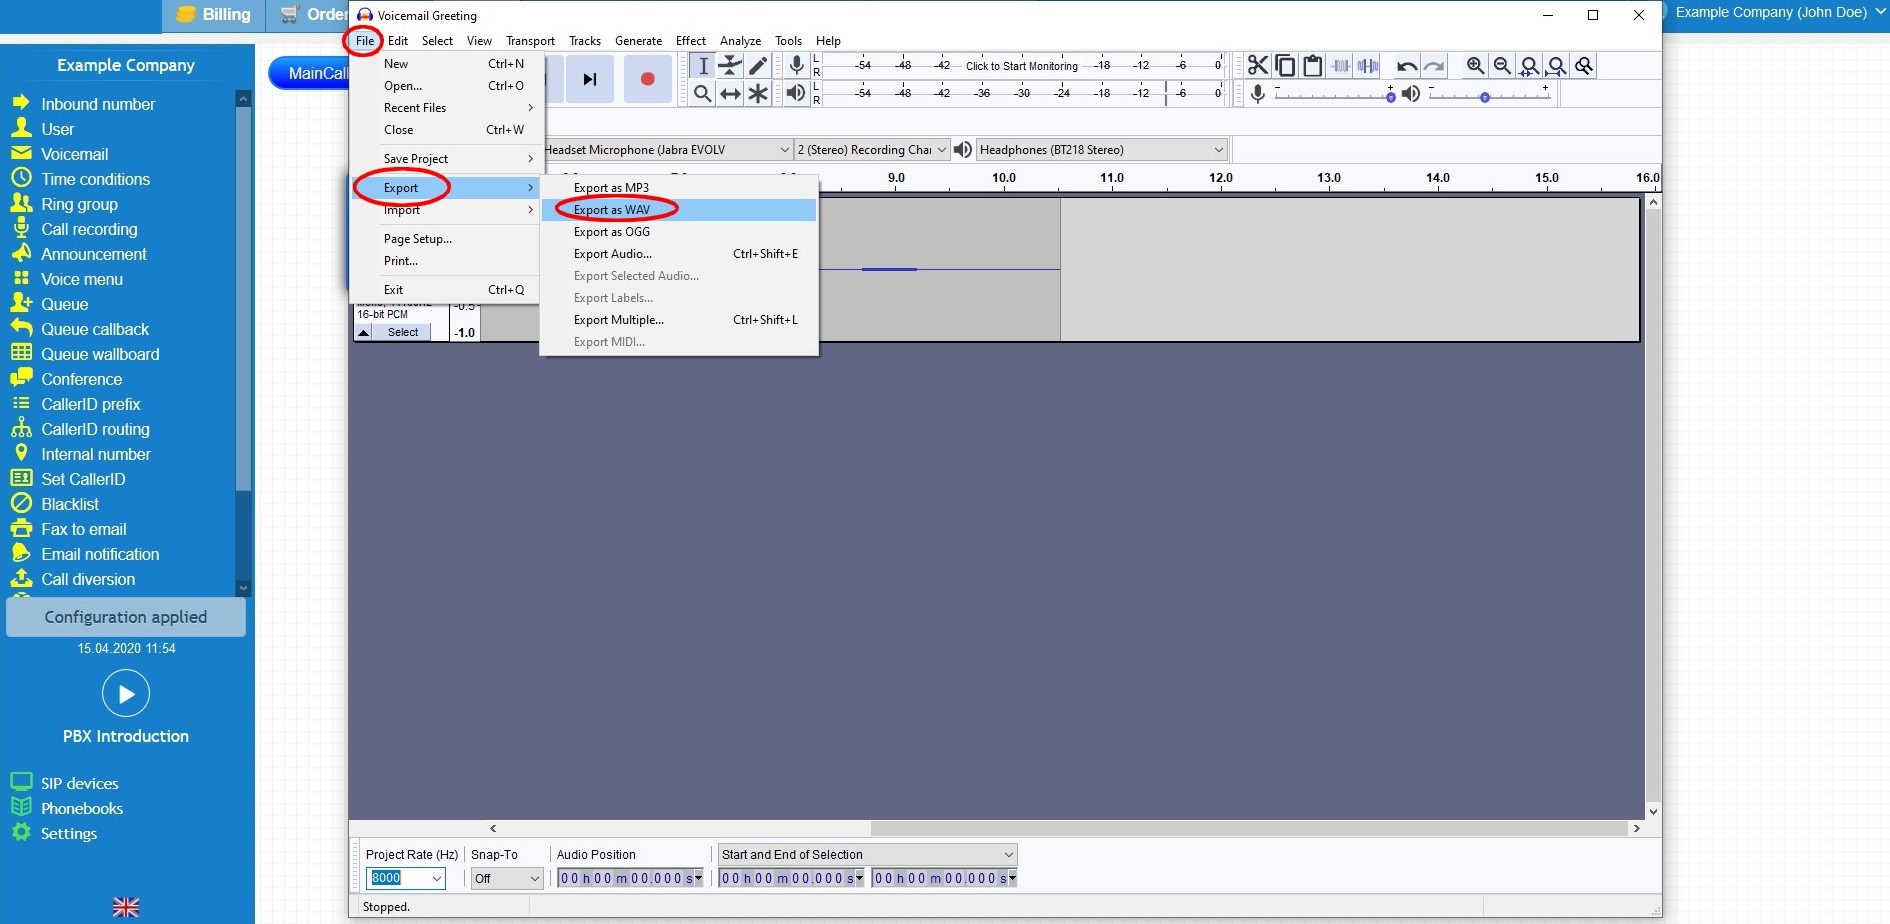
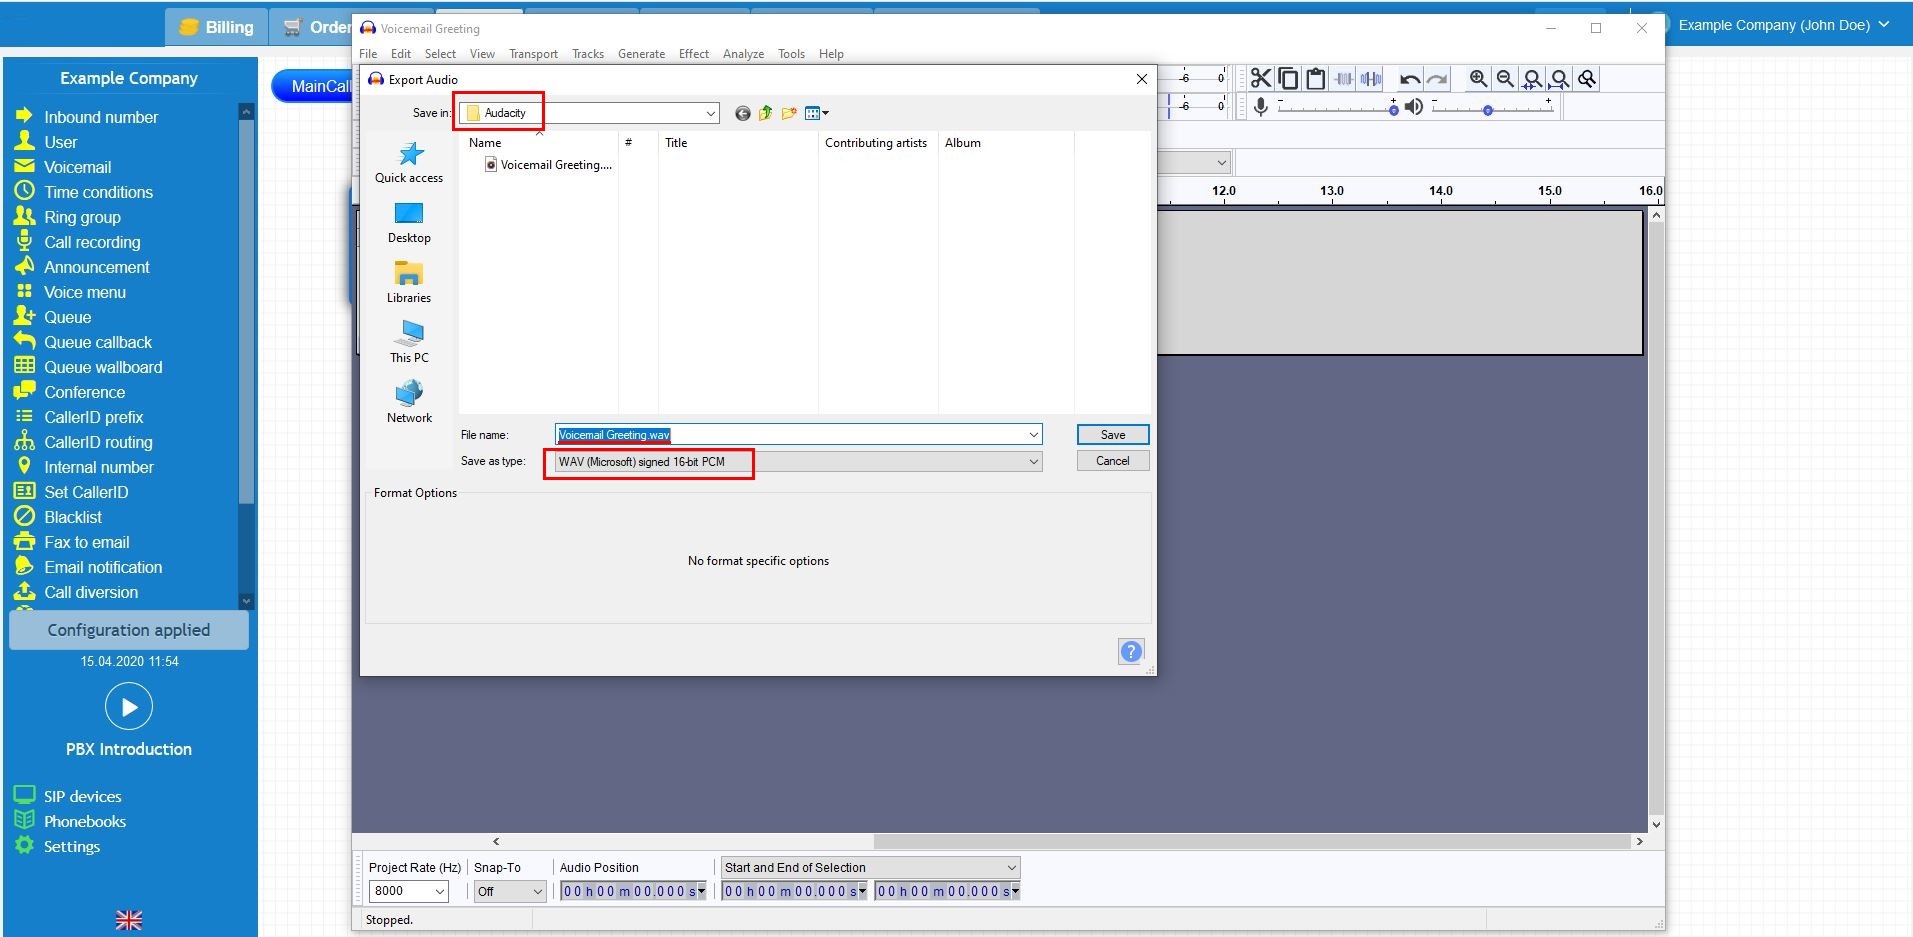
Next, export the file so you can upload it to your call flow, you must select “File”, then export and choose the WAV format.

customgreeting16.jpg

Make sure the audio format is 16-bit PCM.WAV.

customgreeting17.jpg

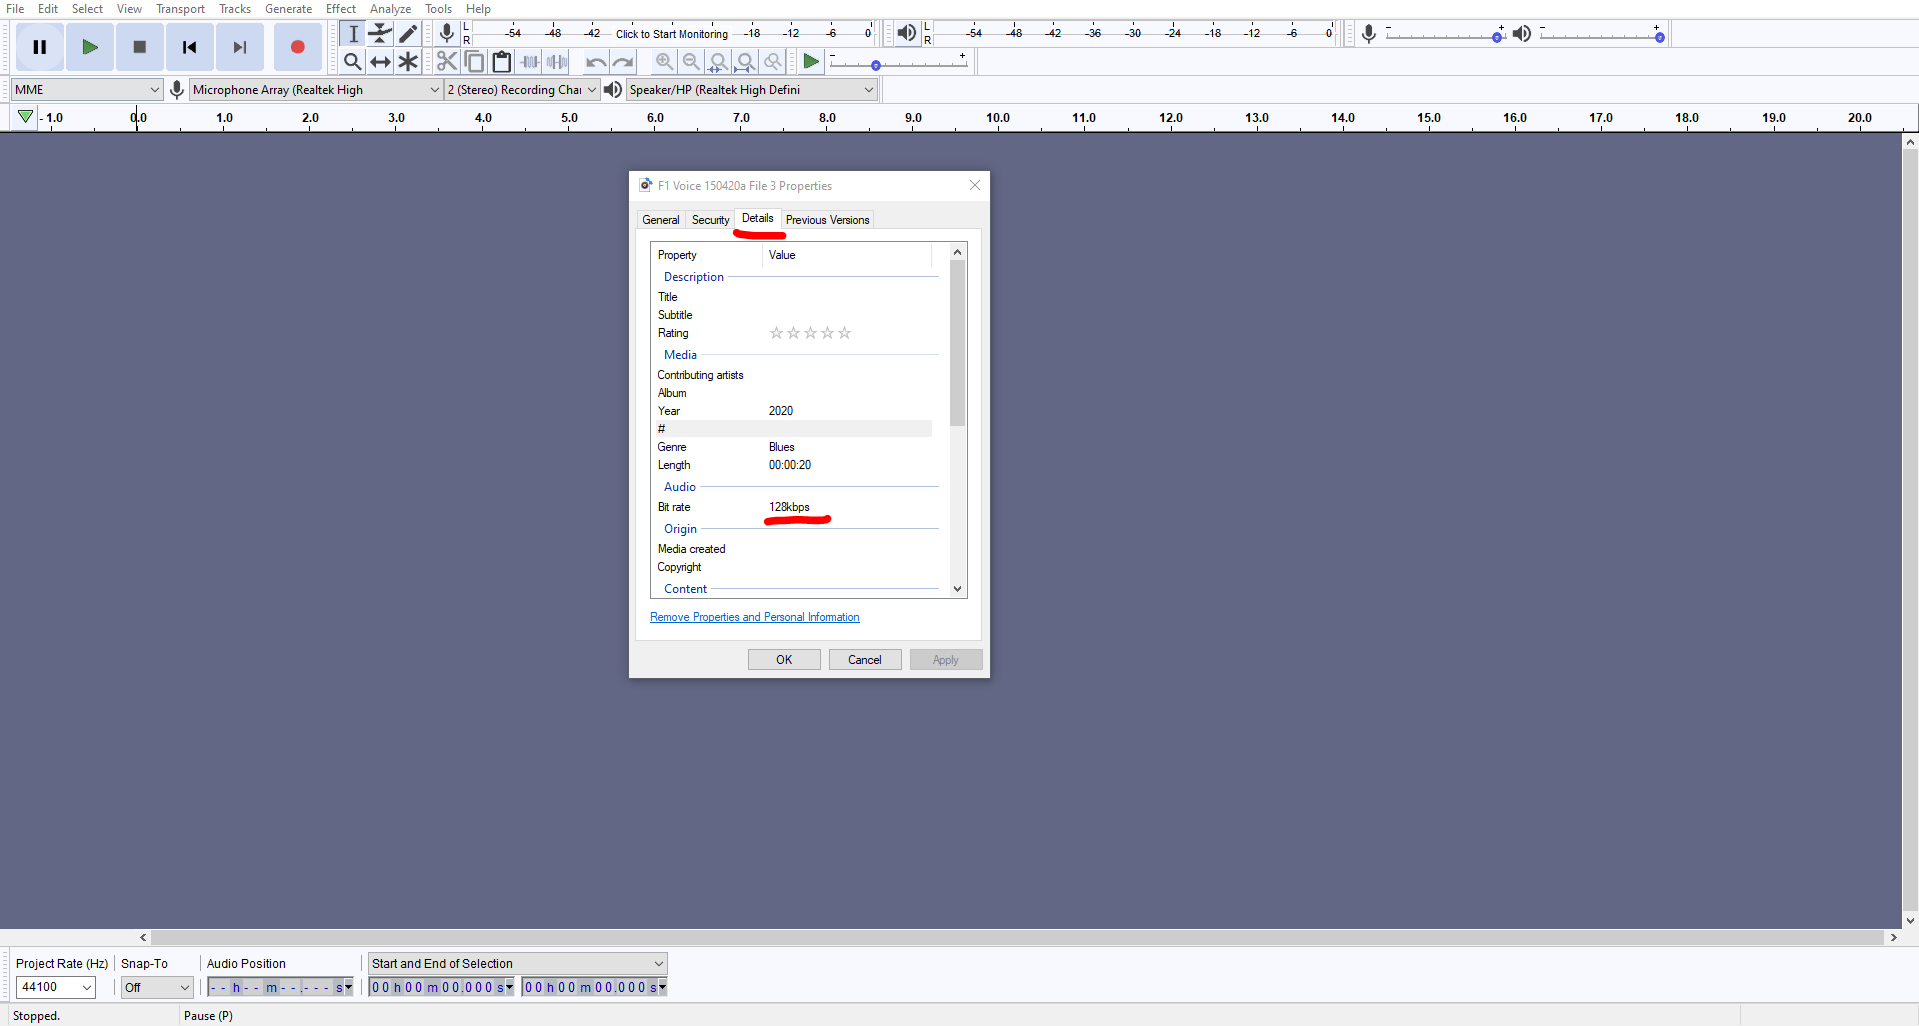
The final process of converting the file is to ensure the bit rate is correct. Navigate to your freshly converted file, right-click on the file, select details and ensure the rate is 128kbps.

mceclip0.png

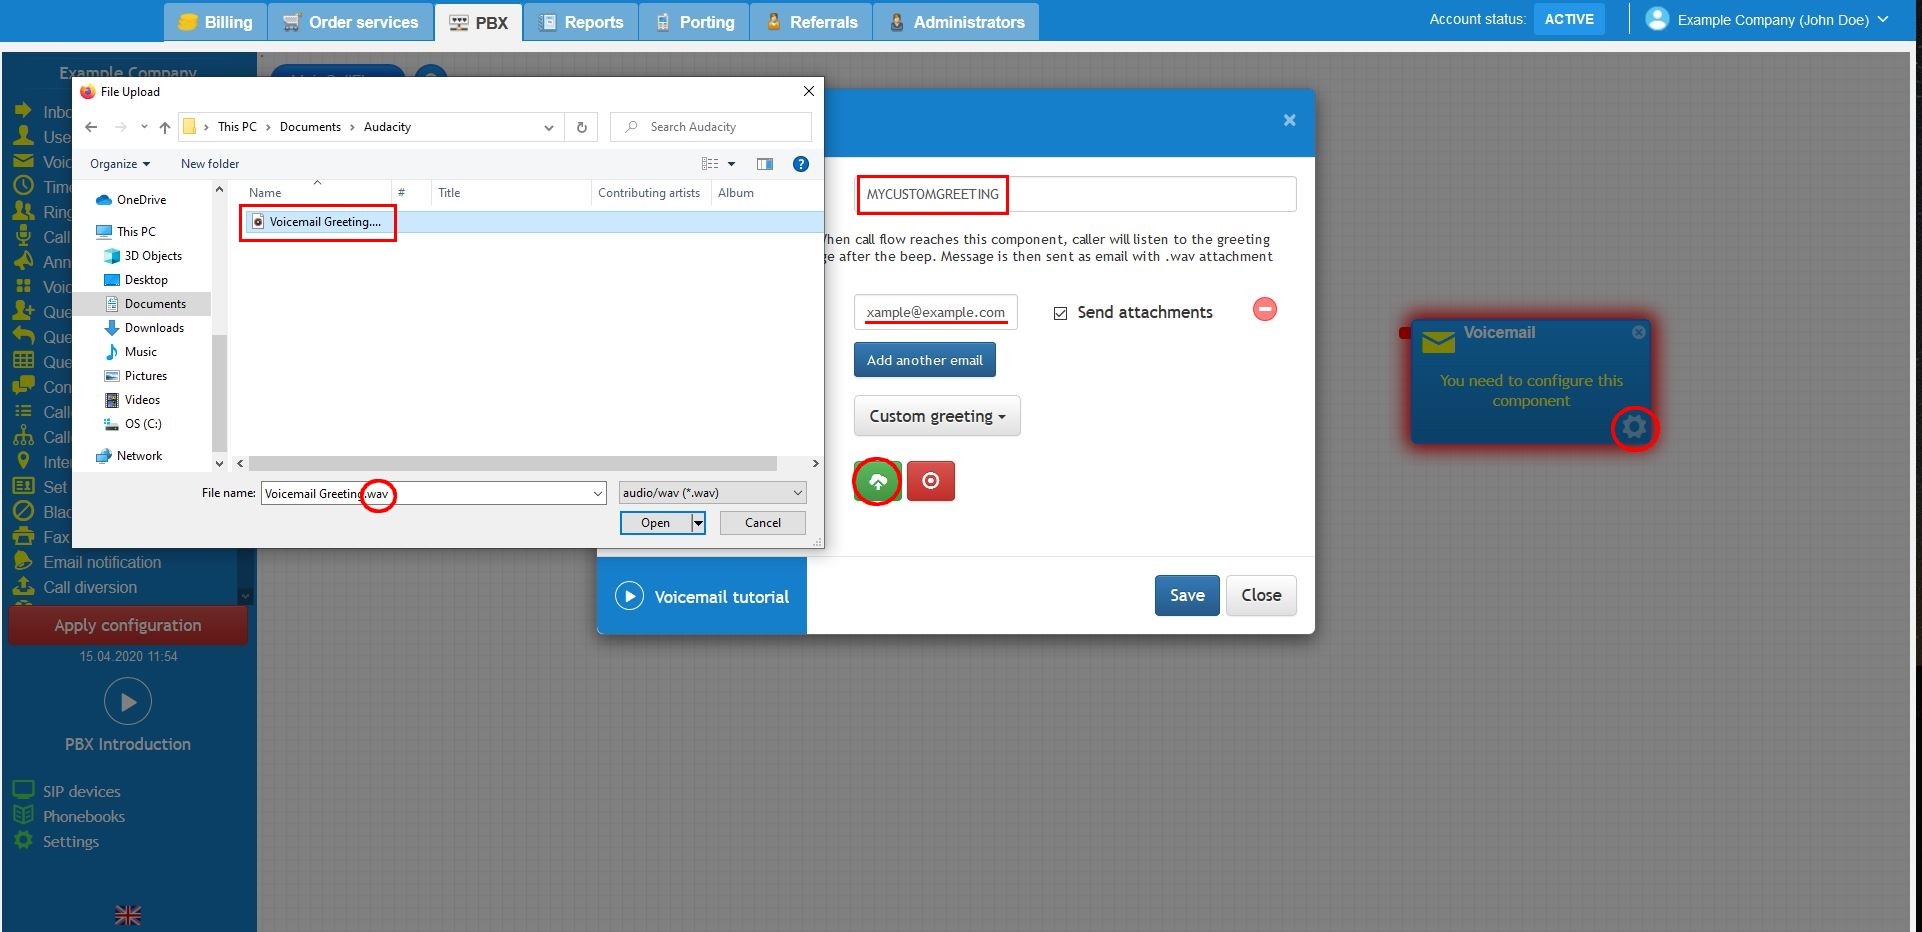
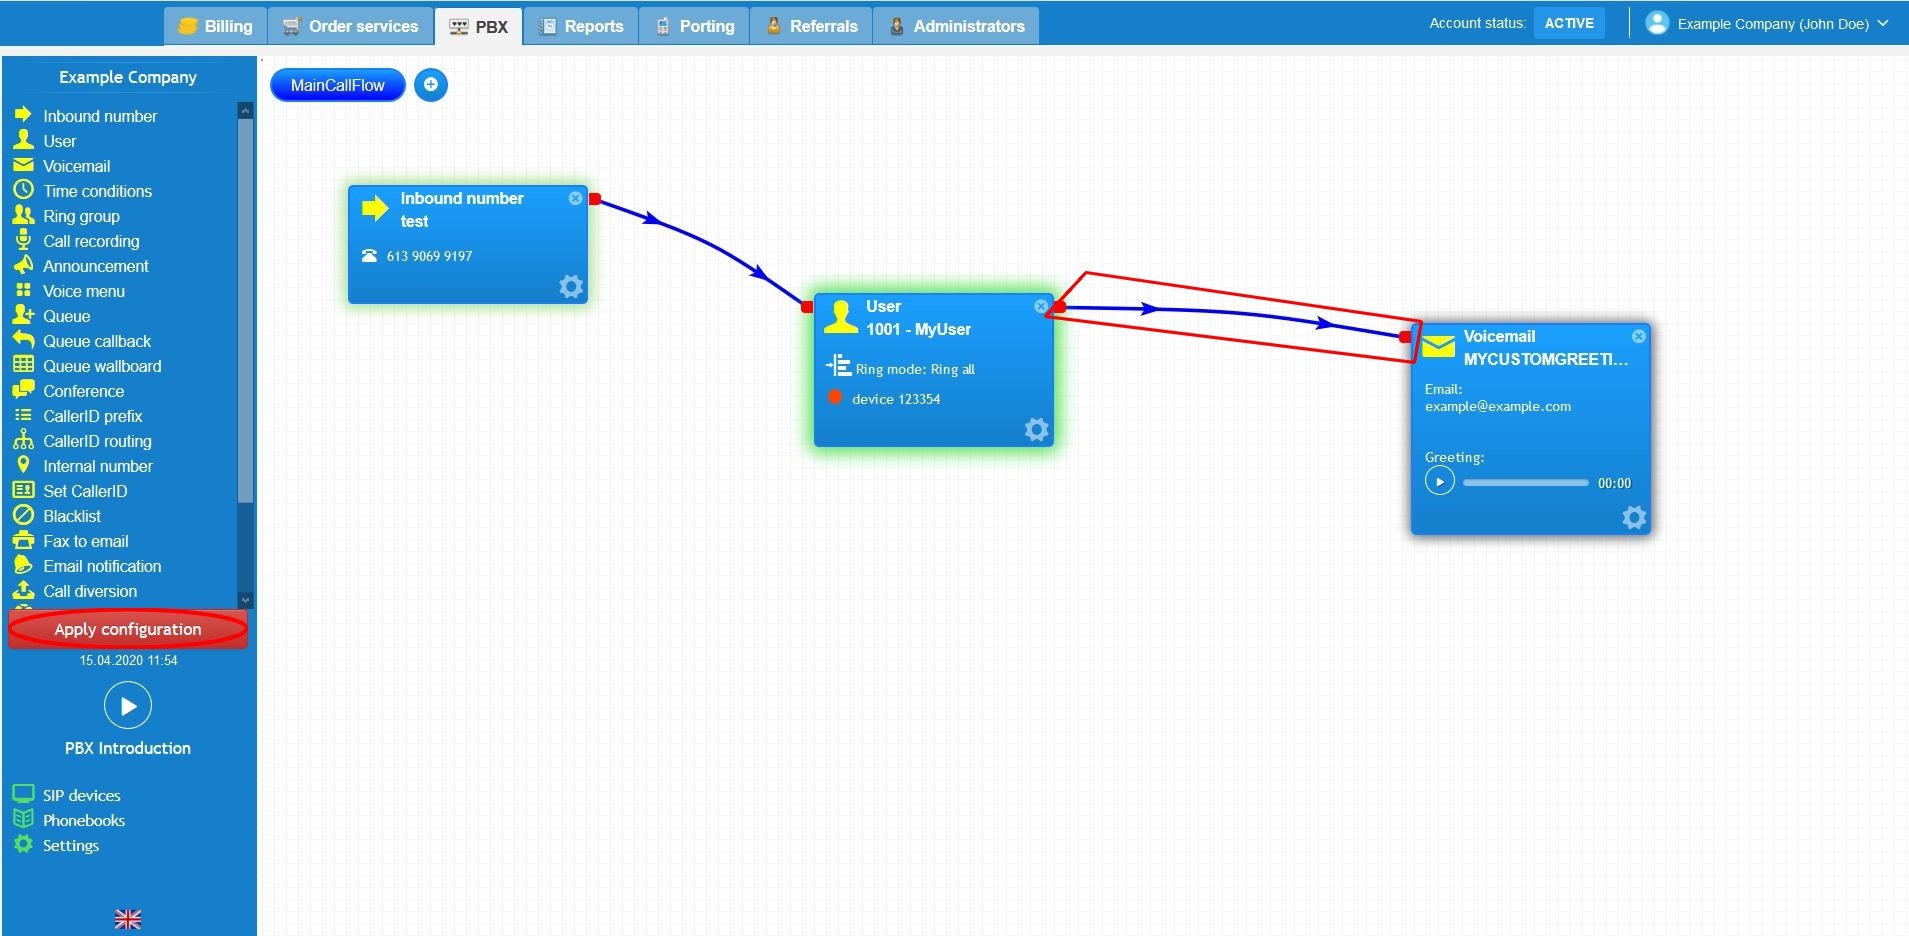
It is now time to upload your freshly converted media file to your call flow. Login to your customer portal, select the PBX tab, drag and drop the relevant object that allows an announcement to be uploaded, and click on the icon settings. Change the announcement option to the custom greeting. Click on the green button and select that file that you have converted.

customgreeting18.jpg

Lastly, call your telephone number to confirm your new announcement plays as expected, additionally, don’t forget to apply the configuration.

customgreeting19.jpg

Watch this in action #

The video below will show you a visual representation of the areas covered throughout this knowledge base guide.

gif.gif

What are your Feelings

Share This Article :

  • Facebook
  • X
  • LinkedIn
  • Pinterest
Still stuck? How can we help?

How can we help?

Updated on September 25, 2025
Scan to Email – Brother
Table of Contents
  • Introduction
  • Converting a custom greeting file
  • Watch this in action
Facebook-f Instagram Pinterest

Company

  • About us
  • Leadership
  • Careers
  • News & Article
  • Legal Notices

Support

  • Help Center
  • Ticket Support
  • FAQ
  • Contact us
  • Community
Get exclusive deals by signing up to our Newsletter.
©CopyRight 2025 | bgptelecom.com.au