Skip to content
Facebook
  • My Portal
  • My PBX
  • My Hosting
  • Help Me
  • Business
    • 1300/1800 Number Plans
    • Business Internet
    • Business PABX Sign Up
    • Business Phone Plans
    • Equipment & Hardware
    • Hosting Pans
    • Microsoft Teams & VoIP
    • Mobile
    • SIP Trunking
  • Corporate
  • Need Help?
    • Guides & Support
    • Log a Ticket
    • Uptime & Outages
  • Contact Us
  • 1300 827 154
Menu
  • Business
    • 1300/1800 Number Plans
    • Business Internet
    • Business PABX Sign Up
    • Business Phone Plans
    • Equipment & Hardware
    • Hosting Pans
    • Microsoft Teams & VoIP
    • Mobile
    • SIP Trunking
  • Corporate
  • Need Help?
    • Guides & Support
    • Log a Ticket
    • Uptime & Outages
  • Contact Us
  • 1300 827 154
  • Residential
    • Mobile
  • Business
    • 1300/1800 Number Plans
    • Business Internet
    • Business PABX Sign Up
    • Business Phone Plans
    • Equipment & Hardware
    • Hosting Pans
    • Microsoft Teams & VoIP
    • Mobile
    • SIP Trunking
  • Corporate
  • Need Help?
    • Guides & Support
    • Log a Ticket
    • Uptime & Outages
  • Contact Us
  • 1300 827 154
Menu
  • Residential
    • Mobile
  • Business
    • 1300/1800 Number Plans
    • Business Internet
    • Business PABX Sign Up
    • Business Phone Plans
    • Equipment & Hardware
    • Hosting Pans
    • Microsoft Teams & VoIP
    • Mobile
    • SIP Trunking
  • Corporate
  • Need Help?
    • Guides & Support
    • Log a Ticket
    • Uptime & Outages
  • Contact Us
  • 1300 827 154

eFax

  • How To Use a Fax Machine
  • eFax Online
  • eFax Messenger
  • eFax By Email
  • Scan to Email – Brother
  • How to Prepare & Upload Voice Prompts to PBX Announcements

Handsets

  • Cisco
    • Manual Configuration of Cisco SPA IP Handsets
  • Yealink
    • Yealink DECT Handsets
    • Yealink Teams Phone Comparison
    • Paging Configuration on Yealink Devices
    • Transferring Calls on Yealink Handsets
    • Yealink SIP IP Phone Comparison
    • PBX Yealink T5 Dect Mode
    • Transfer calls using a Yealink DECT phone (W53H, W56H)
    • How to Change the Logo/Wallpaper on Yealink Handsets
    • Hold and Resume
  • Zoiper
    • Zoiper Softphone Configuration
    • Softphone Error Troubleshooting

Hosted PABX

  • Building Your Phone System
    • Device Twinning
    • How To Use Tabs In Your PBX
    • How to Configure Real Time Call Monitoring
    • How to Import/Export Call flow
    • How to Configure SMS to email
    • How to Restrict Dialing Destinations
    • How to Block or Hide Caller ID
    • How to Prepare & Upload Voice Prompts to PBX Announcements
    • How to set up User(s) with External Number(s)
    • How to Configure Global Blocklists
    • Default Settings Configurations
    • How to Configure Phonebooks
    • How to Configure Inbound Fax-to-Email
    • How to Configure Dial Tone Access (DISA)
    • How to Configure SIP Trunks
    • How to Configure PIN codes
    • How to Configure Blocklist
    • How to Configure Conferencing
    • How to Configure Call Parking
    • How to Configure Queue Wallboards
    • How to Configure Queue Callbacks
    • How to Configure Queue Priority
    • How to Configure Call Queues
    • How to Configure Ring Groups
    • How to Enable Call Recordings
    • How to use Set Caller ID
    • How to Configure CallerID Prefix
    • How to Configure Call Diversions
    • How to Configure DTMF prefix
    • How to Configure Your Automated Voice Menu (IVR)
    • How to Configure Your Automated Voice Menu (IVR)
    • How to Configure Custom Announcements & Prompts
    • How to Configure Geo Routing
    • How to Configure Call Flow Controls
    • How to Configure Time Conditions
    • How to Configure Inbound Email Alerts
    • How to Configure Voicemail
    • How to Configure a User License & Device License
    • How to Configure Web Callback
    • How to Configure Internal Numbers
    • How to Configure Inbound Numbers
  • Webphone
    • Webphone Overview
    • Webphone End User Set Up
    • Webphone Configuration
    • Webphone Troubleshooting

Internet

  • Home Internet troubleshooting
  • Connect Your BYO Modem

Microsoft Teams

  • How to Troubleshoot Microsoft Teams
  • Microsoft 365 Teams
  • Microsoft Teams Audio Conference Integration
  • Skype Communication via Microsoft Teams

On Premise PBX

  • Panasonic
    • How do I configure a Panasonic KX-NS SIP trunk?

SIP Trunks

  • Configuring a SIP trunk to 3CX
  • Home
  • Docs
  • Handsets
  • Yealink
  • Paging Configuration on Yealink Devices

Paging Configuration on Yealink Devices

Table of contents

In this article #

  •  Configure Multicast Listening
  •  Configure a Paging Key
  •  Configure a Paging List
  •  How to use Paging

This article describes how to configure the Yealink handsets to make and receive multicast paging streams on your local area network.

All IP phones in the multicast paging group must be deployed in the same subnet since a broadcast is used. The phone can only send/receive broadcasts to/from the listened channels. Other channels’ broadcasts will be ignored automatically by the IP phone. For more complex network setups, please see your Network Administrator.

The Yealink handsets can be configured to receive and/or send multicast paging messages. Depending on how the feature is configured you can page all phones at the location, or just a select subset. All phones that are required to receive the paging messages need Multicast Listening administered while those phones administered to be able to send paging messages need the Paging key, or Paging List configured on the handset.

Configure Multicast Listening #

To configure the Multicast Listening settings, log into the web GUI for the phone and navigate to the Directory -> Multicast IP menu.

  • In the Listening Address field, enter the IP and port number for the Multicast stream as set by your Network Administrator, for simple network setups you could try 224.0.1.75:10008 as per our example below.
  • The label can be any description or name that will identify the Paging group
  • The channel is the particular channel used for this group, for example, the All group is listening on channel 1, while the Sales group is listening on channel 5.
    mceclip0.png
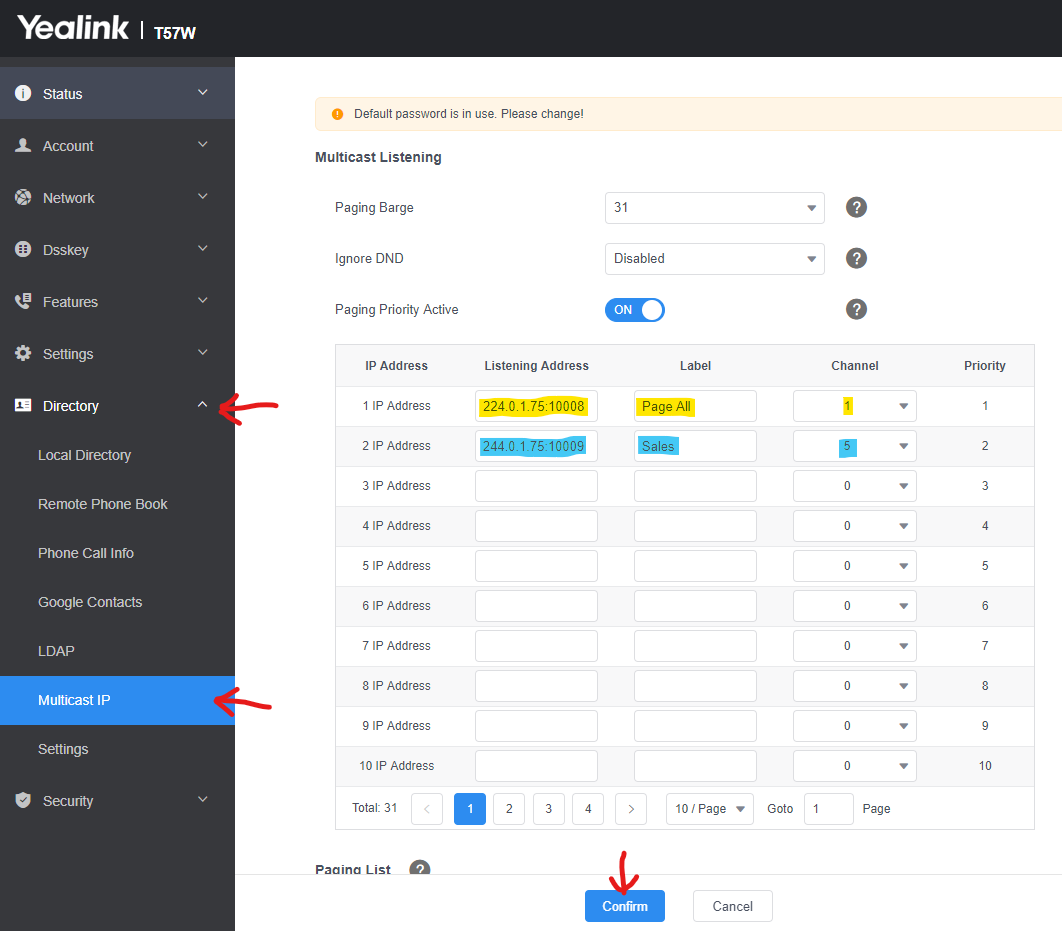
  • Enter the details for each paging group the handset needs to listen for, in this example the phone is listening to the All and Sales groups.
  • Click Confirm to save your settings.

Configure a Paging Key #

To configure an individual Paging key for 1 particular paging group, log into the web GUI for the phone and navigate to Dsskey -> Line Key menu.

  • For the selected key number set the Type to Paging.
  • In the Value field, enter the IP address and port for the paging group you want to configure this button to send the page to.
  • Enter a descriptive name for the group in the Label so you know what the button is for
  • Enter the channel number in the Extension field. The channel number, IP address and port must all match those configured in the listening settings for the paging to work, (valid channels 0-30).
    mceclip1.png
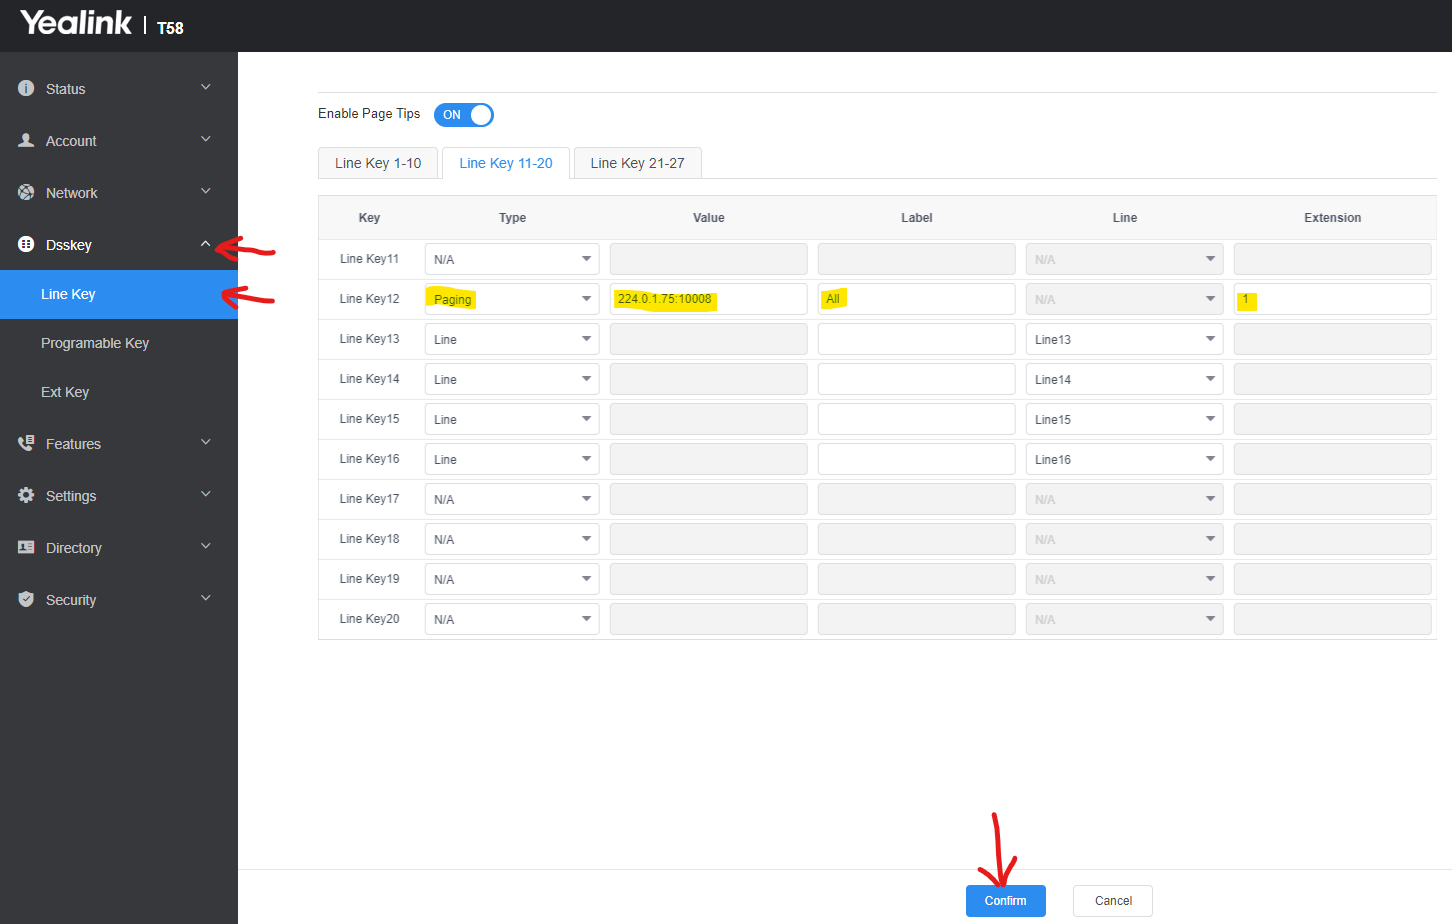
  • The example above configures button 12 on a T58 handset to page the All group on 224.0.1.75:10008,channel 1 as we have configured in the listening section above on another handset.
  • Click Confirm to save you settings

You should now be able to page any phone configured to listen with the same settings. Simply press the button, you will hear a short tone and your voice will be broadcast to all phones configured to listen.

Configure a Paging List #

If you have a large number of paging groups, or you are setting up a reception handset that needs to be able to send paging messages to a number of different groups, you can configure a Paging List button.

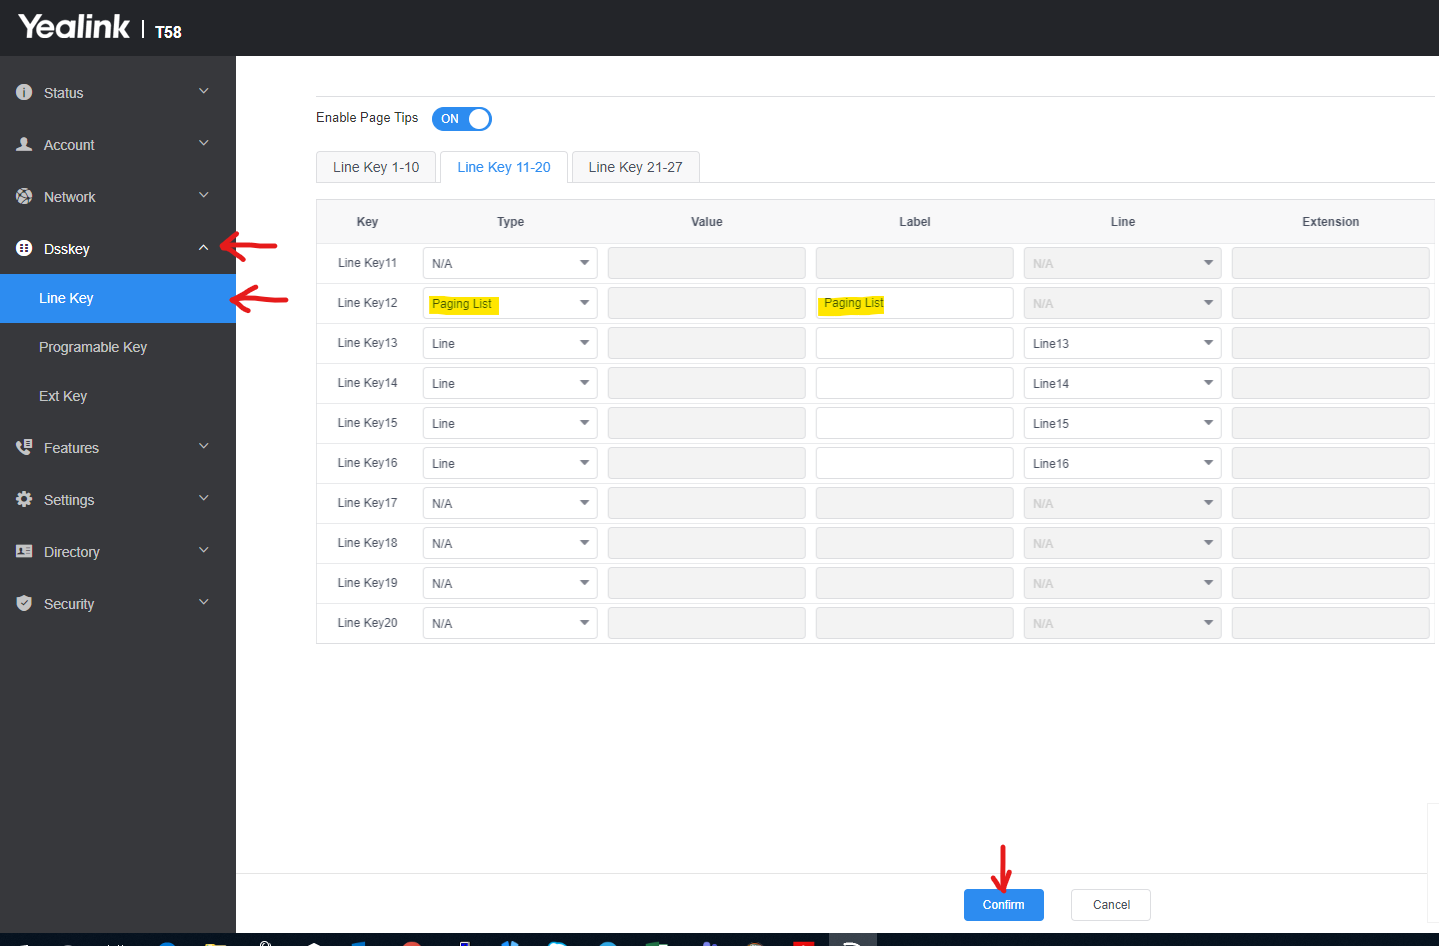
  • First configure a Dsskey to act as the Paging List button, set the Type to Paging List and appropriate description for the button in the Label field.
    mceclip2.png
  • Next, configure the Paging List, navigate to Directory -> Multicast IPmceclip3.png
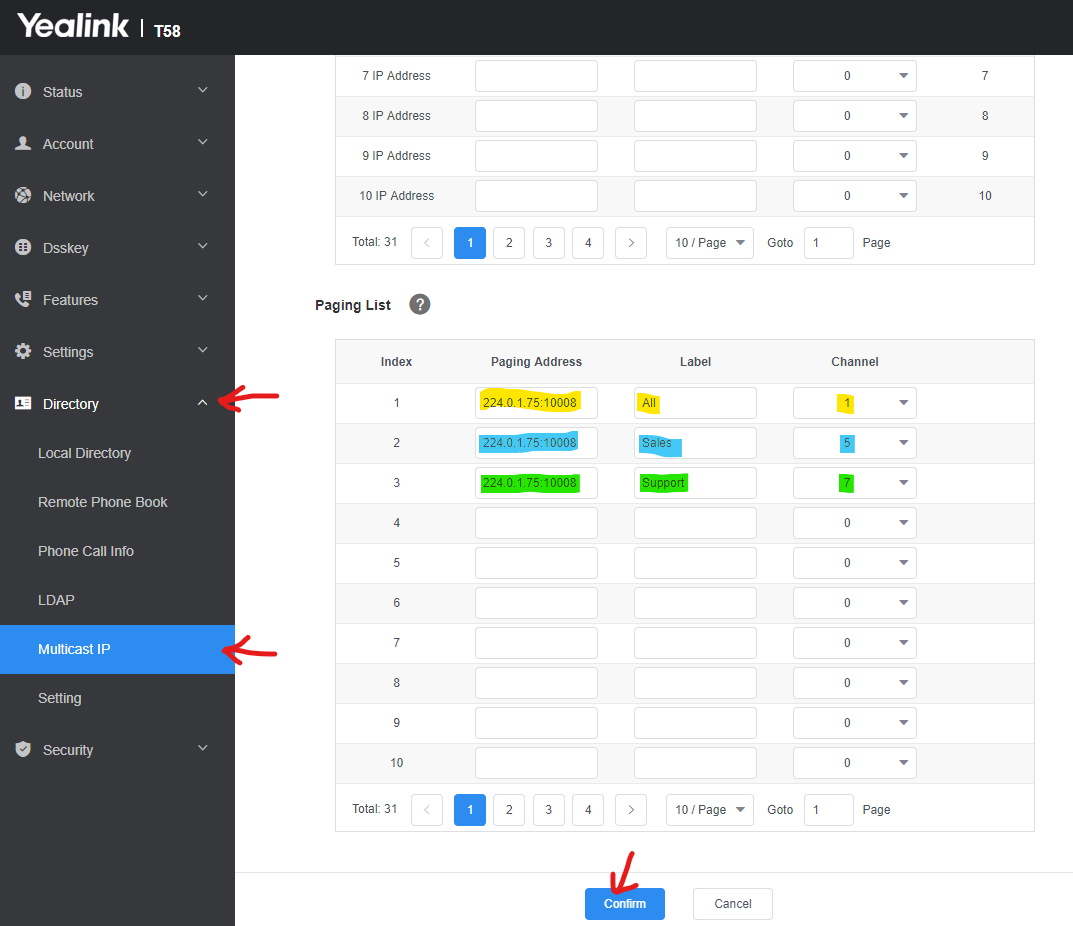
  • Enter the IP address and port for the paging group for the Paging Address field
  • Enter a descriptiveLabel so you know which group is which
  • Enter the unique channel number for each group in the Channel field
  • The example above lists 3 paging groups, All, Sales and Support. By configuring All phones to listen to channel 1 and the Sales phones to also listen on channel 5 you can direct your paging message to the appropriate group.

How to use Paging #

  • Press the appropriatePaging Keyfor the group you wish to page, or press thePaging List button and select the group from the list.
  • Speak into the handset and your voice will be broadcast to all phones configured to listen for the group you selected.
  • To end, hang up or press the End Call button.
What are your Feelings
Share This Article :
  • Facebook
  • Twitter
  • LinkedIn
  • Pinterest
Still stuck? How can we help?

How can we help?

Updated on 20 June 2023
Table of Contents
  • In this article
  • Configure Multicast Listening
  • Configure a Paging Key
  • Configure a Paging List
  • How to use Paging
About Us
  • Contact Us
  • Privacy Policy
  • Service Agreements
Support
  • Guides & Support
  • Uptime & Outages
Portal
  • My PBX
  • My Hosting
  • Help Me

  BGP Telecom is a Telecommunications Industry Ombudsman (TIO) compliant business.

Copyright © 2023 BGP Group Pty. Ltd. | ABN: 25641461574