Skip to content
Facebook
  • My Portal
  • My PBX
  • My Hosting
  • Help Me
  • Business
    • 1300/1800 Number Plans
    • Business Internet
    • Business PABX Sign Up
    • Business Phone Plans
    • Equipment & Hardware
    • Hosting Pans
    • Microsoft Teams & VoIP
    • Mobile
    • SIP Trunking
  • Corporate
  • Need Help?
    • Guides & Support
    • Log a Ticket
    • Uptime & Outages
  • Contact Us
  • 1300 827 154
Menu
  • Business
    • 1300/1800 Number Plans
    • Business Internet
    • Business PABX Sign Up
    • Business Phone Plans
    • Equipment & Hardware
    • Hosting Pans
    • Microsoft Teams & VoIP
    • Mobile
    • SIP Trunking
  • Corporate
  • Need Help?
    • Guides & Support
    • Log a Ticket
    • Uptime & Outages
  • Contact Us
  • 1300 827 154
  • Residential
    • Mobile
  • Business
    • 1300/1800 Number Plans
    • Business Internet
    • Business PABX Sign Up
    • Business Phone Plans
    • Equipment & Hardware
    • Hosting Pans
    • Microsoft Teams & VoIP
    • Mobile
    • SIP Trunking
  • Corporate
  • Need Help?
    • Guides & Support
    • Log a Ticket
    • Uptime & Outages
  • Contact Us
  • 1300 827 154
Menu
  • Residential
    • Mobile
  • Business
    • 1300/1800 Number Plans
    • Business Internet
    • Business PABX Sign Up
    • Business Phone Plans
    • Equipment & Hardware
    • Hosting Pans
    • Microsoft Teams & VoIP
    • Mobile
    • SIP Trunking
  • Corporate
  • Need Help?
    • Guides & Support
    • Log a Ticket
    • Uptime & Outages
  • Contact Us
  • 1300 827 154

eFax

  • How To Use a Fax Machine
  • eFax Online
  • eFax Messenger
  • eFax By Email
  • Scan to Email – Brother
  • How to Prepare & Upload Voice Prompts to PBX Announcements

Handsets

  • Cisco
    • Manual Configuration of Cisco SPA IP Handsets
  • Yealink
    • Yealink DECT Handsets
    • Yealink Teams Phone Comparison
    • Paging Configuration on Yealink Devices
    • Transferring Calls on Yealink Handsets
    • Yealink SIP IP Phone Comparison
    • PBX Yealink T5 Dect Mode
    • Transfer calls using a Yealink DECT phone (W53H, W56H)
    • How to Change the Logo/Wallpaper on Yealink Handsets
    • Hold and Resume
  • Zoiper
    • Zoiper Softphone Configuration
    • Softphone Error Troubleshooting

Hosted PABX

  • Building Your Phone System
    • Device Twinning
    • How To Use Tabs In Your PBX
    • How to Configure Real Time Call Monitoring
    • How to Import/Export Call flow
    • How to Configure SMS to email
    • How to Restrict Dialing Destinations
    • How to Block or Hide Caller ID
    • How to Prepare & Upload Voice Prompts to PBX Announcements
    • How to set up User(s) with External Number(s)
    • How to Configure Global Blocklists
    • Default Settings Configurations
    • How to Configure Phonebooks
    • How to Configure Inbound Fax-to-Email
    • How to Configure Dial Tone Access (DISA)
    • How to Configure SIP Trunks
    • How to Configure PIN codes
    • How to Configure Blocklist
    • How to Configure Conferencing
    • How to Configure Call Parking
    • How to Configure Queue Wallboards
    • How to Configure Queue Callbacks
    • How to Configure Queue Priority
    • How to Configure Call Queues
    • How to Configure Ring Groups
    • How to Enable Call Recordings
    • How to use Set Caller ID
    • How to Configure CallerID Prefix
    • How to Configure Call Diversions
    • How to Configure DTMF prefix
    • How to Configure Your Automated Voice Menu (IVR)
    • How to Configure Your Automated Voice Menu (IVR)
    • How to Configure Custom Announcements & Prompts
    • How to Configure Geo Routing
    • How to Configure Call Flow Controls
    • How to Configure Time Conditions
    • How to Configure Inbound Email Alerts
    • How to Configure Voicemail
    • How to Configure a User License & Device License
    • How to Configure Web Callback
    • How to Configure Internal Numbers
    • How to Configure Inbound Numbers
  • Webphone
    • Webphone Overview
    • Webphone End User Set Up
    • Webphone Configuration
    • Webphone Troubleshooting

Internet

  • Home Internet troubleshooting
  • Connect Your BYO Modem

Microsoft Teams

  • How to Troubleshoot Microsoft Teams
  • Microsoft 365 Teams
  • Microsoft Teams Audio Conference Integration
  • Skype Communication via Microsoft Teams

On Premise PBX

  • Panasonic
    • How do I configure a Panasonic KX-NS SIP trunk?

SIP Trunks

  • Configuring a SIP trunk to 3CX
  • Home
  • Docs
  • Handsets
  • Yealink
  • PBX Yealink T5 Dect Mode

PBX Yealink T5 Dect Mode

Table of contents

t58dect.gif

The Yealink T53W,T54W,T57W, T58A, T58V and T59 are capable of acting as DECT base stationwhen using a Yealink DD10K Dect USB Dongle (purchased separately).

When acting as a base station, the T5handset itself is still fully capable of making and receiving calls, and can have W52H, W56H, W53H, and other handsets using the DD10K dongle paired to it.

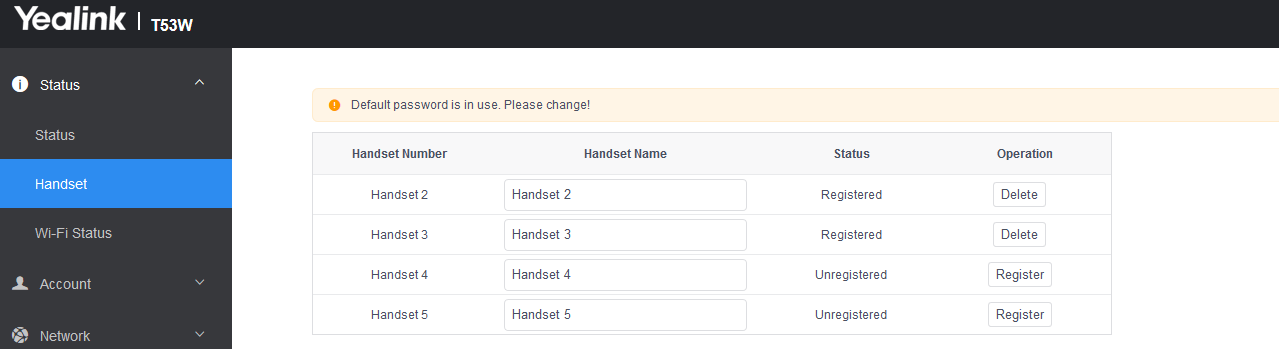
The T5can have up to four additional handsets registered to it and will behave the same as the traditional W60B base station.

Setting up the ‘base’ #

Once the DD10Khas been plugged in, you’ll get extra options on the phone itself and on the web interface to support registering new handsets.

If you wanted to register a new handset without using the web interface as pictured above, you can navigate to the DECT phone registration menu by pressing Menu->Settings->DECT Settings->Handsets

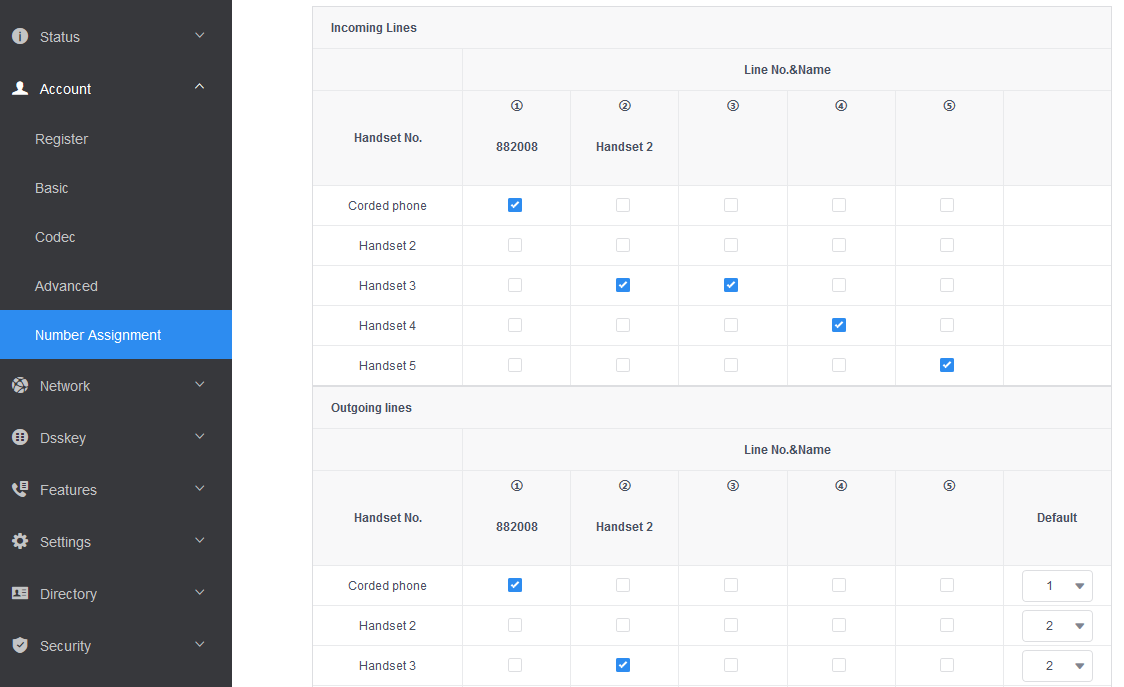
Once handsets are registered, you can allocate lines/accounts to each handset as you would on the regular base station by going to account->number assignment

Transferring calls between handsets #

Once you’ve got some handsets registered to the phone, you can transfer calls between the handsets using transfer->intercom and then selecting the handset you want to transfer to.

Transferring in master/slave mode

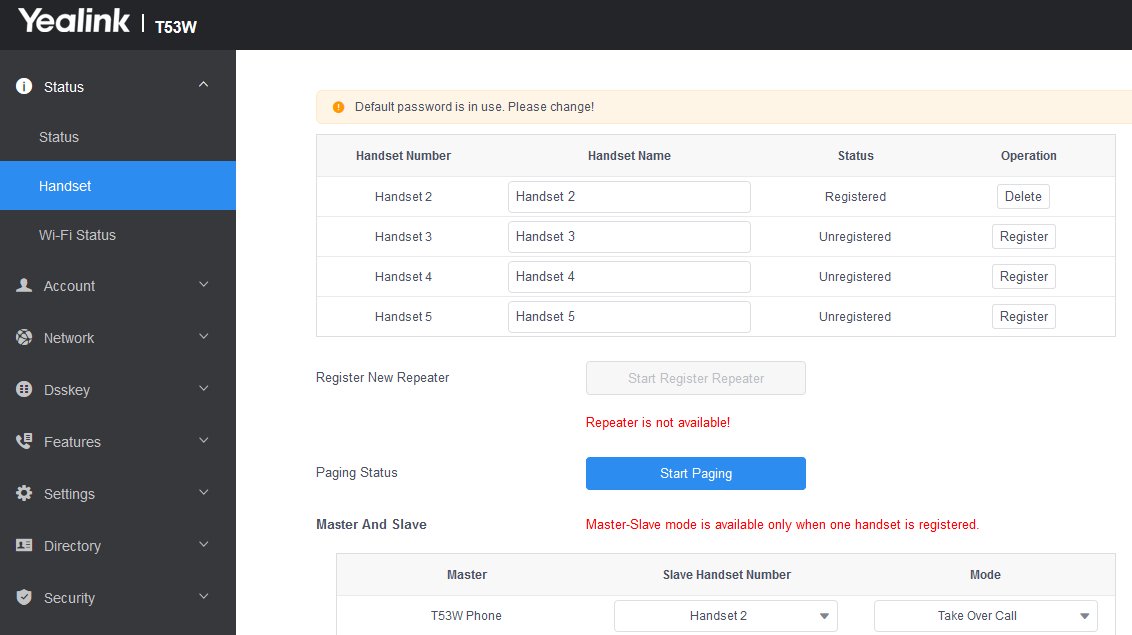
If you’ve got just one DECT phone registered to the T5, you can enable the DECT handset into a master/slave mode, where you can seamlessly transfer calls between the T5phone and the registered DECThandset. This can be enabled via the web interface using the handset status page. Or it can be enabled on the T5 phone itself by navigating to Menu->Settings->DECT Settings->Select Slave.

When done, theslave phone will ring alongside the master. Both can call out using the same caller ID and extension number. When calls are answered on themasterT5you can transfer the call by pressing the more soft key and then pressing the call shift button. This will automatically transfer the call to theslave handset. Theslave handset can transfer back using the regular transfer->intercom option.

Note that on aT58A orT58V there is nomore soft key during a call. Instead, swipe right on the call to reveal thecall shift

Please note that if themaster/slave mode is set tobusy, then calls cannot be transferred between the two phones.

What are your Feelings
Share This Article :
  • Facebook
  • Twitter
  • LinkedIn
  • Pinterest
Still stuck? How can we help?

How can we help?

Updated on 20 June 2023
Table of Contents
  • Setting up the 'base'
  • Transferring calls between handsets
About Us
  • Contact Us
  • Privacy Policy
  • Service Agreements
Support
  • Guides & Support
  • Uptime & Outages
Portal
  • My PBX
  • My Hosting
  • Help Me

  BGP Telecom is a Telecommunications Industry Ombudsman (TIO) compliant business.

Copyright © 2023 BGP Group Pty. Ltd. | ABN: 25641461574