Skip to content
Facebook
  • My Portal
  • My PBX
  • My Hosting
  • Help Me
  • Business
    • 1300/1800 Number Plans
    • Business Internet
    • Business PABX Sign Up
    • Business Phone Plans
    • Equipment & Hardware
    • Hosting Pans
    • Microsoft Teams & VoIP
    • Mobile
    • SIP Trunking
  • Corporate
  • Need Help?
    • Guides & Support
    • Log a Ticket
    • Uptime & Outages
  • Contact Us
  • 1300 827 154
Menu
  • Business
    • 1300/1800 Number Plans
    • Business Internet
    • Business PABX Sign Up
    • Business Phone Plans
    • Equipment & Hardware
    • Hosting Pans
    • Microsoft Teams & VoIP
    • Mobile
    • SIP Trunking
  • Corporate
  • Need Help?
    • Guides & Support
    • Log a Ticket
    • Uptime & Outages
  • Contact Us
  • 1300 827 154
  • Residential
    • Mobile
  • Business
    • 1300/1800 Number Plans
    • Business Internet
    • Business PABX Sign Up
    • Business Phone Plans
    • Equipment & Hardware
    • Hosting Pans
    • Microsoft Teams & VoIP
    • Mobile
    • SIP Trunking
  • Corporate
  • Need Help?
    • Guides & Support
    • Log a Ticket
    • Uptime & Outages
  • Contact Us
  • 1300 827 154
Menu
  • Residential
    • Mobile
  • Business
    • 1300/1800 Number Plans
    • Business Internet
    • Business PABX Sign Up
    • Business Phone Plans
    • Equipment & Hardware
    • Hosting Pans
    • Microsoft Teams & VoIP
    • Mobile
    • SIP Trunking
  • Corporate
  • Need Help?
    • Guides & Support
    • Log a Ticket
    • Uptime & Outages
  • Contact Us
  • 1300 827 154

eFax

  • How To Use a Fax Machine
  • eFax Online
  • eFax Messenger
  • eFax By Email
  • Scan to Email – Brother
  • How to Prepare & Upload Voice Prompts to PBX Announcements

Handsets

  • Cisco
    • Manual Configuration of Cisco SPA IP Handsets
  • Yealink
    • Yealink DECT Handsets
    • Yealink Teams Phone Comparison
    • Paging Configuration on Yealink Devices
    • Transferring Calls on Yealink Handsets
    • Yealink SIP IP Phone Comparison
    • PBX Yealink T5 Dect Mode
    • Transfer calls using a Yealink DECT phone (W53H, W56H)
    • How to Change the Logo/Wallpaper on Yealink Handsets
    • Hold and Resume
  • Zoiper
    • Zoiper Softphone Configuration
    • Softphone Error Troubleshooting

Hosted PABX

  • Building Your Phone System
    • Device Twinning
    • How To Use Tabs In Your PBX
    • How to Configure Real Time Call Monitoring
    • How to Import/Export Call flow
    • How to Configure SMS to email
    • How to Restrict Dialing Destinations
    • How to Block or Hide Caller ID
    • How to Prepare & Upload Voice Prompts to PBX Announcements
    • How to set up User(s) with External Number(s)
    • How to Configure Global Blocklists
    • Default Settings Configurations
    • How to Configure Phonebooks
    • How to Configure Inbound Fax-to-Email
    • How to Configure Dial Tone Access (DISA)
    • How to Configure SIP Trunks
    • How to Configure PIN codes
    • How to Configure Blocklist
    • How to Configure Conferencing
    • How to Configure Call Parking
    • How to Configure Queue Wallboards
    • How to Configure Queue Callbacks
    • How to Configure Queue Priority
    • How to Configure Call Queues
    • How to Configure Ring Groups
    • How to Enable Call Recordings
    • How to use Set Caller ID
    • How to Configure CallerID Prefix
    • How to Configure Call Diversions
    • How to Configure DTMF prefix
    • How to Configure Your Automated Voice Menu (IVR)
    • How to Configure Your Automated Voice Menu (IVR)
    • How to Configure Custom Announcements & Prompts
    • How to Configure Geo Routing
    • How to Configure Call Flow Controls
    • How to Configure Time Conditions
    • How to Configure Inbound Email Alerts
    • How to Configure Voicemail
    • How to Configure a User License & Device License
    • How to Configure Web Callback
    • How to Configure Internal Numbers
    • How to Configure Inbound Numbers
  • Webphone
    • Webphone Overview
    • Webphone End User Set Up
    • Webphone Configuration
    • Webphone Troubleshooting

Internet

  • Home Internet troubleshooting
  • Connect Your BYO Modem

Microsoft Teams

  • How to Troubleshoot Microsoft Teams
  • Microsoft 365 Teams
  • Microsoft Teams Audio Conference Integration
  • Skype Communication via Microsoft Teams

On Premise PBX

  • Panasonic
    • How do I configure a Panasonic KX-NS SIP trunk?

SIP Trunks

  • Configuring a SIP trunk to 3CX
  • Home
  • Docs
  • Hosted PABX
  • Building Your Phone System
  • How to Configure Web Callback

How to Configure Web Callback

Introduction #

At the end of this article, you will be able to add and configure the Web Callback Feature within your PBX configuration. Should you need any assistance, feel free to contact our support department.

Ordering SIP trunks #

Web Callback feature is a javascript widget that will allow visitors to request an immediate call directly available from your website. This is commonly known as click to call. In order to make calls from the PBX, you will need to order a SIP trunk plan including the number of channels required. Please, note that the number of channels determines the number of simultaneous calls for the trunk. To order, firstly, select the ‘Order Services’ tab, click on ‘SIP trunks’ from the left menu and add a new trunk. Once added, enter a descriptive name and its number of channels. Finally, agree to the service term and submit the order, as shown in the image below.

mceclip0.png

Configuring the Web Callback feature #

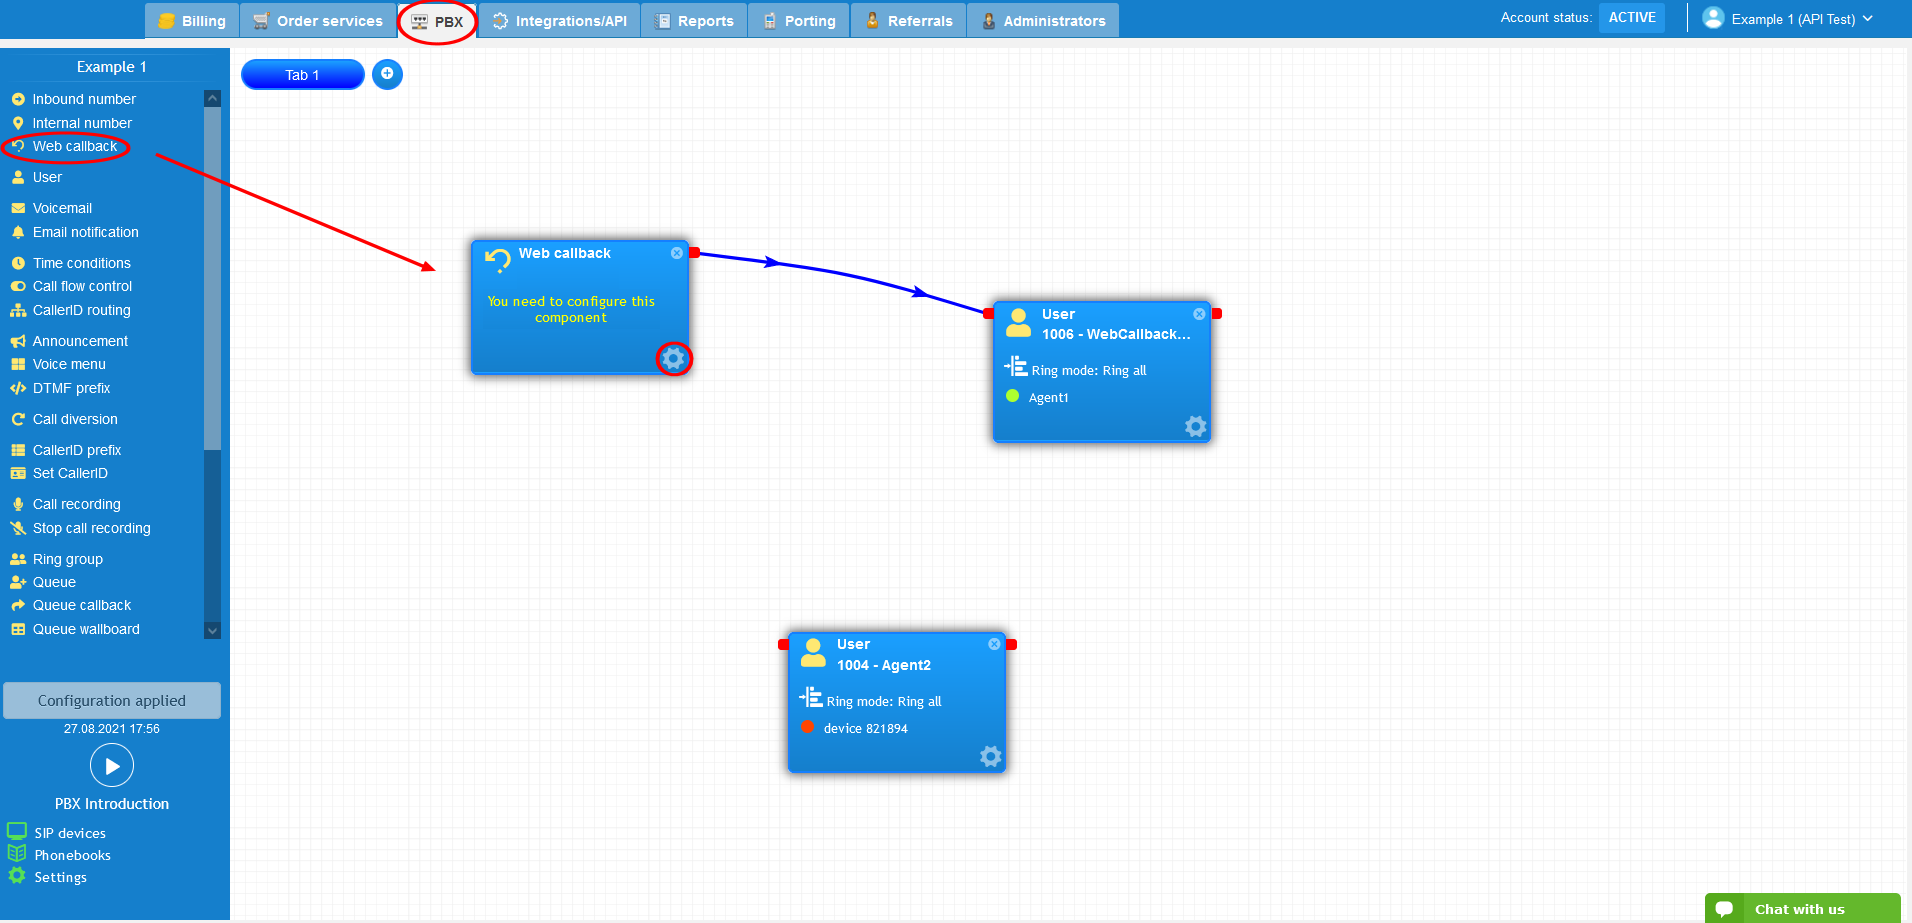
To configure the Web Callback feature, select the PBX tab, and drag and drop the Web Callback object from the left-hand menu onto the main screen. Next, click on the settings icon towards the bottom-right corner of the object.

2.png

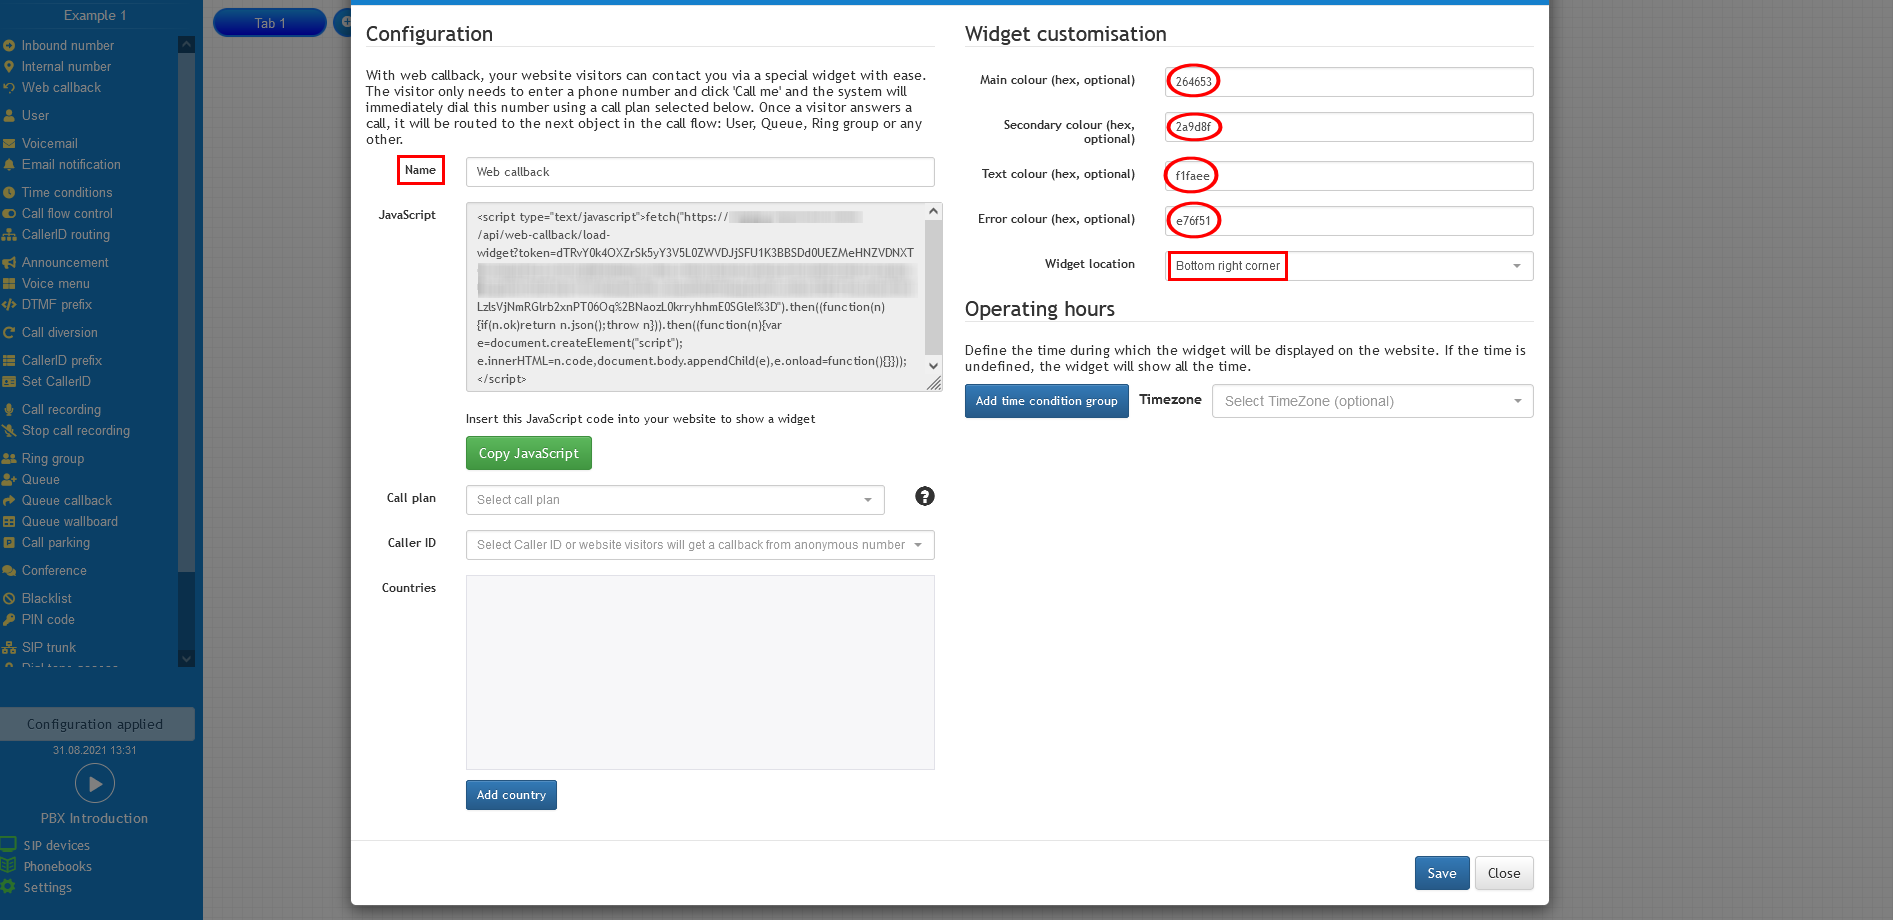
The settings window will pop up next prompting you to enter a descriptive name for the object and personalise the widget colours by entering any colour codes. The colour codes can be found on this link. Please note that entering the colour codes is an optional functionality. If you choose not to add custom codes, the object colours will be set using the default colours displayed. In the ‘widget location’ field, select the position of the VoIP icon on your website.

3.png

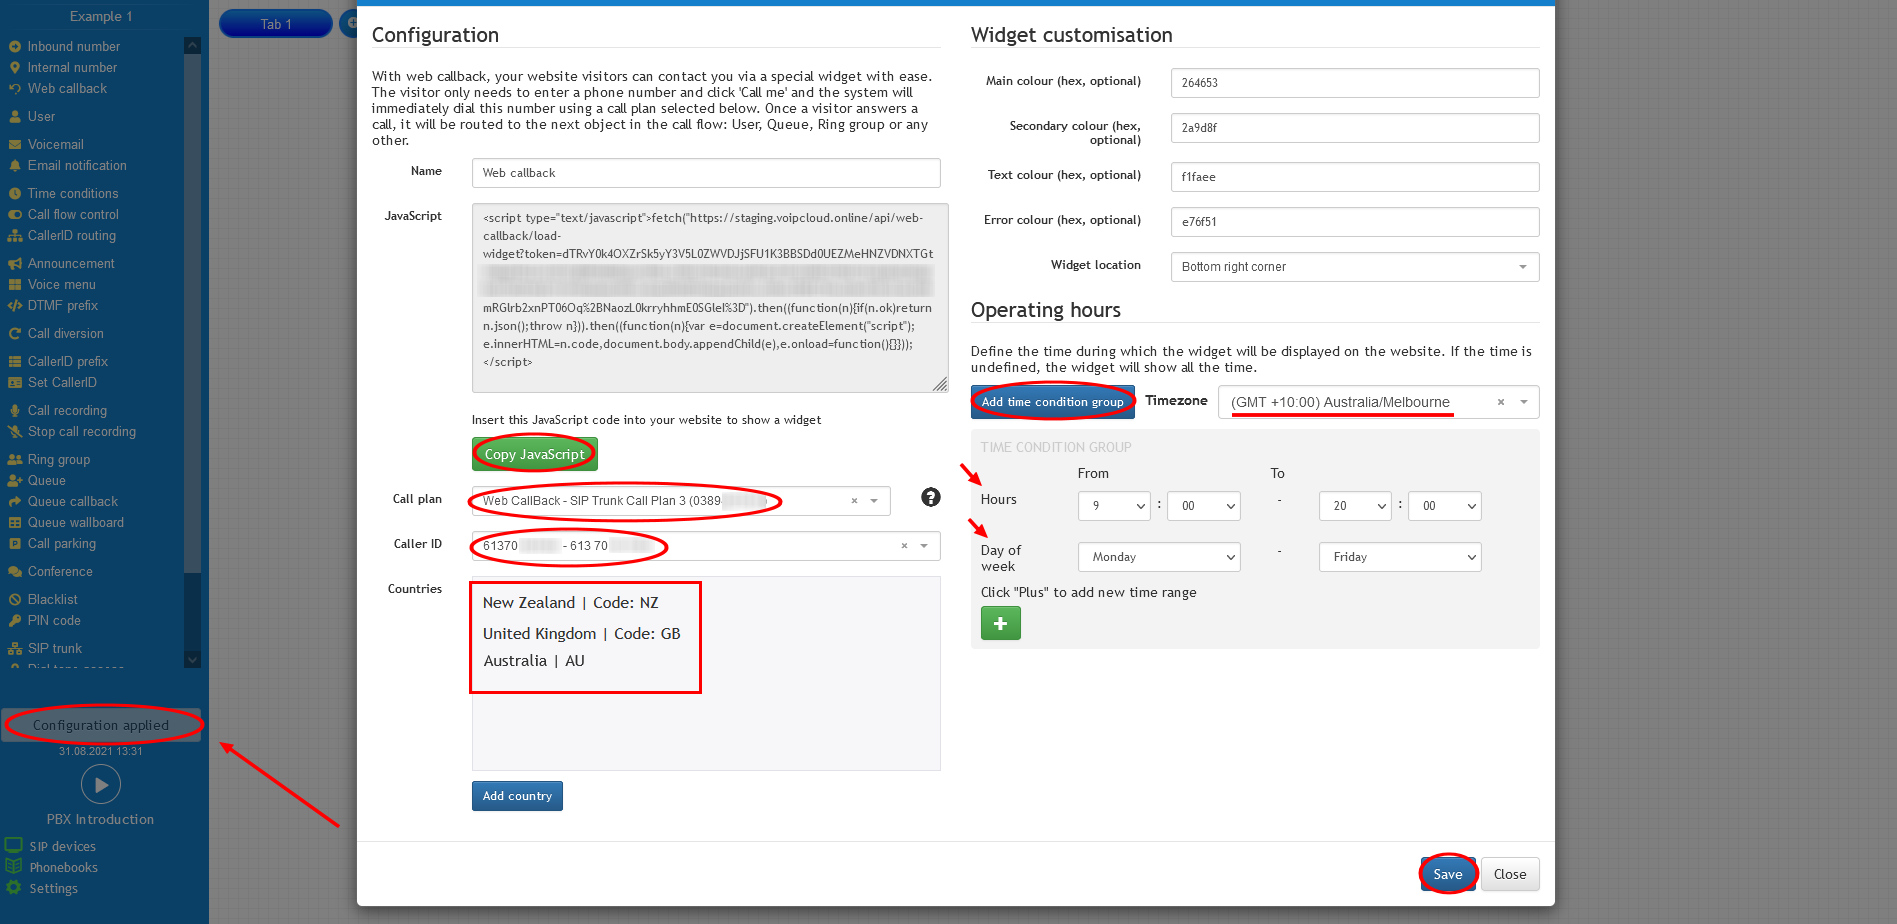
Following that, click on the call plan and caller ID dropdowns to choose the SIP trunk call plan previously ordered and the caller ID respectively. The caller ID defines the number that will be displayed for the visitor who requested the callback. Below the caller ID, click on ‘Add country’ to allow from which countries telephone numbers can be entered to request a callback from the website. Otherwise, calls will not be placed.

Lastly, similar to the time conditions object, you can determine when the widget will be available on the website. To configure, click on the “Add time condition group” button located under the operating hours, then click the green plus icon to add the required metrics. On clicking the plus icon, you can add hours, day of the week, date and month conditions. Don’t forget to define the timezone that the time conditions should match.

Once the web callback object has been configured, copy the javascript code to paste later on your website source code by hitting the green button “Copy Javascript”. Then, press the button save and apply the configuration.

4.png

Head back to the call flow, connect the Web Callback object to a user, queue or ring group, and apply the configuration.

6.PNG

Configuring the web callback on your website #

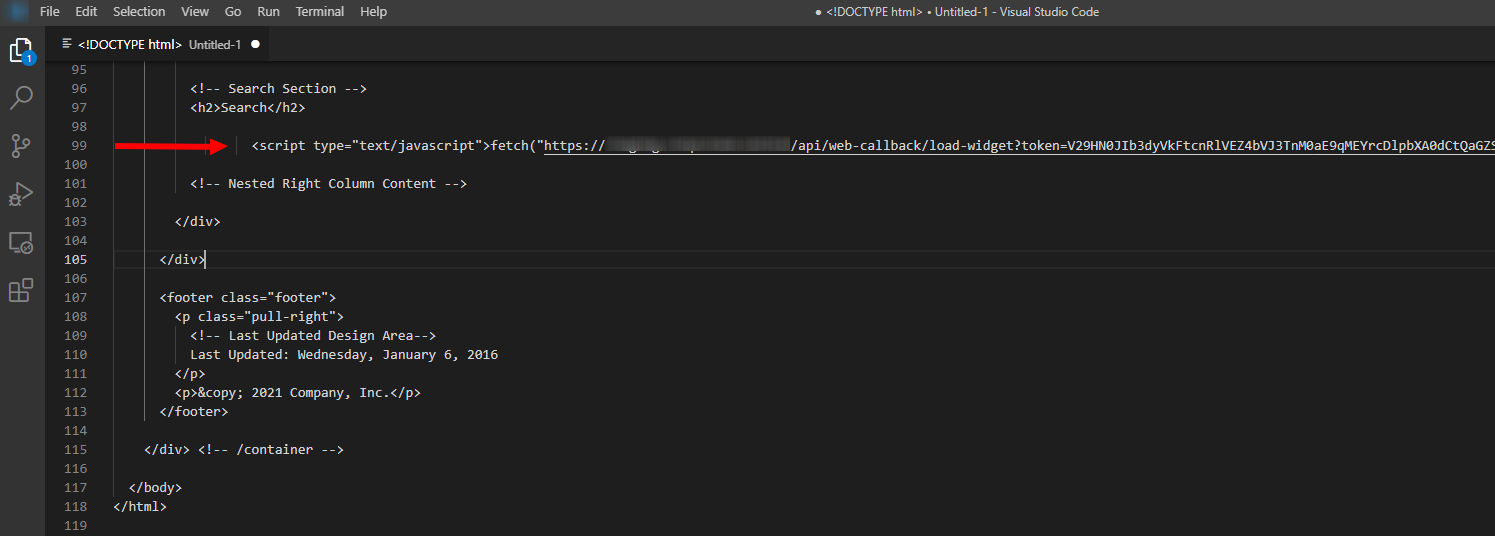
To display the Web Callback widget on the website, copy the JavaScript code from within the object into the website’s source code. The script can be added to any part of the website code. In the figure below, the JavaScript code has been added to the HTML’s body.

5.png

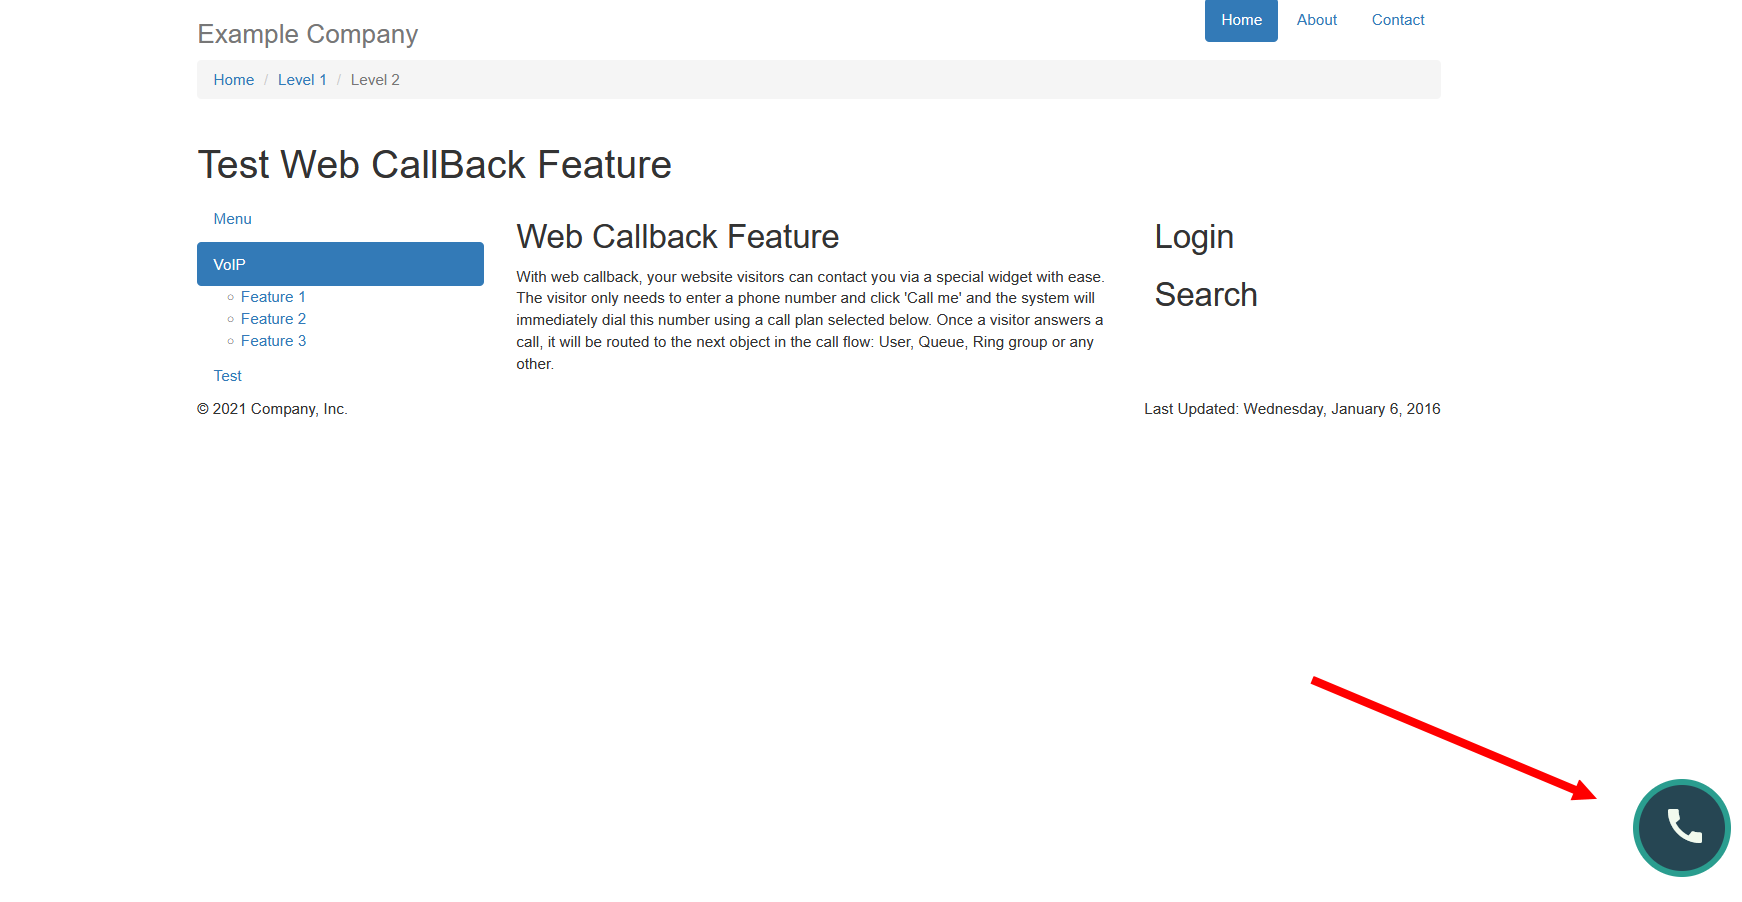
If you have followed all steps correctly until now, the phone icon should appear on the website. If you cannot see it, please refresh your browser.

8.png

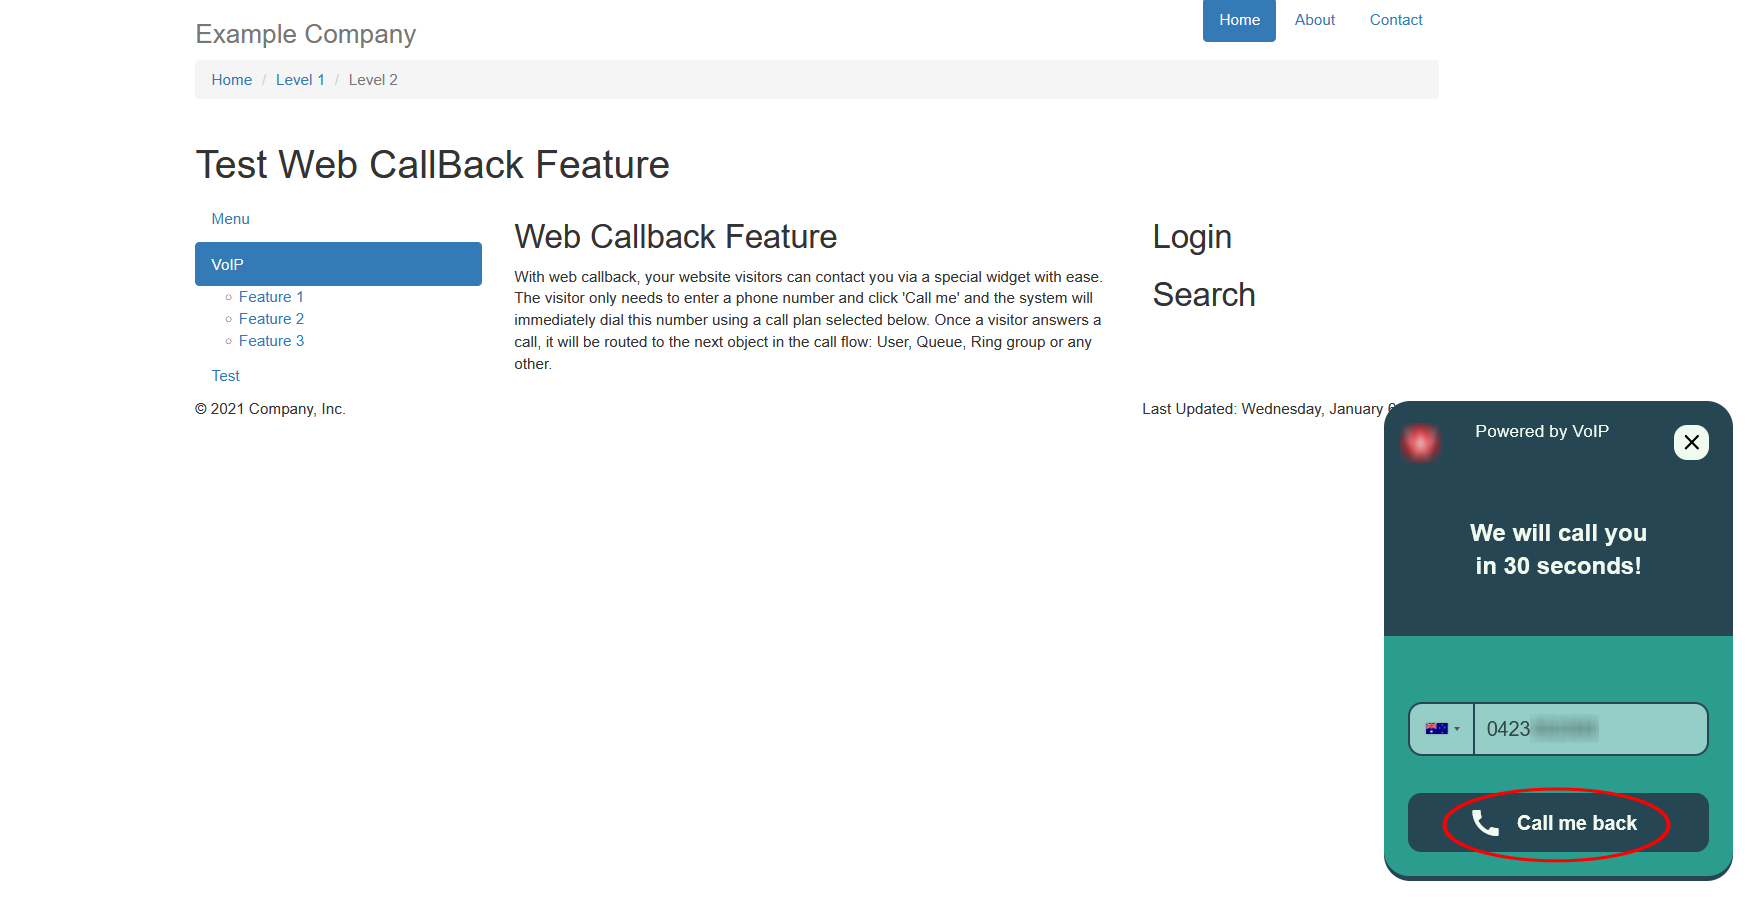
Now, click on the widget, the following window will pop up; select the country’s flag you are located in, enter a phone number and hit the button “call me back”. Both, the visitor and the agent will receive a call and they will be connected in 30 seconds.

9.png

Web Callback feature usages #

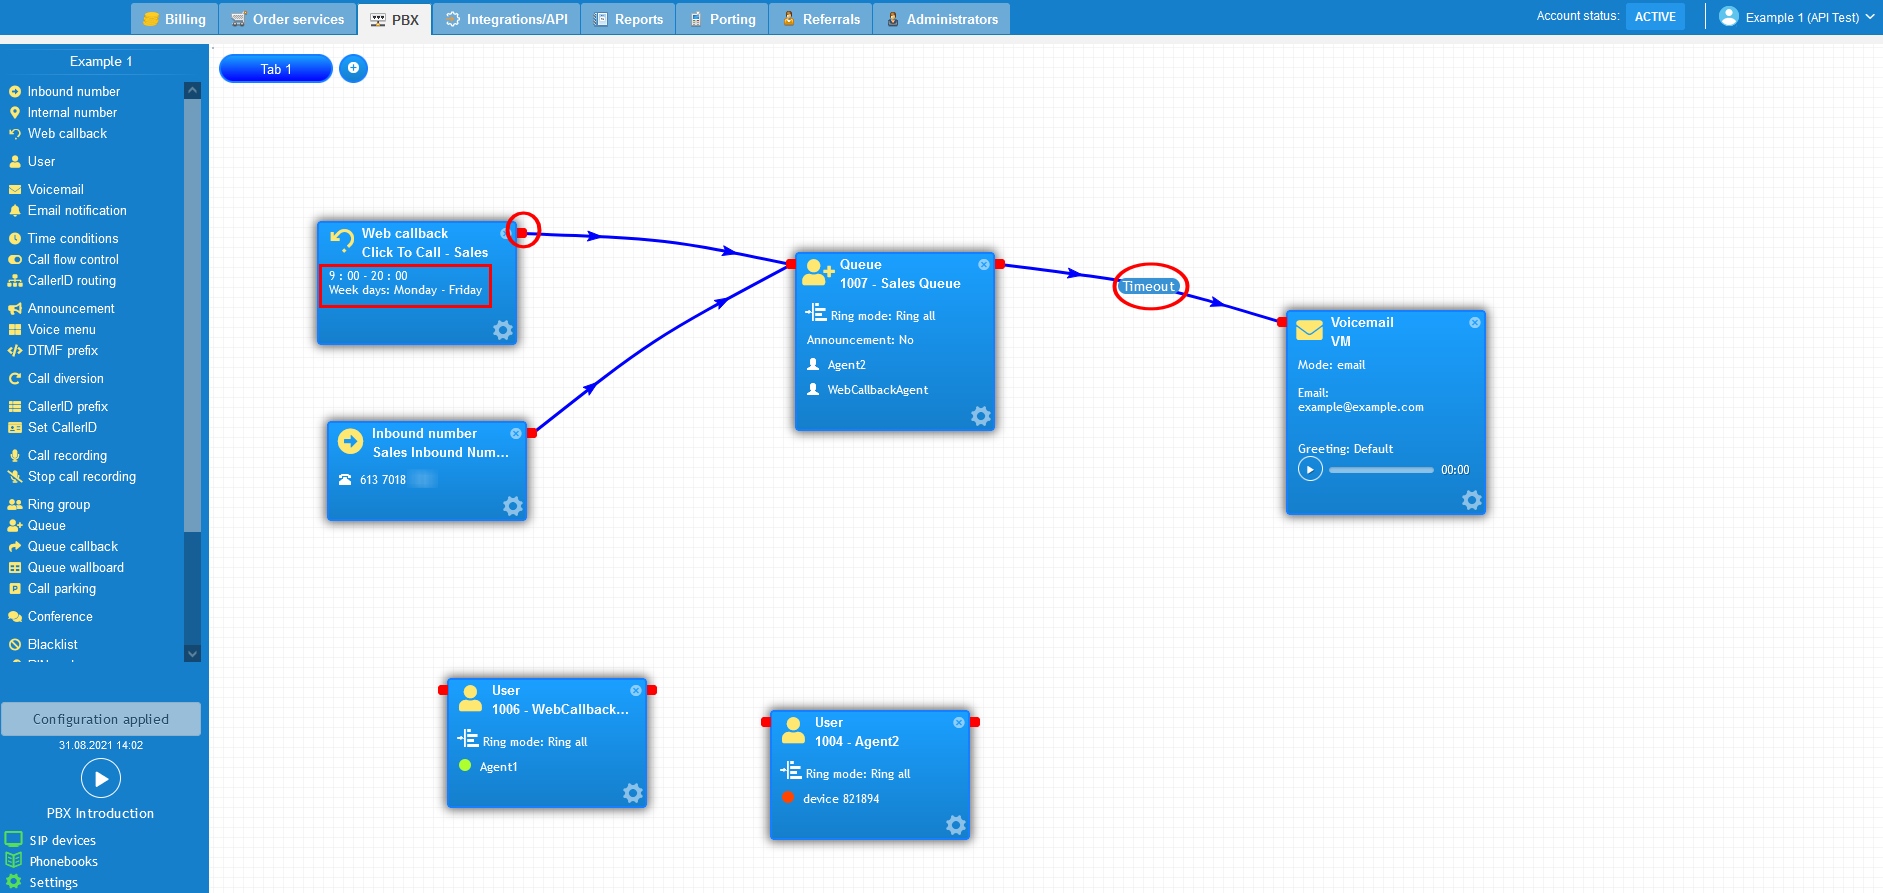
A large company desires to increase its sales funnel to convert into a higher number of customers. For that, the headquarters have decided to implement the Web Callback on their website connecting the sales agents to the website’s visitors within 30 seconds. The following image shows the company’s call flow, the Web Callback and inbound number objects are connected to the sales queue in which agents answer customers calls.

7.png

Watch this in action #

The video below will show you a visual representation of the areas covered throughout this knowledge base guide.

webcallback.gif
What are your Feelings
Share This Article :
  • Facebook
  • Twitter
  • LinkedIn
  • Pinterest
Still stuck? How can we help?

How can we help?

Updated on 6 August 2023
How To Use Tabs In Your PBX
Table of Contents
  • Introduction
  • Ordering SIP trunks
  • Configuring the Web Callback feature
  • Configuring the web callback on your website
  • Web Callback feature usages
  • Watch this in action
About Us
  • Contact Us
  • Privacy Policy
  • Service Agreements
Support
  • Guides & Support
  • Uptime & Outages
Portal
  • My PBX
  • My Hosting
  • Help Me

  BGP Telecom is a Telecommunications Industry Ombudsman (TIO) compliant business.

Copyright © 2023 BGP Group Pty. Ltd. | ABN: 25641461574