Skip to content
  • support@bgpgroup.com.au
  • 1300 827 154
  • NBN Coverage
  • Opticomm Coverage
  • My PABX
  • Home
  • Internet Plans
  • Mobile Plans
  • Business
    • Hosted Pbx
    • Microsoft Teams Voip
    • Phone Packages
    • Docs
  • Need Help?
    • Guides & Support
    • Uptime & Outages
  • Contact Us
Login / Register
$0.00 0 Cart

eFax

  • How to Prepare & Upload Voice Prompts to PBX Announcements
  • Scan to Email – Brother
  • eFax By Email
  • eFax Messenger
  • eFax Online
  • How To Use a Fax Machine

Handsets

  • Cisco
    • Manual Configuration of Cisco SPA IP Handsets
  • Yealink
    • Hold and Resume
    • How to Change the Logo/Wallpaper on Yealink Handsets
    • Transfer calls using a Yealink DECT phone (W53H, W56H)
    • PBX Yealink T5 Dect Mode
    • Yealink SIP IP Phone Comparison
    • Transferring Calls on Yealink Handsets
    • Paging Configuration on Yealink Devices
    • Yealink Teams Phone Comparison
    • Yealink DECT Handsets
  • Zoiper
    • Softphone Error Troubleshooting
    • Zoiper Softphone Configuration

Hosted PABX

  • Building Your Phone System
    • How to Configure Inbound Numbers
    • How to Configure Internal Numbers
    • How to Configure Web Callback
    • How to Configure a User License & Device License
    • How to Configure Voicemail
    • How to Configure Inbound Email Alerts
    • How to Configure Time Conditions
    • How to Configure Call Flow Controls
    • How to Configure Geo Routing
    • How to Configure Custom Announcements & Prompts
    • How to Configure Your Automated Voice Menu (IVR)
    • How to Configure Your Automated Voice Menu (IVR)
    • How to Configure DTMF prefix
    • How to Configure Call Diversions
    • How to Configure CallerID Prefix
    • How to use Set Caller ID
    • How to Enable Call Recordings
    • How to Configure Ring Groups
    • How to Configure Call Queues
    • How to Configure Queue Priority
    • How to Configure Queue Callbacks
    • How to Configure Queue Wallboards
    • How to Configure Inbound Fax-to-Email
    • How to Configure Phonebooks
    • Default Settings Configurations
    • How to Configure Global Blocklists
    • How to set up User(s) with External Number(s)
    • How to Prepare & Upload Voice Prompts to PBX Announcements
    • How to Block or Hide Caller ID
    • How to Restrict Dialing Destinations
    • How to Configure SMS to email
    • How to Import/Export Call flow
    • How to Configure Real Time Call Monitoring
    • How To Use Tabs In Your PBX
    • Device Twinning
    • How to Configure Call Parking
    • How to Configure Conferencing
    • How to Configure Blocklist
    • How to Configure PIN codes
    • How to Configure SIP Trunks
    • How to Configure Dial Tone Access (DISA)
  • Webphone
    • Webphone Troubleshooting
    • Webphone Configuration
    • Webphone End User Set Up
    • Webphone Overview

Internet

  • Connect Your BYO Modem
  • Home Internet troubleshooting

Microsoft Teams

  • Skype Communication via Microsoft Teams
  • Microsoft Teams Audio Conference Integration
  • Microsoft 365 Teams
  • How to Troubleshoot Microsoft Teams

On Premise PBX

  • Panasonic
    • How do I configure a Panasonic KX-NS SIP trunk?

SIP Trunks

  • Configuring a SIP trunk to 3CX
View Categories
  • Home
  • Docs
  • Hosted PABX
  • Building Your Phone System
  • How to Enable Call Recordings

How to Enable Call Recordings

3 min read

Introduction #

At the end of this article, you will be able to configure the PBX call recording object within your call flow on the PBX tab. The article will also assist you with some common uses of the object within your call flow configuration. Should you need any assistance, feel free to contact our support department.

Configuring a PBX call recording #

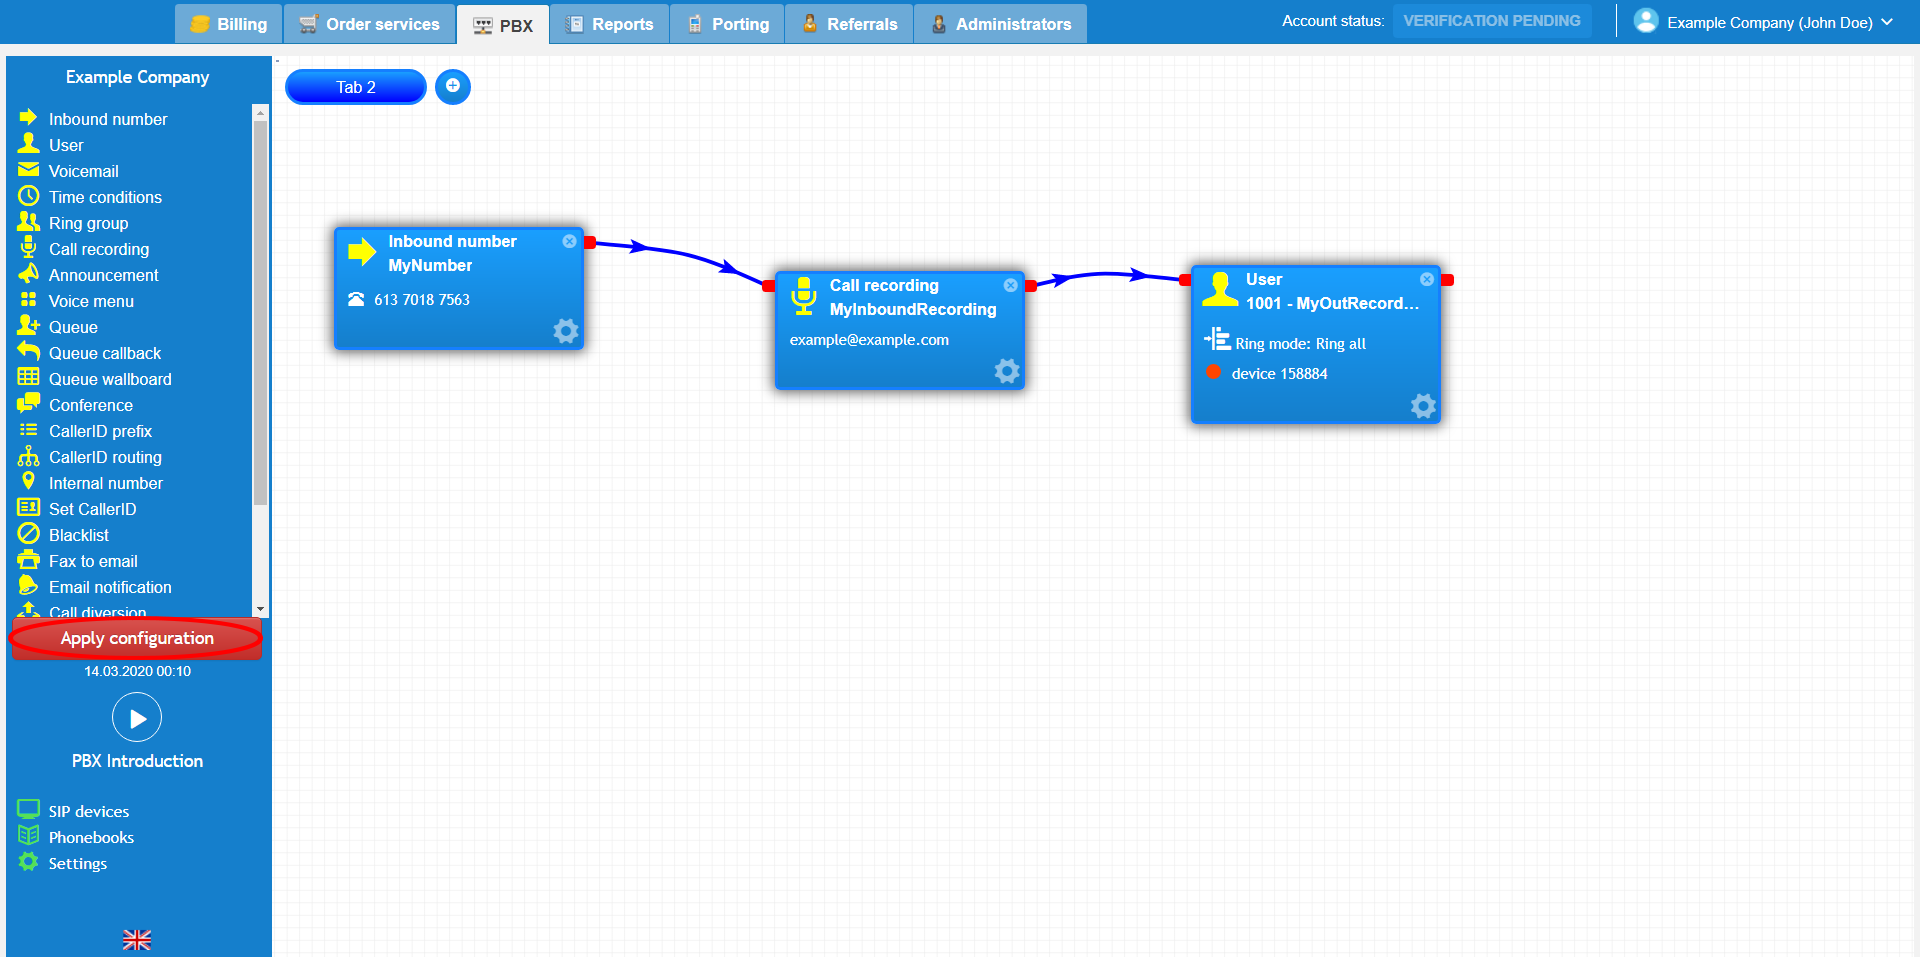
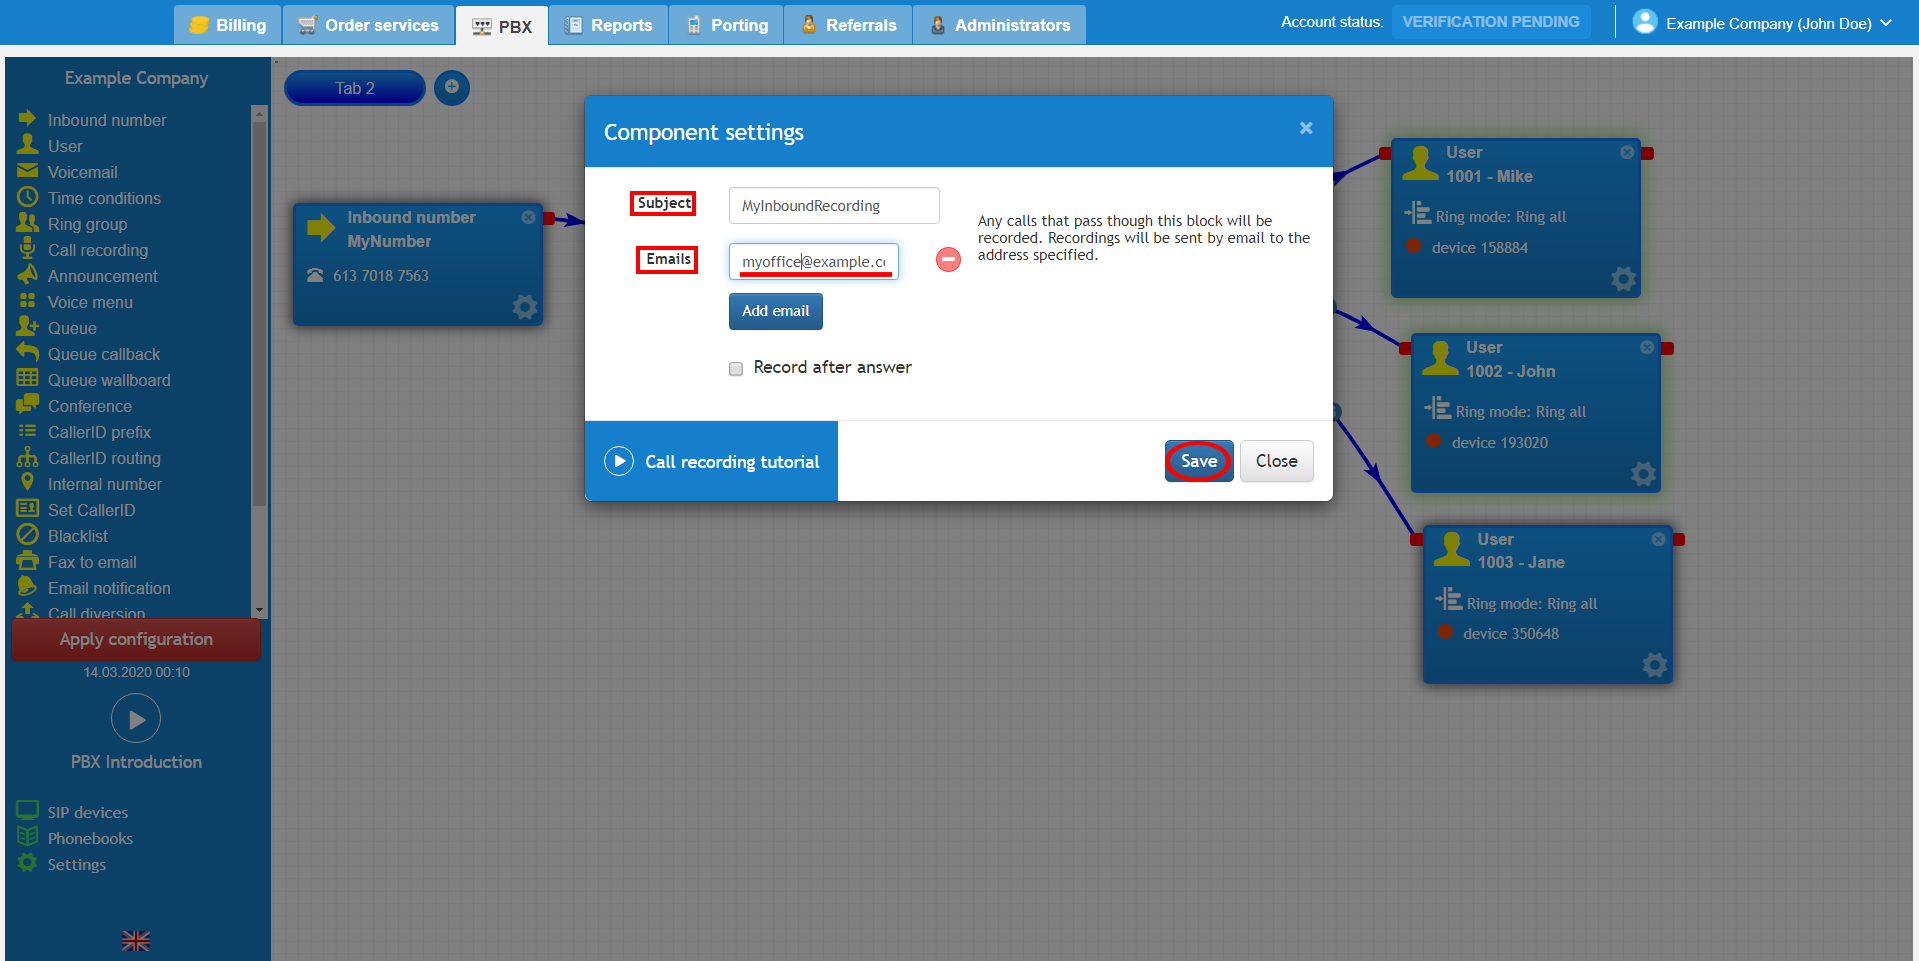
PBX call recording object is a feature that allows you to record inbound calls, which are then sent to the nominated email address. However, for outbound call recording, it is necessary to set it up on the user object. Once you have logged into the customer portal click on the PBX tab.Then select the call recording object from the toolbox menu on the left, drag and drop it onto the main configuration screen. Next, click on the settings icon.

callrecording1.PNG

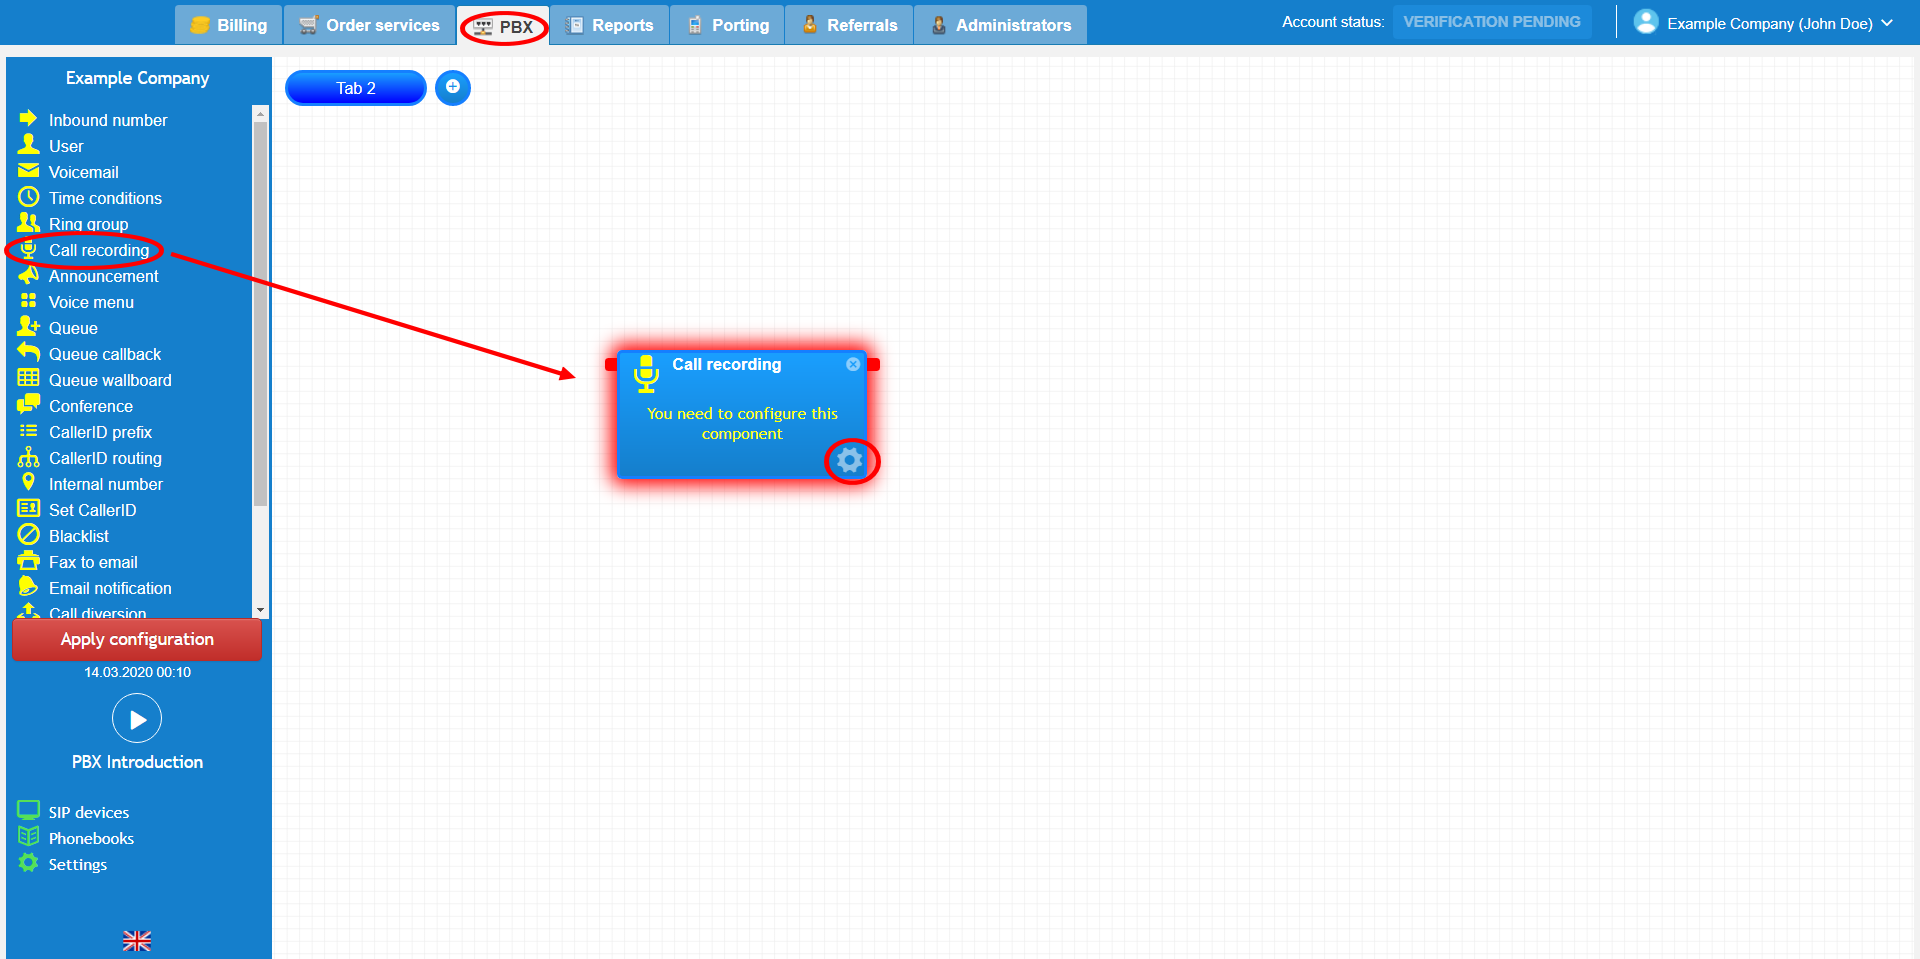
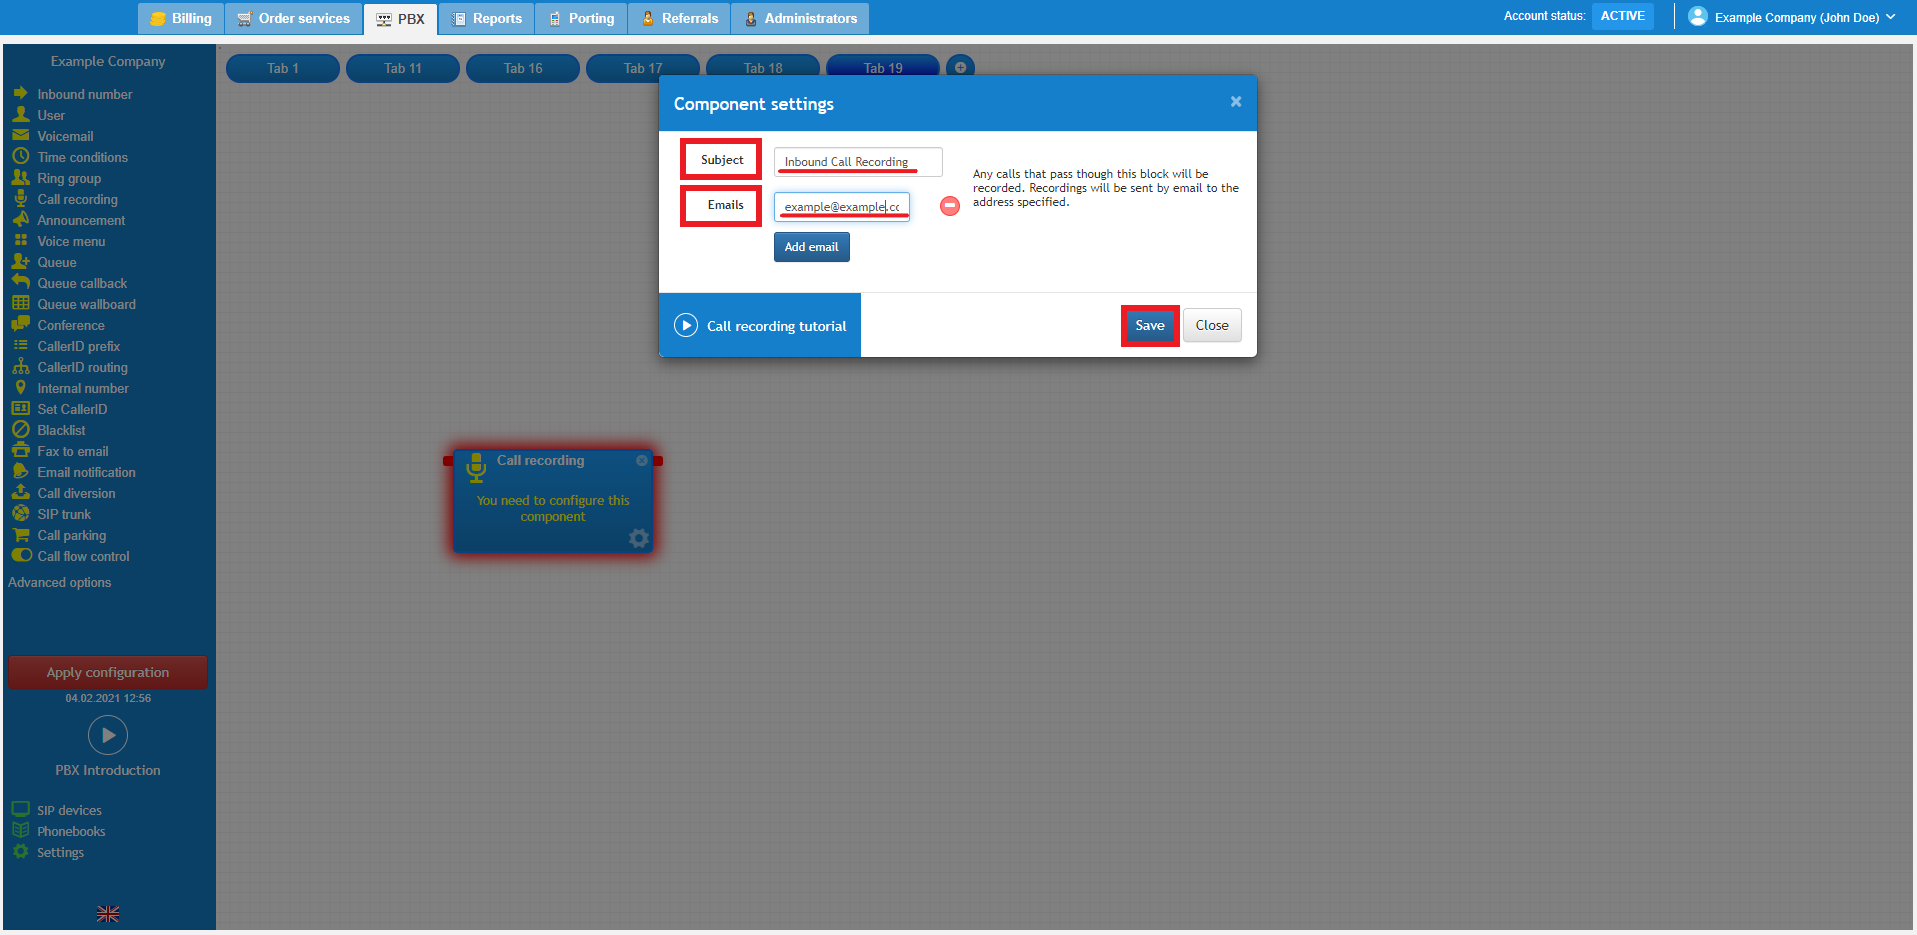
After that, enter the subject and an email address(s) you would like to be sent to for this inbound call recording object. The call will begin recording as soon as the call reaches the call recording object. This may result in a multitude of emails being sent with ringing tones at the start of the inbound call recordings.

tempsnip.png

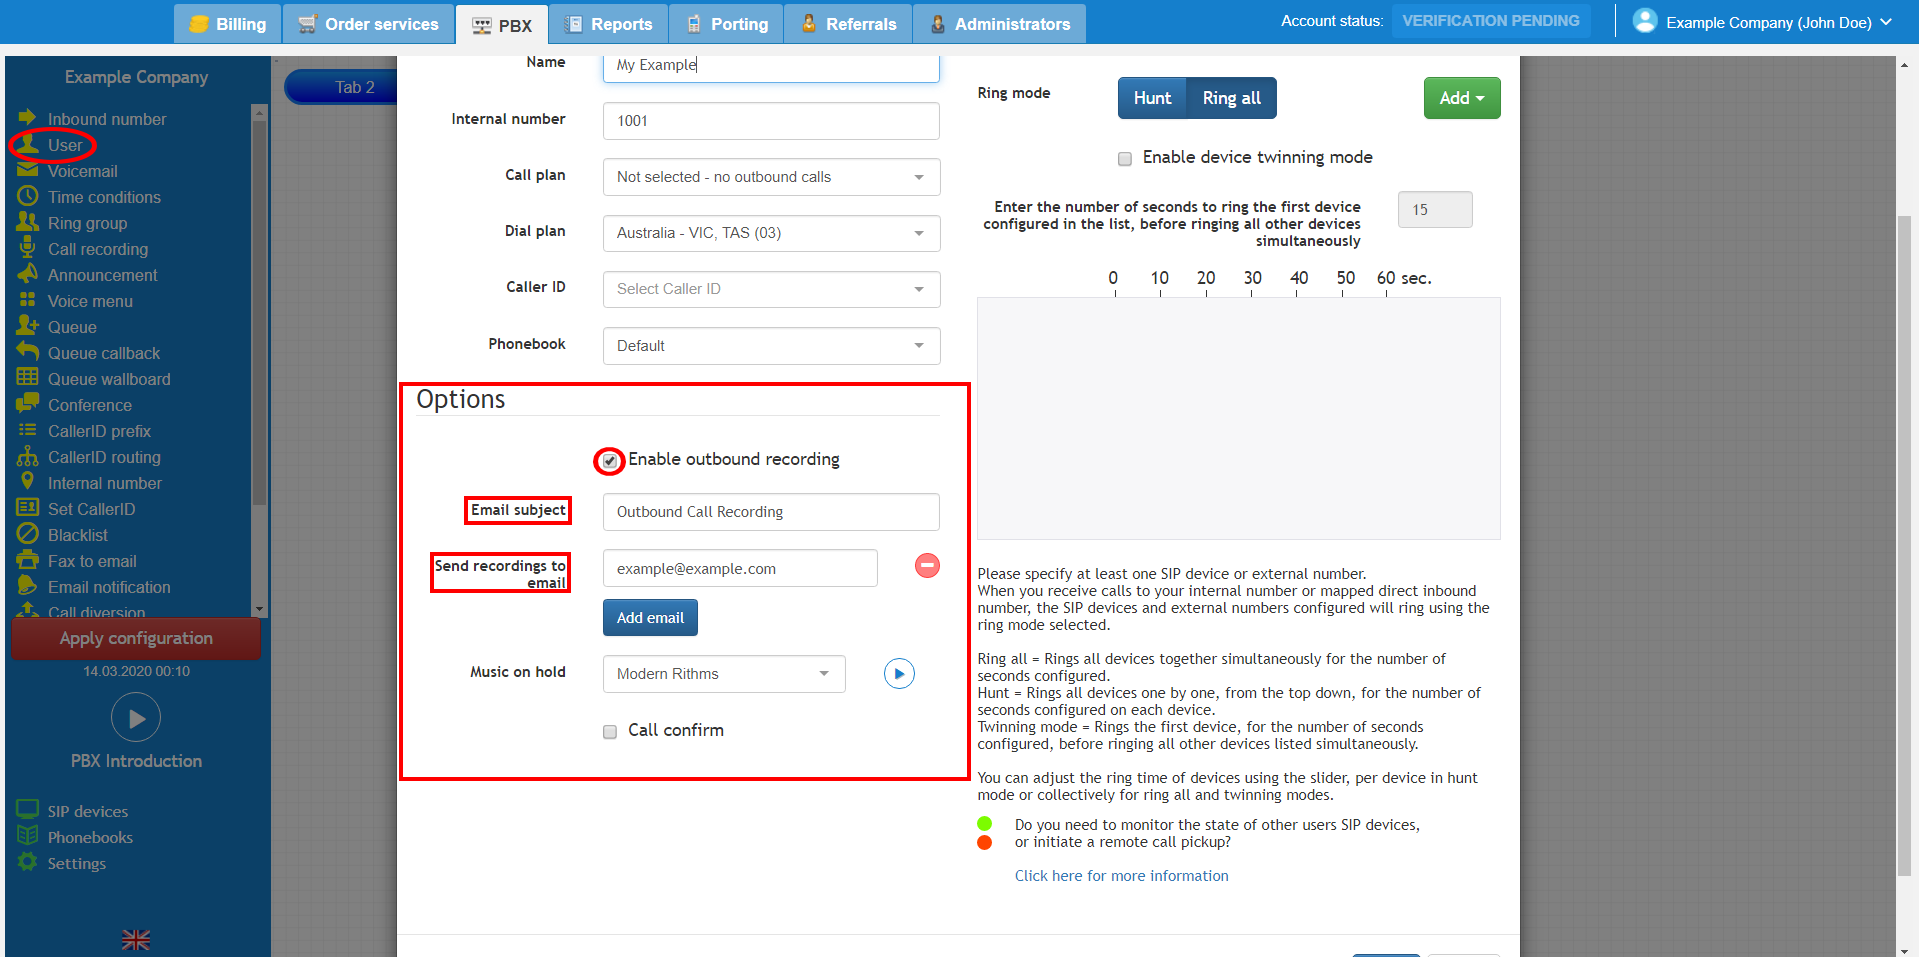
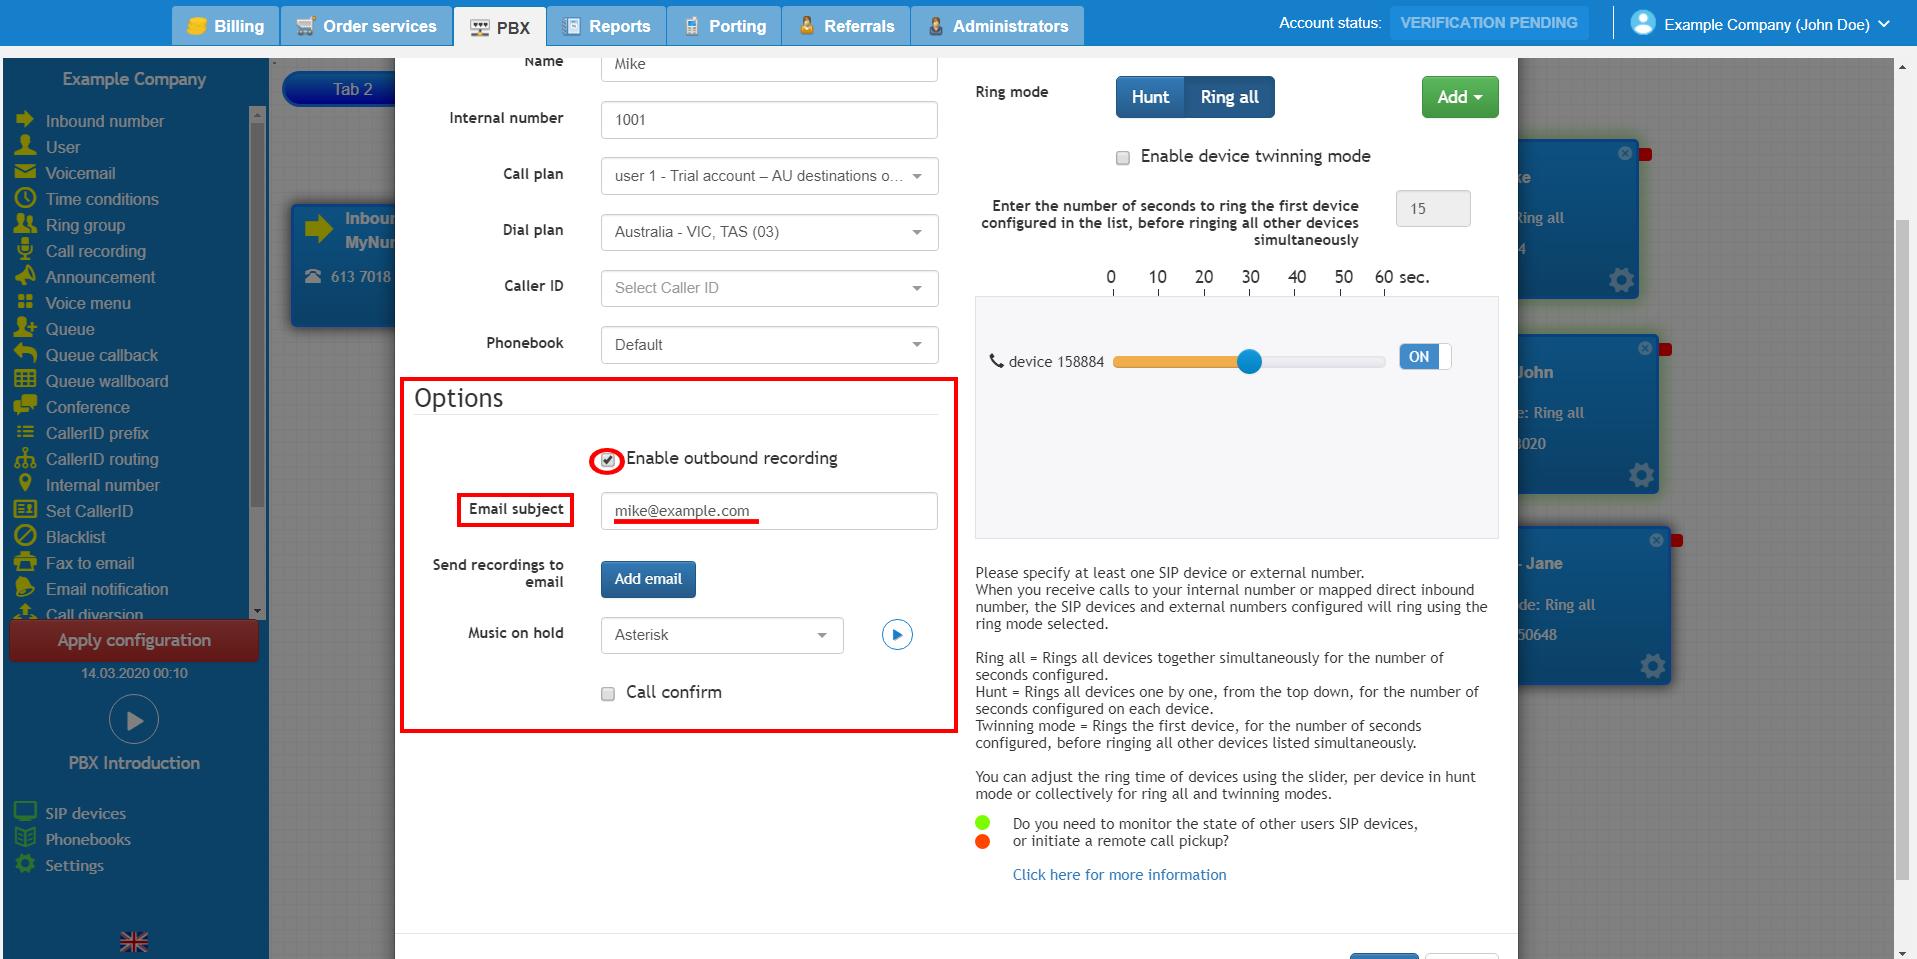
To configure outbound call recording, you should select the user object and click the enable outbound call recording checkbox. Then, enter the subject and the email address that you would like outbound call recordings for this user to be sent to.

callrecording3.PNG

Finally, connect the call recording object into your call flow and test an inbound call. Don’t forget to apply the new configuration.

callrecording4.PNG

PBX call recording usage #

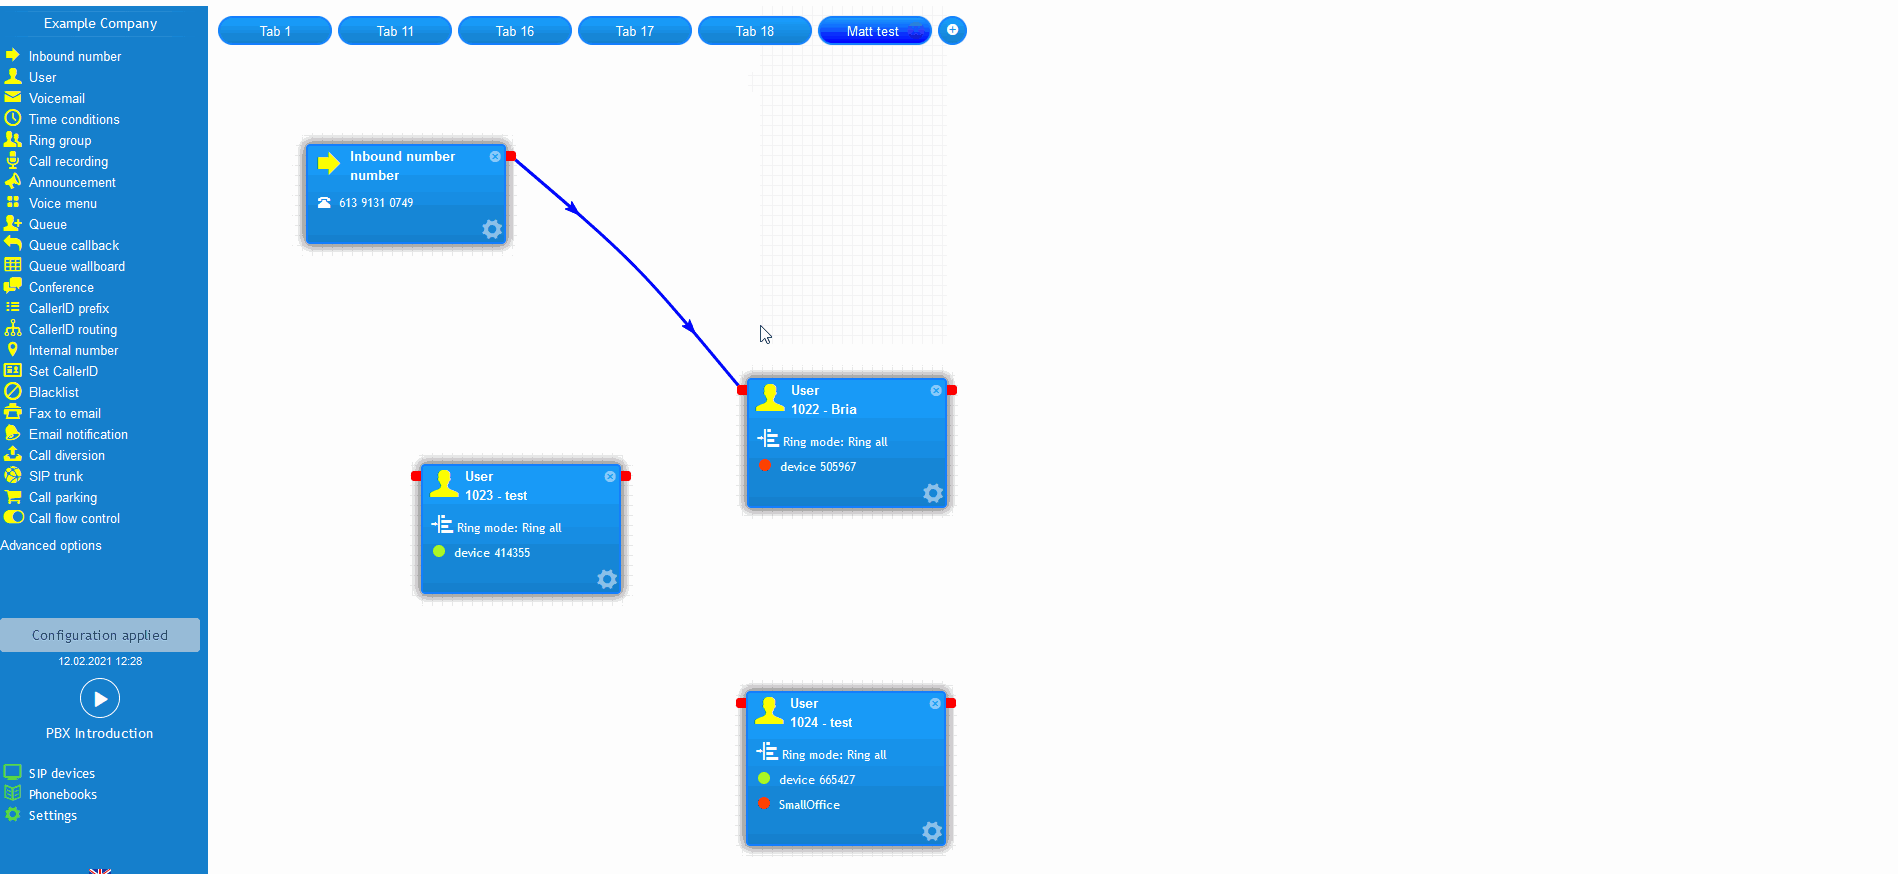
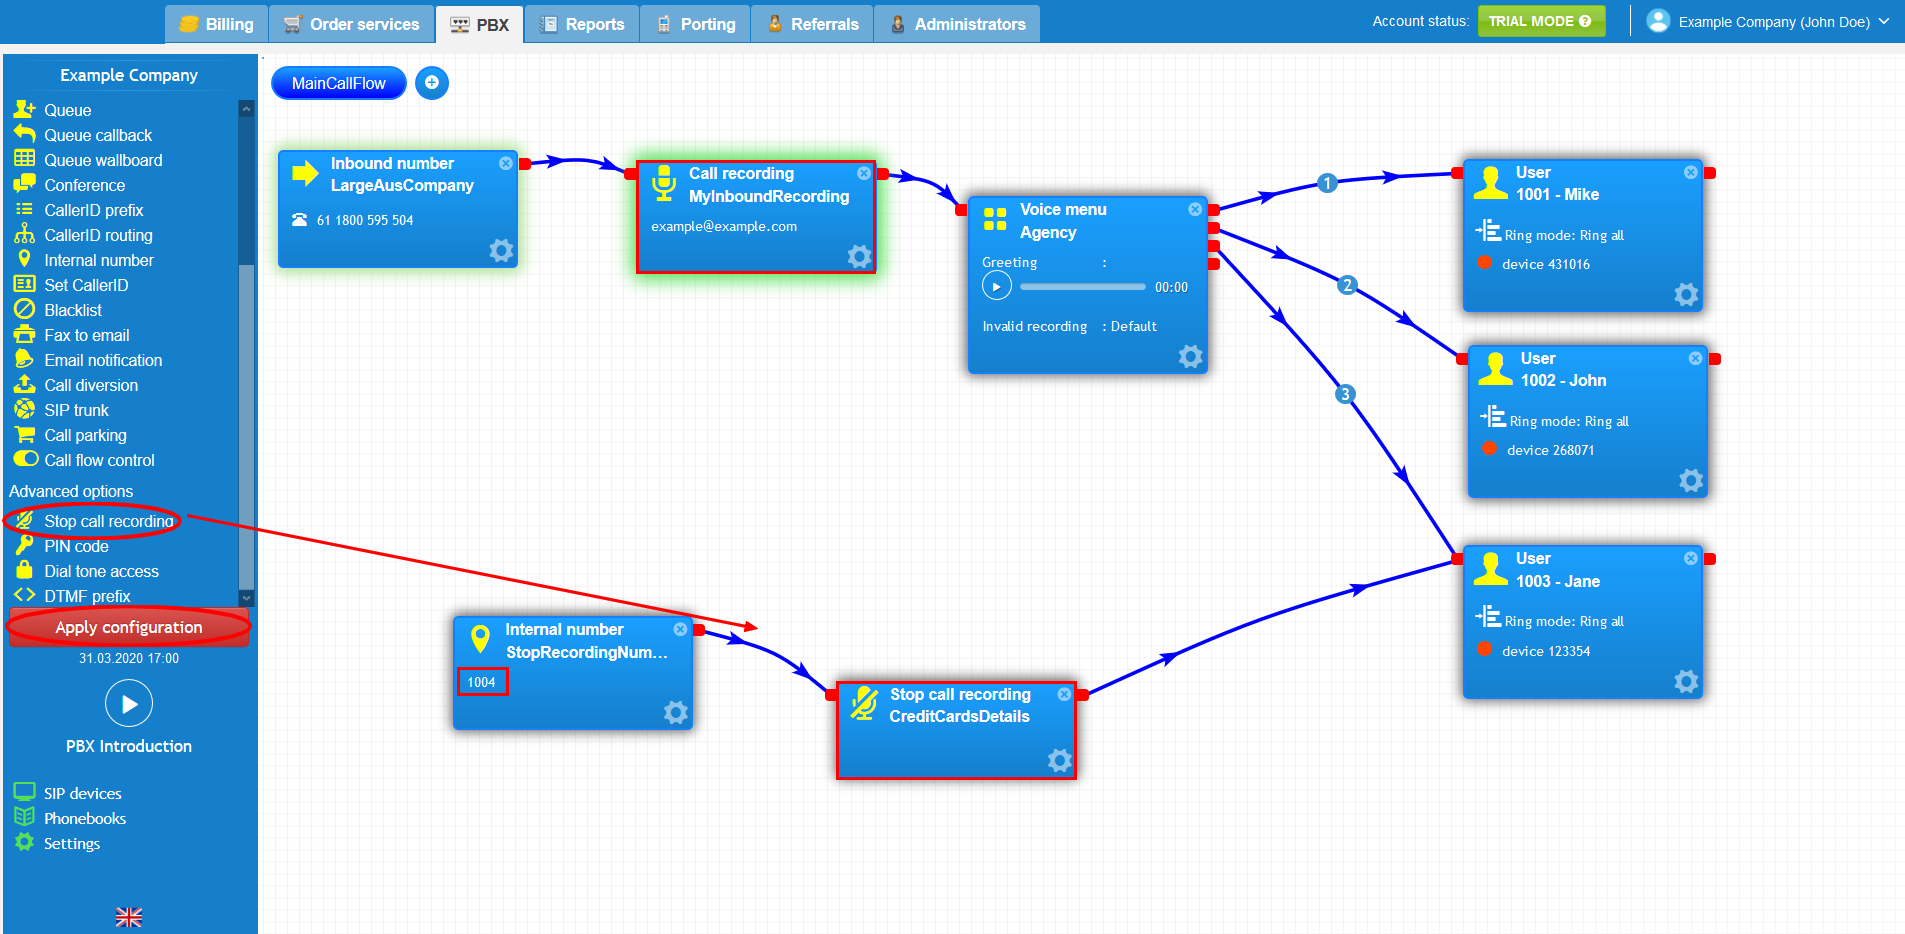
This scenario simulates an employment agency who require inbound call recordings to be sent to a shared company mailbox so that they can provide training for their new recruitment agents. There is also an announcement played to the caller outlining that calls will be recorded for training and quality assurance purposes. We have 3 recruitment agents, Mike, John and Jane. When a client calls their office, there is a voice menu which redirects the call to the chosen recruitment agent. All inbound calls are sent to a shared mailbox so the recruitment manager can access instantly and provide coaching and training to Mike, John and Jane.

callrecording5.PNG

However, their outbound calls are configured to be sent to their personal email as opposed to a shared mailbox.

callrecording6.PNG

The screenshot below demonstrates what the call flow would look like in this scenario. You can use as many inbound call recording objects as you like and the recorded calls can be sent to a range of email addresses. In addition, there was a requirement to stop recording on connected calls so that the caller could provide their card details to pay for recruitment services. During the payment process call, Jane transferred the call to the internal number 1004 which stopped the call from being recorded and then transferred the call back to Jane to input the card details into the billing system.

callrecording.PNG

Watch this in action #

The video below will show you a visual representation of the areas covered throughout this knowledge base guide.

gif.gif
What are your Feelings

Share This Article :

  • Facebook
  • X
  • LinkedIn
  • Pinterest
Still stuck? How can we help?

How can we help?

Updated on September 25, 2025
How to Configure Internal Numbers
Table of Contents
  • Introduction
  • Configuring a PBX call recording
  • PBX call recording usage
  • Watch this in action
Facebook-f Instagram Pinterest

Company

  • About us
  • Leadership
  • Careers
  • News & Article
  • Legal Notices

Support

  • Help Center
  • Ticket Support
  • FAQ
  • Contact us
  • Community
Get exclusive deals by signing up to our Newsletter.
©CopyRight 2025 | bgptelecom.com.au